Subaru Crosstrek Service Manual: Removal
CLUTCH SYSTEM > Master Cylinder
REMOVAL
CAUTION:
• Be careful not to spill the brake fluid. Brake fluid spilled on the vehicle body will harm the paint surface; wash it off with water and wipe clean quickly if spilled.
• Before handling the airbag system components, refer to “CAUTION” of “General Description” in “AIRBAG SYSTEM”. General Description > CAUTION">
1. Turn the ignition switch to OFF.
2. Disconnect the ground cable from battery and wait for at least 60 seconds before starting work. NOTE">
3. Drain the brake fluid. Clutch Fluid">
4. Remove the cover assembly - instrument panel LWR driver. Instrument Panel Lower Cover > REMOVAL">
5. Remove the knee airbag module. Knee Airbag Module > REMOVAL">
6. Remove the snap pin and clevis pin, and then separate the push rod of the master cylinder.
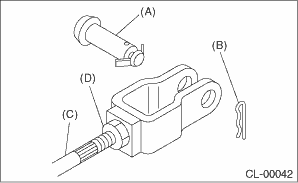
(A) | Clevis pin |
(B) | Snap pin |
(C) | Push rod |
(D) | Lock nut |
7. Remove the clip (A) from the air intake boot.
8. Loosen the clamp (B) connecting the air intake boot and air cleaner case (rear).
9. Loosen the clamp (C) which connects the air intake boot and throttle body.
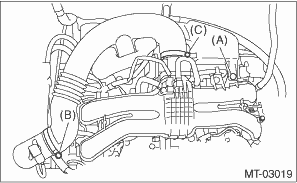
10. Remove the air intake boot from the throttle body, and move it to the left side wheel apron.
11. Disconnect the clutch pipe and tank hose from the master cylinder.
12. Remove the master cylinder.
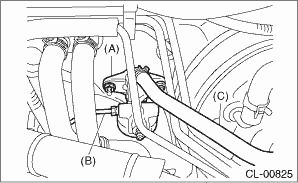
(A) | Master cylinder |
(B) | Clutch pipe |
(C) | Tank hose |
 Assembly
CLUTCH SYSTEM > Master CylinderASSEMBLY1. Apply a coat of grease to the contact surfaces of the push rod and piston before installation.Grease:SILICONE GREASE G-40M or equivalent2. Assemble in the ...
 Disassembly
CLUTCH SYSTEM > Master CylinderDISASSEMBLY1. Remove the straight pin and nipple.(A)Nipple(B)Straight pin2. Remove the oil seal.(A)Oil seal3. Move the seat towards the rear.(A)Seat(B)Master cylinder ...
Other materials:
Dtc p0605 internal control module read only memory (rom) error
ENGINE (DIAGNOSTICS)(H4DO) > Diagnostic Procedure with Diagnostic Trouble Code (DTC)DTC P0605 INTERNAL CONTROL MODULE READ ONLY MEMORY (ROM) ERRORNOTE:For the diagnostic procedure, refer to DTC P0606. Diagnostic Procedure with Diagnostic Trouble Code (DTC) > DTC P0606 CONTROL MODULE PROCESSOR ...
Selecting an audio source
1. Press the AUDIO/TUNE knob.
2. Select the desired source.
Example: Source select screen
NOTE
If the audio control screen appears,
select the "Source" key on the audio
screen or press the AUDIO/TUNE knob
again.
When you push the AUDIO/TUNE
knob while any screen other than t ...
Air conditioner control
The air conditioner operates only when
the engine is running.
Press the air conditioner button while the
fan is in operation to turn on the air
conditioner. When the air conditioner is
on, the "A/C" indicator light illuminates.
To turn off the air conditioner, press the
button again.
NOT ...
