
Subaru Crosstrek Service Manual: Removal
BRAKE > Front Disc Rotor
REMOVAL
1. Lift up the vehicle, and then remove the front wheels.
2. Remove the caliper body assembly from the housing assembly - front axle.
(1) Remove the bolt from the brake hose bracket.
(2) Remove the mounting bolt, and remove the caliper body assembly.
(3) Prepare wiring harnesses etc. to be discarded, and suspend the caliper body assembly from the front strut assembly with the harnesses.
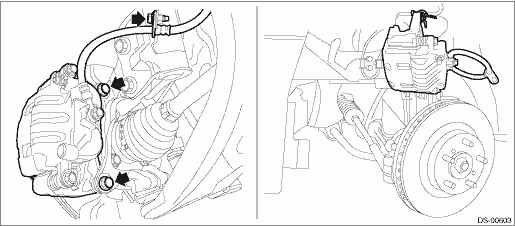
3. Remove the front disc rotor.
NOTE:
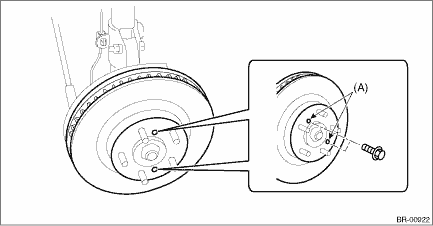
When the disc rotor is difficult to be removed from the hub unit COMPL - front axle, screw in 8 mm (0.31 in) bolt to the threaded part of the disc rotor (A), and remove the disc rotor.
 Inspection
BRAKE > Front Disc RotorINSPECTION1. DISC ROTOR RUNOUT CHECK1. Check the hub unit COMPL - front axle for free play and runout before the inspection of disc rotor runout limit. Front Hub Unit Beari ...
 Installation
BRAKE > Front Disc RotorINSTALLATIONNOTE:Before installation, remove mud and foreign matter from the caliper body assembly.1. Before installation, check the front disc rotor. Front Disc Rotor > ...
Other materials:
Time lag test Inspection
CONTINUOUSLY VARIABLE TRANSMISSION(TR580) > Time Lag TestINSPECTIONNOTE:When the select lever is shifted while the engine is idling, there will be a certain time elapse or lag before shock is felt. This symptom helps to check the condition of forward clutch and reverse brake.• Perform the t ...
Installation
WIPER AND WASHER SYSTEMS > Front Wiper Motor and LinkINSTALLATIONCAUTION:• If the cowl panel assembly cannot be installed properly, do not hit or set it forcibly. The claws of the cowl panel or the windshield glass may be damaged.• Before installing the windshield glass and cowl panel ...
Driving on grades
Before going down a steep hill, slow
down and shift into lower gear (if necessary,
use 1st gear) in order to utilize the
engine braking effect and prevent overheating
of your vehicle's brakes. Do not
make sudden downshifts.
When driving uphill in hot weather, the
air conditioner may ...
