
Subaru Ascent 2018-2026 Owner's Manual: Outside mirrors
Convex mirror (passenger side)
WARNING
In the Subaru Ascent, the passenger-side outside mirror uses a convex design, which alters depth perception. Objects reflected in this mirror appear smaller and farther away than they actually are. For this reason, never rely solely on the convex mirror when judging distance during lane changes. Always verify the actual position of vehicles using the interior mirror or by briefly looking over your shoulder.
CAUTION
Before operating the Subaru Ascent, always ensure that both outside mirrors are properly adjusted to provide optimal visibility and safe driving conditions.
Remote control mirror switch
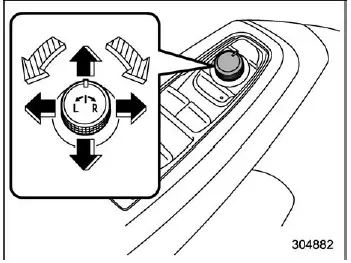
 Select side to adjust
 Direction control
The power-operated outside mirrors in the Subaru Ascent function only when the ignition switch is set to the "ON" or "ACC" position, ensuring controlled and intentional adjustment.
1. Rotate the control selector to choose the mirror you wish to adjust. Select "L" for the left mirror or "R" for the right mirror.
2. Move the directional control switch to reposition the mirror surface in the desired direction for optimal rear and side visibility.
3. After completing the adjustment, return the control switch to the neutral position to prevent unintended movement.
NOTE
- The outside mirrors of the Subaru Ascent can also be adjusted manually if necessary.
For models with memory function:
- The outside mirrors in the Subaru Ascent remain adjustable for approximately
45 seconds after the ignition is turned off and the vehicle is unlocked using
the key fob.
- The ignition switch has been turned to the "OFF" position.
- The door has been unlocked using the access key fob.
- The mirror position can be stored using memory buttons "1" and "2" or linked to individual key fobs, allowing personalized settings for multiple drivers.
- The Subaru Ascent can also recall mirror positions using the Driver Monitoring System user profiles, enabling automatic adjustment based on the recognized driver.
Reverse tilt-down feature (if equipped)
When reversing the Subaru Ascent, the outside mirrors can automatically tilt downward to improve visibility of the area near the rear wheels and curb.
1. Turn the ignition switch to the ON position.
2. Shift the transmission into the R (Reverse) position.
3. The selected outside mirror will tilt downward automatically to enhance visibility.
The mirror will return to its original position once the following conditions are met:
- Approximately 9 seconds after shifting out of reverse.
- The ignition switch is turned to the "OFF" position.
- The Subaru Ascent continues normal operation.
NOTE
- The tilt-down angle can be stored using memory buttons or key fobs for personalized convenience.
- The feature can also be integrated with Driver Monitoring System profiles
for automatic recall.
To enable this, register user profiles within the Driver Monitoring System settings.
- The activation or deactivation of this function can be adjusted through the center information display settings of the Subaru Ascent.
- By default, this feature operates on the front passenger-side mirror,
but driver-side activation can be configured by a SUBARU dealer.
Contact your SUBARU dealer for configuration details.
CAUTION
When adjusting the reverse tilt-down feature in the Subaru Ascent, always keep the brake pedal depressed to maintain vehicle stability and safety.
To fine-tune the reverse tilt-down angle, adjust the mirror using the remote control switch while the feature is active. Refer to the "Remote control mirror switch" section for detailed instructions.
Memory function: The Subaru Ascent allows the tilt-down mirror angle to be stored in memory. Save the preferred angle using memory buttons "1", "2", or the associated key fobs, and recall it automatically when needed.
For complete details on storing and retrieving mirror positions, refer to the section on synchronized seat and mirror memory functions.
NOTE
If the driver’s seat position is adjusted forward or backward by more than 1.18 in (30 mm), the reverse tilt-down mirror may revert to its default or last stored position.
Hold last position function: This feature allows the Subaru Ascent to retain the most recently adjusted tilt-down mirror angle without requiring manual reconfiguration.
The hold last position function will activate under the following conditions:
- The memory function is not actively used.
- The seat position has been adjusted forward or backward by more than 1.18 in (30 mm).
NOTE
- By default, this function is disabled in the Subaru Ascent.
It can be enabled through a SUBARU dealer if desired.
- If the hold last position feature remains disabled, the system will revert to the factory default tilt-down angle during operation.
The outside mirror system in the Subaru Ascent is engineered to enhance driver awareness and adaptability, offering precise control, memory integration, and intelligent features that improve safety and convenience in everyday driving situations.
 HomeLink Wireless Control System
The HomeLink Wireless Control System in the Subaru Ascent offers a highly convenient
and integrated solution for replacing up to three separate hand-held radio-frequency
remotes. This advanced sys ...
 Power folding mirror switch
In the Subaru Ascent, the power folding mirror switch allows convenient control
of the exterior mirrors, and it functions only when the ignition switch is in the
"ON" or "ACC&qu ...
Other materials:
Dtc b228a engine speed signal(with auto start stop)
KEYLESS ACCESS WITH PUSH BUTTON START SYSTEM (DIAGNOSTICS) > Diagnostic Procedure with Diagnostic Trouble Code (DTC)DTC B228A ENGINE SPEED SIGNAL(WITH Auto Start Stop)DTC detecting condition:When the engine speed signal transmitted from the ECM via solid line and the engine speed signal transmitt ...
Dtc b28aa stereo camera microcomputer 1
EyeSight (DIAGNOSTICS) > Diagnostic Procedure with Diagnostic Trouble Code (DTC)DTC B28AA STEREO CAMERA MICROCOMPUTER 1Detected when communication error occurs due to malfunction of microcomputer inside the stereo camera.DTC DETECTING CONDITION:Communication error occurs due to malfunction of mic ...
Dtc p0752 shift solenoid "a" stuck on
CONTINUOUSLY VARIABLE TRANSMISSION (DIAGNOSTICS) > Diagnostic Procedure with Diagnostic Trouble Code (DTC)DTC P0752 SHIFT SOLENOID "A" STUCK ONDTC detecting condition:Detected when two consecutive driving cycles with fault occur.Trouble symptom:• Acceleration is poor during standi ...
