Subaru Crosstrek Service Manual: Ornament Installation
EXTERIOR/INTERIOR TRIM > Ornament
INSTALLATION
1. LETTER MARK
Align the end of application tape with the end of panel, then adhere the letter mark.
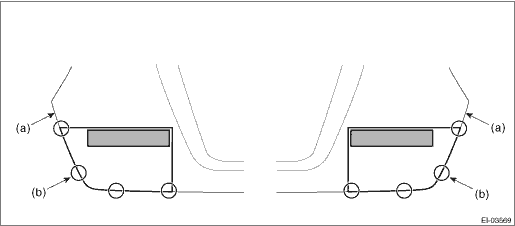
(a) | Panel - rear gate end | (b) | Application tape end |
NOTE:
• Align the cutout of application tape with the end reference of the front door. (a)
• Align the upper end of application tape with the end of rounded corner of character line. (b)
 Heat shield cover Note
EXTERIOR/INTERIOR TRIM > Heat Shield CoverNOTERefer to “EXHAUST” section for removal and installation procedure of the heat shield cover. ...

Other materials:
Dtc b28a6 internal stereo camera communication 1
EyeSight (DIAGNOSTICS) > Diagnostic Procedure with Diagnostic Trouble Code (DTC)DTC B28A6 INTERNAL STEREO CAMERA COMMUNICATION 1Detected when communication error occurs inside the stereo camera.DTC DETECTING CONDITION:Communication error occurs inside the stereo camera.TROUBLE SYMPTOM:All functio ...
Rear tie-down holes
Rear tie-down hole
The rear tie-down holes are located near
each of the jack-up reinforcements.
There is a plug in each rear tie-down hole.
To use the rear tie-down holes, remove
the plugs. After using the rear tie-down
holes, return the plugs to their original
places.
WARNING
...
Removal
WIPER AND WASHER SYSTEMS > Wiper BladeREMOVAL1. FRONTWhile pushing the locking clip (A) up, pull out the blade assembly - windshield wiper in the direction of the arrow, and remove it from the arm assembly - windshield wiper.2. REARTurn the blade assembly - rear wiper in the direction of arrow (A ...
