Subaru Crosstrek Service Manual: Installation
ENTERTAINMENT > Data Communication Module
INSTALLATION
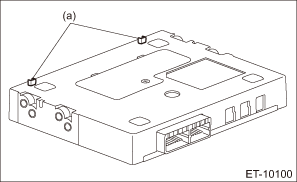
1. DATA COMMUNICATION MODULE
CAUTION:
• After installing the center grille assembly, check that the air vent grille of the center grille assembly is inserted correctly into the air vent duct.
• Before handling the airbag system components, always refer to “CAUTION” of “General Description” in “AIRBAG SYSTEM”.
1. Install each part in the reverse order of removal.
NOTE:
Align the positioning pin (a) of the data communication module with the positioning hole of the audio assembly or navigation assembly.
2. Perform the registration if the data communication module is replaced with a new part. Telematics System > OPERATION">
3. Check LED lighting status of overhead console or stereo camera cover assembly. Check List for Interview > CHECK">
2. BACKUP BATTERY
CAUTION:
• After installing the center grille assembly, check that the air vent grille of the center grille assembly is inserted correctly into the air vent duct.
• Before handling the airbag system components, always refer to “CAUTION” of “General Description” in “AIRBAG SYSTEM”.
Install each part in the reverse order of removal.
Tightening torque:
Battery cover: 0.3 N·m (0.03 kgf-m, 0.2 ft-lb)
 Removal
ENTERTAINMENT > Data Communication ModuleREMOVAL1. DATA COMMUNICATION MODULECAUTION:Before handling the airbag system components, always refer to “CAUTION” of “General Description ...

Other materials:
Welcome screen and Good-bye screen
When the driver's door is opened and
closed after unlocking the door, the
welcome screen will appear on the multi
information display for approximately 20
seconds.
When the ignition switch is turned to the
"LOCK"/"OFF" position, the multi information
display gradually turns off (Good-bye
s ...
Dtc b1837 short in curtain airbag lh squib circuit (to ground)
AIRBAG SYSTEM (DIAGNOSTICS) > Diagnostic Chart with Trouble CodeDTC B1837 SHORT IN CURTAIN AIRBAG LH SQUIB CIRCUIT (TO GROUND)Diagnosis start condition:Ignition voltage is 10 V to 16 V.DTC detecting condition:• Curtain airbag harness (LH) circuit is shorted to ground.• Curtain airbag ...
Disassembly
INSTRUMENTATION/DRIVER INFO > Combination MeterDISASSEMBLYCAUTION:• Use gloves to avoid damage and getting fingerprints on the glass surface and meter surfaces.• Be careful not to apply excessive force to the trip knob.• Be sure not to touch the meter indicator needle.• Be ...
