Subaru Crosstrek Service Manual: Inspection
ENTERTAINMENT > Diagnostics with Phenomenon
INSPECTION
1. POWER WILL NOT TURN ON
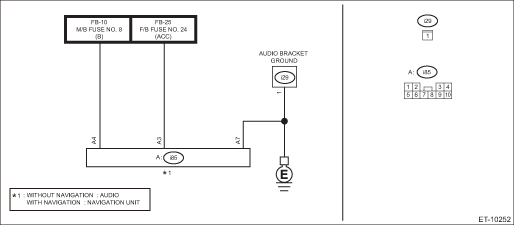
Wiring diagram:
• Audio system: Audio System > WIRING DIAGRAM">
• Navigation system: Navigation System > WIRING DIAGRAM">
| STEP | CHECK | YES | NO |
1.CHECK CONNECTOR CONNECTION.
Check that the connector is connected to the unit.
Is the connector connected?
Diagnostics with Phenomenon > INSPECTION">Go to Step 2.
Connect the connector.
2.CHECK CONNECTOR.
Check for poor contact of connectors or terminals.
Is the connector OK?
Diagnostics with Phenomenon > INSPECTION">Go to Step 3.
Repair or replace the harness.
3.CHECK POWER SUPPLY VOLTAGE.
1) Disconnect the connector.
2) Turn the ignition switch to ACC.
3) Using a tester, measure the voltage between connector and chassis ground.
NOTE:
Turn the electrical parts to OFF.
Connector & terminal
(i85) No. 4 (+) — Chassis ground (−):
Is the voltage 12 V or more?
Diagnostics with Phenomenon > INSPECTION">Go to Step 8.
Diagnostics with Phenomenon > INSPECTION">Go to Step 4.
4.CHECK FUSE.
1) Turn the ignition to OFF.
2) Check the fuse No. 8 inside the main fuse box.
Is the fuse OK?
Diagnostics with Phenomenon > INSPECTION">Go to Step 5.
Replace the fuse. If the fuse is blown again, check or replace the short circuit of the power supply harness.
5.CHECK HARNESS (POWER SUPPLY).
Measure the resistance between main fuse box and connector.
Connector & terminal
F/B fuse No. 8 — (i85) No. 4:
Is the resistance 1 ? or less?
Diagnostics with Phenomenon > INSPECTION">Go to Step 6.
Repair or replace the open circuit of harness.
6.CHECK HARNESS (GROUND).
Measure the resistance between connector and chassis ground.
Connector & terminal
(i85) No. 7 — Chassis ground:
Is the resistance 1 ? or less?
Diagnostics with Phenomenon > INSPECTION">Go to Step 7.
Repair or replace the open circuit of harness.
7.CHECK BATTERY.
Check the battery. Battery">
Is the battery OK?
Diagnostics with Phenomenon > INSPECTION">Go to Step 8.
Charge or replace the battery.
8.CHECK OPERATION.
1) Connect all connectors.
2) Turn the ignition switch to ACC and the power supply switch of the unit to ON.
Does the power turn ON?
Currently no failure is found.
Replace the unit. Audio">
2. THE SCREEN FREEZES AND DOES NOT ACCEPT ANY OPERATION ENTRY
| STEP | CHECK | YES | NO |
1.CHECK RESTARTING DISPLAY.
Turn the ignition switch OFF > ACC.
Is the screen freeze eliminated?
Diagnostics with Phenomenon > INSPECTION">Go to Step 5.
Diagnostics with Phenomenon > INSPECTION">Go to Step 2.
2.REMOVE OTHER MEDIA OR EXTERNAL DEVICES.
Remove the CD, SD card (model with SD card slot) or external devices connected to USB. Also, remove the external devices with Bluetooth.
Is the screen freeze eliminated?
Diagnostics with Phenomenon > INSPECTION">Go to Step 3.
Diagnostics with Phenomenon > INSPECTION">Go to Step 6.
3.CHECK OTHER EXTERNAL DEVICE CONNECTION.
When screen freeze is eliminated, connect external devices one by one to identify the device that causes screen freeze.
Is the device that reproduces screen freeze identified?
Diagnostics with Phenomenon > INSPECTION">Go to Step 4.
Diagnostics with Phenomenon > INSPECTION">Go to Step 5.
4.CHECK OTHER EXTERNAL DEVICE CONNECTION.
1) Replace the identified device with the one that has the same performance.
2) Turn the ignition switch to ACC.
Does the screen freeze occur?
Replace the unit. Audio">
The external device may be defective.
5.CHECK OPERATION PROCEDURE.
Ask how the user operates when screen freeze occurs, and perform using the same procedure.
Are the operation and screen normal?
Currently no failure is found.
Diagnostics with Phenomenon > INSPECTION">Go to Step 6.
6.CHECK ENVIRONMENTAL CONDITION.
Check if any external devices which emit strong electromagnetic waves and noises, such as a radio antenna, is installed inside the vehicle.
Is an external device installed?
Remove the external device and perform the inspection from step 2 again. If the fault is not fixed: Diagnostics with Phenomenon > INSPECTION">Go to Step 7.
Diagnostics with Phenomenon > INSPECTION">Go to Step 7.
7.PERFORM INITIALIZATION PROCEDURE.
Perform the initialization procedure for the unit.
CAUTION:
When the initialization procedure is performed, the data, telephone directory, etc. recorded in the unit body will be deleted. Before initialization, obtain permission from the user.
• Audio system: Audio System > OPERATION">
• Navigation system: Navigation System > OPERATION">
Is the screen freeze eliminated?
Diagnostics with Phenomenon > INSPECTION">Go to Step 5. If the screen freeze occurs again, replace the unit. Audio">
Replace the unit. Audio">
3. THE SCREEN IS BLACKED OUT, OR THE SCREEN IS NOT DISPLAYED
| STEP | CHECK | YES | NO |
1.CHECK RESTARTING DISPLAY.
Turn the ignition switch OFF > ACC.
Is the screen properly displayed?
Currently no failure is found.
Diagnostics with Phenomenon > INSPECTION">Go to Step 2.
2.CHECK POWER SUPPLY BUTTON.
Check if the screen OFF mode is turned on by pressing the power supply button of the unit body.
Is the screen properly displayed?
The screen OFF mode might be activated. Currently no failure is found.
Diagnostics with Phenomenon > INSPECTION">Go to Step 3.
3.CHECK BUTTON ILLUMINATION.
Turn the ignition switch to ACC.
Do the buttons located beside the screen illuminate?
Diagnostics with Phenomenon > INSPECTION">Go to Step 4.
Perform "Power will not turn ON" in Diagnostics with Phenomenon. Diagnostics with Phenomenon > INSPECTION">
4.CHECK INDICATION WITH ILLUMINATION ON.
Turn the lighting switch to ON.
Does the screen brightness change?
Diagnostics with Phenomenon > INSPECTION">Go to Step 7.
Diagnostics with Phenomenon > INSPECTION">Go to Step 5.
5.CHECK HARNESS.
Check for poor contact of the harnesses, connectors and terminals that are connected to the unit body.
Is harness normal?
Diagnostics with Phenomenon > INSPECTION">Go to Step 6.
Repair or replace the harness.
6.CHECK BODY INTEGRATED UNIT.
Display the data of «Lighting I Switch input» using Subaru Select Monitor.
NOTE:
For detailed operation procedures, refer to “Application help”.
Is the input signal normal?
Diagnostics with Phenomenon > INSPECTION">Go to Step 7.
Replace the body integrated unit. Body Integrated Unit">
7.CHECK UNDER OVERLOAD CONDITION.
1) Turn the ignition to OFF.
2) Leave as is for 10 minutes (cooling down), and then turn the ignition to ACC to check the operation.
Is the screen properly displayed?
Diagnostics with Phenomenon > INSPECTION">Go to Step 8.
Replace the unit. Audio">
8.OPERATIONAL CHECK.
Obtain the information about the audio device that the user used (SD, Bluetooth, CD, etc.), and connect the same device. Then play the device for 10 minutes or more.
Is the screen properly displayed?
Currently no failure is found.
Diagnostics with Phenomenon > INSPECTION">Go to Step 9.
9.CHECK EXTERNAL DEVICE.
1) Replace the external device that might cause trouble with another device. (If trouble occurs while using a CD, replace the CD with another one. If trouble occurs while using an external device that is connected via USB, replace the external device with another device.)
2) Operate for 10 minutes or more.
Is the screen properly displayed?
The external device might have trouble, resulting in the overload state.
Replace the unit. Audio">
4. SYSTEM IS RESET
Wiring diagram:
• Audio system: Audio System > WIRING DIAGRAM">
• Navigation system: Navigation System > WIRING DIAGRAM">
| STEP | CHECK | YES | NO |
1.CHECK ENVIRONMENTAL CONDITION.
Check if any external devices which emit strong electromagnetic waves and noises, such as a radio antenna, is installed inside the vehicle.
Is an external device installed?
Remove the external device to check the operation. If the fault is not fixed: Diagnostics with Phenomenon > INSPECTION">Go to Step 2.
Diagnostics with Phenomenon > INSPECTION">Go to Step 2.
2.CHECK CONNECTOR CONNECTION.
Check that the connector is connected to the unit.
Is the connector connected?
Diagnostics with Phenomenon > INSPECTION">Go to Step 3.
Connect the connector.
3.CHECK CONNECTOR.
Check for poor contact of connectors or terminals.
Is the connector OK?
Diagnostics with Phenomenon > INSPECTION">Go to Step 4.
Repair or replace the harness.
4.CHECK POWER SUPPLY VOLTAGE.
1) Turn the ignition switch to ACC.
2) Using a tester, measure the voltage between connector and chassis ground.
NOTE:
Turn the electrical parts to OFF.
Connector & terminal
(i85) No. 4 (+) — Chassis ground (−):
Is the voltage 12 V or more?
Diagnostics with Phenomenon > INSPECTION">Go to Step 8.
Diagnostics with Phenomenon > INSPECTION">Go to Step 5.
5.CHECK OPEN CIRCUIT IN HARNESS (POWER SUPPLY).
Using the tester, measure the resistance between connector and chassis ground while shaking the harness.
Connector & terminal
(i85) No. 4 — Chassis ground:
Is the resistance 1 ? or less?
Diagnostics with Phenomenon > INSPECTION">Go to Step 6.
Repair or replace the open circuit of harness.
6.CHECK OPEN CIRCUIT IN HARNESS (GROUND).
Using the tester, measure the resistance between connector and chassis ground while shaking the harness.
Connector & terminal
(i85) No. 7 — Chassis ground:
Is the resistance 1 ? or less?
Diagnostics with Phenomenon > INSPECTION">Go to Step 7.
Repair or replace the open circuit of harness.
7.CHECK BATTERY.
Check the battery. Battery">
Is the battery OK?
Diagnostics with Phenomenon > INSPECTION">Go to Step 8.
Replace the unit. Audio">
8.CHECK UNIT OPERATION.
1) Connect all connectors.
2) Turn the ignition switch to ACC and the power supply switch of the unit to ON.
Is the reset eliminated?
Currently no failure is found.
Replace the unit. Audio">
5. CDS CANNOT BE PLAYED BACK
| STEP | CHECK | YES | NO |
1.CONFIRM CD INSERTION CONDITION.
Check that the CD is inserted properly.
Is the CD normal?
Diagnostics with Phenomenon > INSPECTION">Go to Step 2.
Insert the CD properly.
2.CHECK CD.
Check the CD surfaces are free from scratches or dirt.
Is the CD normal?
Diagnostics with Phenomenon > INSPECTION">Go to Step 3.
The CD is defective.
3.CHECK CD.
Replace the CD with another one. (Use a playable CD. Refer to owner's manual for details.)
Is the CD played back?
The CD is defective.
Diagnostics with Phenomenon > INSPECTION">Go to Step 4.
4.CHECK DEW CONDENSATION IN UNIT.
1) After starting the engine, turn ON the air conditioner and dry inside the vehicle for 10 minutes or more.
2) Check the CD operation.
Is the CD played back?
Dew condensation occurred inside the unit.
Replace the unit. Audio">
6. SOUND DOES NOT COME OUT FROM THE SPEAKER
| STEP | CHECK | YES | NO |
1.CHECK THE MODE IN WHICH NO SOUND COME OUT.
Check if sound comes out in each mode such as CD, radio, etc.
Does it have no sound in all modes?
Diagnostics with Phenomenon > INSPECTION">Go to Step 2.
Check each mode in which no sound come out.
For CD: Diagnostics with Phenomenon > INSPECTION">
For radio: Diagnostics with Phenomenon > INSPECTION">
For Bluetooth audio: Diagnostics with Phenomenon > INSPECTION">
2.CHECK DIAGNOSTIC MODE.
Perform {Audio Check} on the {Line Diag} screen.
• Audio system: Audio System > OPERATION">
• Navigation system: Navigation System > OPERATION">
Does it have no sound in all speakers?
Diagnostics with Phenomenon > INSPECTION">Go to Step 3.
Check the harness between the unit and speaker for open circuit or short circuit. If no fault is found, replace the speaker.
3.CHECK MUTE MODE.
Check if the MUTE mode is turned on when the MUTE button is installed.
Is the volume level set to the minimum?
Since the MUTE mode is on or the volume level is set to the minimum, sound does not come out.
Diagnostics with Phenomenon > INSPECTION">Go to Step 4.
4.CHECK DTC (MODEL WITH TELEMATICS).
Read DTCs of the Telematics. Diagnostic Code(s) Display">
Are B2A0E (mute line circuit), B2A05 (left speaker/audio circuit) and B2A06 (right speaker/audio circuit) displayed?
Perform the diagnosis according to DTC. Diagnostic Procedure with Diagnostic Trouble Code (DTC) > DTC B2A0E MUTE LINE CIRCUIT">
Diagnostics with Phenomenon > INSPECTION">Go to Step 5.
5.CHECK CONNECTOR.
Check for poor contact in the connector of the unit and the connector of each speaker.
Are the connectors and terminals normal?
Replace the unit. Audio">
Repair or replace the harness.
7. BLUETOOTH CONNECTION CANNOT BE ESTABLISHED
| STEP | CHECK | YES | NO |
1.CHECK BLUETOOTH DEVICE.
Restart the Bluetooth device, and connect again.
Does it start properly?
Currently no failure is found.
Diagnostics with Phenomenon > INSPECTION">Go to Step 2.
 List
List
ENTERTAINMENT > Diagnostics with PhenomenonLIST1. AUDIO SYSTEMSymptomsReferencePower will not turn ON. Diagnostics with Phenomenon > INSPECTION">The screen freezes and does not accept an ...

Other materials:
Dtc b2789 id code box communication
KEYLESS ACCESS WITH PUSH BUTTON START SYSTEM (DIAGNOSTICS) > Diagnostic Procedure with Diagnostic Trouble Code (DTC)DTC B2789 ID CODE BOX COMMUNICATIONDTC detecting condition:• When communication between keyless access CM and ID code box is interrupted for a set amount of time.• Open ...
Preparation tool
WIPER AND WASHER SYSTEMS > General DescriptionPREPARATION TOOL1. SPECIAL TOOLILLUSTRATIONTOOL NUMBERDESCRIPTIONREMARKS — SUBARU SELECT MONITOR 4Used for setting of each function and troubleshooting for electrical system.NOTE:For detailed operation procedures of Subaru Select Monitor 4, refer to ...
Installing forward facing child restraint
WARNING
Before installing a child restraint
system, be sure to confirm that the
seatback is securely locked into
place. Otherwise, in an accident,
serious injury or death could result.
1. Shake the seatback slightly to confirm
that it is securely locked into place.
It is possible to check ...
