
Subaru Crosstrek Service Manual: Inspection
ENTERTAINMENT > Audio System
INSPECTION
1. BASIC INSPECTION
Model with 6.2 inch display
1. Using the Check List for Interview, ask the customer the condition of how the trouble occurred. Check List for Interview > CHECK">
2. Check the battery. Battery > INSPECTION">
3. Check the list of Diagnostics with Phenomenon, and perform diagnosis according to the procedures. Diagnostics with Phenomenon > LIST">
Model with 7 inch display
Refer to “BASIC INSPECTION” in “Navigation System”. Navigation System > INSPECTION">
2. SYSTEM BLOCK DIAGRAM
Model with 6.2 inch display
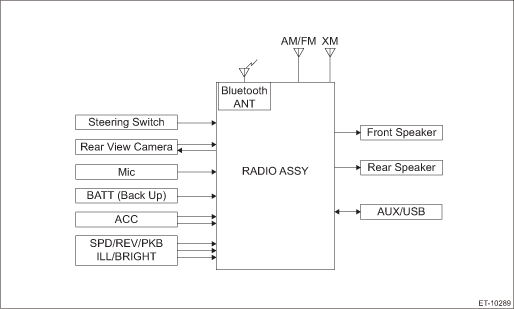
Model with 7 inch display
Refer to “System Block Diagram” in “Navigation System”. Navigation System > INSPECTION">
3. MODULE I/O SIGNAL
Model with 6.2 inch display
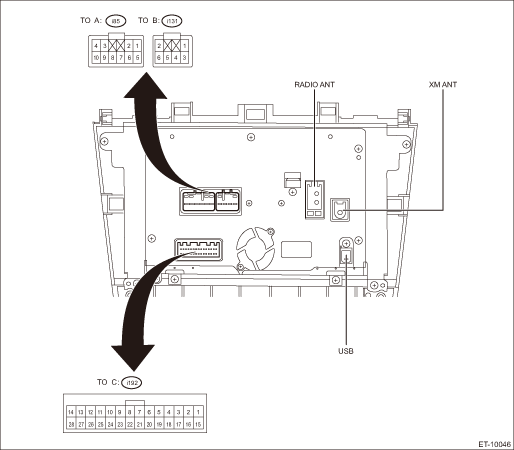
• Power supply and speaker output terminal
Terminal No. | Content | Measuring condition | Measurement value | Note |
(i85) No. 1 | FRONT-RH (+) | — | — | — |
(i85) No. 2 | FRONT-LH (+) | — | — | — |
(i85) No. 3 ←> Chassis ground | ACC | ACC ON | 11 — 15 V | — |
(i85) No. 4 ←> Chassis ground | +B | Always | 11 — 15 V | — |
(i85) No. 5 | FRONT-RH (−) | — | — | — |
(i85) No. 6 | FRONT-LH (−) | — | — | — |
(i85) No. 7 ←> Chassis ground | GND | Always | 0 V | — |
(i85) No. 8 | ANTENNA-ON | — | — | — |
(i85) No. 9 | N.C. | — | — | — |
(i85) No. 10 | ILLUMI (+) | — | — | — |
(i131) No. 1 | REAR-RH (+) | — | — | — |
(i131) No. 2 | REAR-LH (+) | — | — | — |
(i131) No. 3 | REAR-RH (−) | — | — | — |
(i131) No. 4 | N.C. | — | — | — |
(i131) No. 5 | ILLUMI (−) | — | — | — |
(i131) No. 6 | REAR-LH (−) | — | — | — |
• Steering switch and AUX input terminal for microphone etc.
Terminal No. | Content | Measuring condition | Measurement value | Note |
(i192) No. 1 | N.C. | — | — | — |
(i192) No. 2 | REV | — | — | — |
(i192) No. 3 | BRIGHT | — | — | — |
(i192) No. 4 | MAC+B | — | — | — |
(i192) No. 5 | MIC (+) | — | — | — |
(i192) No. 6 | MIC-DET | — | — | — |
(i192) No. 7 | N.C. | — | — | — |
(i192) No. 8 | N.C. | — | — | — |
(i192) No. 9 | N.C. | — | — | — |
(i192) No. 10 | N.C. | — | — | — |
(i192) No. 11 | CAM + 6V | — | — | — |
(i192) No. 12 | CV (+) | — | — | — |
(i192) No. 13 | CV (−) (SHIELD) | — | — | — |
(i192) No. 14 | SHIELD-GND (AUX) | — | — | — |
(i192) No. 15 ←> Chassis ground | PKB | At parking ON | 1 V or less | — |
(i192) No. 16 | N.C. | — | — | — |
(i192) No. 17 ←> Chassis ground | SPD | When the tire is rotating | Pulse signal | — |
(i192) No. 18 | SHIELD-GND (MIC) | — | — | — |
(i192) No. 19 | MIC (−) | — | — | — |
(i192) No. 20 | GND (CAMERA) | — | — | — |
(i192) No. 21 | SW1 (+) | — | — | — |
(i192) No. 22 | SW2 (+) | — | — | — |
(i192) No. 23 | SW-GND | — | — | — |
(i192) No. 24 | N.C. | — | — | — |
(i192) No. 25 | AUX-ON | — | — | — |
(i192) No. 26 | AUX-R (+) | — | — | — |
(i192) No. 27 | AUX-LR (−) | — | — | — |
(i192) No. 28 | AUX-L (+) | — | — | — |
Model with 7 inch display
Refer to “Control Module I/O Signal” in “Navigation System”. Navigation System > INSPECTION">
 Audio system
...
 Wiring diagram
ENTERTAINMENT > Audio SystemWIRING DIAGRAM1. AUDIORefer to “Audio System” in the wiring diagram.• 6.2 inch display: Audio System > WIRING DIAGRAM">• 7 inch displ ...
Other materials:
Removal
SECURITY AND LOCKS > Keyless Entry Control ModuleREMOVAL1. Disconnect the ground cable from battery. NOTE">2. Remove the trim panel - rear apron LH. Rear Quarter Trim > REMOVAL">3. Remove the keyless entry control module.(1) Disconnect the connector.(2) Remove the bolt and th ...
Entering the vehicle while it is running via remote start (models without "keyless
access with push-button start system")
1. Unlock the Subaru Ascent using the remote keyless entry system.
NOTE
If the Subaru Ascent is unlocked manually with a physical key while the alarm
system is armed, the alarm will activate and the engine will stop. To deactivate
the alarm, perform one of the following actions.
Insert the ...
Removal
SECURITY AND LOCKS > Keyless Access Indoor AntennaREMOVAL1. FRONT ANTENNA1. Disconnect the ground cable from battery. NOTE">2. Remove the cover - shift lever. Console Box > REMOVAL">3. Disconnect the connector and remove the front antenna assembly - interior.2. REAR ANTENNA1. ...
