Subaru Crosstrek Service Manual: Inspection
BRAKE > Brake Pedal
INSPECTION
1. Move the pad - brake pedal in a horizontal direction with a force of approx. 10 N (1 kgf, 2 lbf), and check that the pedal deflection is in the range of specifications.
CAUTION:
If excessive deflection is noted, replace with a new bushing.
Deflection of brake pedal:
Wear limit: 5.0 mm (0.197 in) or less
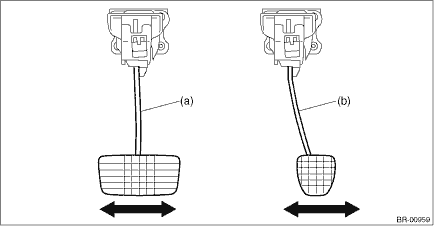
(a) | Brake pedal (except for MT model) | (b) | Brake pedal (MT model) |
2. Check the position of the pedal pad.
Pedal height L:
140 — 150 mm (5.51 — 5.91 in)
Brake pedal free play A:
0.5 — 2.7 mm (0.02 — 0.11 in) [When pulling the brake pedal upward with a force of less than 10 N (1 kgf, 2 lbf).]
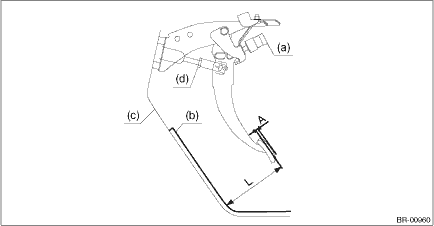
(a) | Stop light switch | (c) | Toe board | (d) | Brake booster operating rod |
(b) | Mat |
3. If it is not within the specification, loosen the lock nuts of vacuum booster operating rod, and rotate the rod to adjust the pedal height L within the specification.
4. Tighten the lock nut.
Tightening torque:
Operating lock nut: 22 N·m (2.24 kgf-m, 16.2 ft-lb)
NOTE:
Check the brake pedal height. When adjusting, also adjust the stop light switch.
 Brake pedal
...
 Removal
BRAKE > Brake PedalREMOVAL1. CVT MODELCAUTION:Before handling the airbag system components, always refer to “CAUTION” of “General Description” in “AIRBAG SYSTEM” ...
Other materials:
Example of the type of accident
The Subaru Ascent is equipped with an advanced SRS frontal airbag system engineered
to provide effective protection during specific types of collisions. The driver's
and front passenger's SRS frontal airbags are carefully calibrated to deploy only
under conditions where additional prot ...
Dtc b1801 open in driver s airbag
AIRBAG SYSTEM (DIAGNOSTICS) > Diagnostic Chart with Trouble CodeDTC B1801 OPEN IN DRIVER’S AIRBAGDiagnosis start condition:Ignition voltage is 10 V to 16 V.DTC detecting condition:• Airbag main harness circuit is open.• Airbag module harness (driver’s side) circuit is open ...
Inspection
HVAC SYSTEM (HEATER, VENTILATOR AND A/C) > Relay and FuseINSPECTION1. CHECK FUSE1. Remove the fuse and inspect visually.2. If the fuse is blown out, replace the fuse.NOTE:If the fuse is blown again, check the system wiring harness.2. CHECK RELAY1. Check the resistance between relay terminals.&bul ...
