
Subaru Crosstrek Service Manual: Dtc p0452 evap system (cpc) pressure sensor/switch circuit low
ENGINE (DIAGNOSTICS)(H4DO) > Diagnostic Procedure with Diagnostic Trouble Code (DTC)
DTC P0452 EVAP SYSTEM (CPC) PRESSURE SENSOR/SWITCH CIRCUIT LOW
DTC detecting condition:
Immediately at fault recognition
CAUTION:
After servicing or replacing faulty parts, perform Clear Memory Mode Clear Memory Mode > OPERATION"> , and Inspection Mode Inspection Mode > PROCEDURE">.
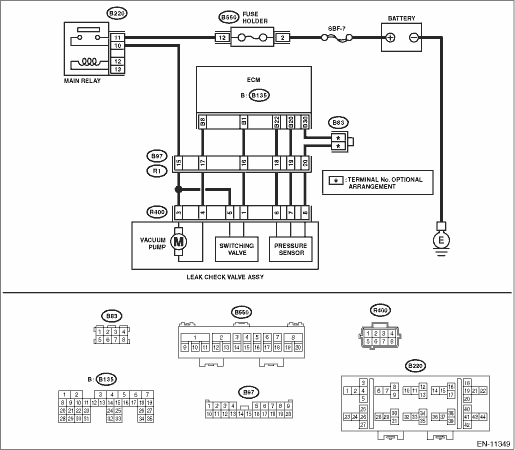
Wiring diagram:
Engine electrical system Engine Electrical System">
| STEP | CHECK | YES | NO |
1.CHECK CURRENT DATA.
1) Turn the ignition switch to ON.
2) Read the value of «Atmosphere Pressure» using the Subaru Select Monitor or a general scan tool.
NOTE:
• Subaru Select Monitor
For detailed operation procedures, refer to “Current Data Display For Engine”. Subaru Select Monitor">
• General scan tool
For detailed operation procedures, refer to the general scan tool operation manual.
Is the value in «Atmosphere Pressure» 34 kPa (255 mmHg, 10 inHg) or less?
Diagnostic Procedure with Diagnostic Trouble Code (DTC) > DTC P0452 EVAP SYSTEM (CPC) PRESSURE SENSOR/SWITCH CIRCUIT LOW">Go to Step 2.
Even if DTC is detected, the circuit has returned to a normal condition at this time. Reproduce the failure, and then perform the diagnosis again.
NOTE:
In this case, temporary poor contact of connector, temporary open or short circuit of harness may be the cause.
2.CHECK POWER SUPPLY OF LEAK CHECK VALVE ASSEMBLY.
1) Turn the ignition switch to OFF.
2) Disconnect the connector from the leak check valve assembly.
3) Turn the ignition switch to ON.
4) Measure the voltage between the leak check valve assembly connector and chassis ground.
Connector & terminal
(R400) No. 6 (+) — Chassis ground (−):
Is the voltage 4.5 V or more?
Diagnostic Procedure with Diagnostic Trouble Code (DTC) > DTC P0452 EVAP SYSTEM (CPC) PRESSURE SENSOR/SWITCH CIRCUIT LOW">Go to Step 3.
Repair the harness and connector.
NOTE:
In this case, repair the following item:
• Open circuit in harness between ECM connector and the leak check valve assembly connector
• Poor contact of ECM connector
• Poor contact of coupling connector
3.CHECK HARNESS BETWEEN ECM AND LEAK CHECK VALVE ASSEMBLY CONNECTOR.
1) Turn the ignition switch to OFF.
2) Disconnect the connector from ECM.
3) Measure the resistance between ECM connector and chassis ground.
Connector & terminal
(B135) No. 20 — Chassis ground:
Is the resistance 1 M? or more?
Diagnostic Procedure with Diagnostic Trouble Code (DTC) > DTC P0452 EVAP SYSTEM (CPC) PRESSURE SENSOR/SWITCH CIRCUIT LOW">Go to Step 4.
Repair the short circuit to ground in harness between ECM connector and leak check valve assembly connector.
4.CHECK FOR POOR CONTACT.
Check for poor contact of leak check valve assembly connector.
Is there poor contact in the leak check valve assembly connector?
Repair the poor contact in the leak check valve assembly connector.
Replace the leak check valve assembly. Leak Check Valve Assembly">
1. OUTLINE OF DIAGNOSIS
Detect the open or short circuit in Evaporative Leak Check Module pressure sensor.
Judge as NG if out of specification.
2. COMPONENT DESCRIPTION
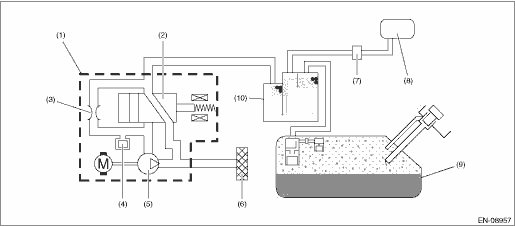
(1) | Leak check valve ASSY | (5) | Vacuum pump | (9) | Fuel tank |
(2) | Switching valve | (6) | Drain filter | (10) | Canister |
(3) | Reference orifice (0.02 inch orifice) | (7) | Purge control solenoid valve | ||
(4) | Pressure sensor | (8) | Intake manifold |
3. EXECUTION CONDITION
Secondary Parameters | Execution condition |
12 V battery system voltage | ≥ 10.9 V |
4. GENERAL DRIVING CYCLE
Always perform the diagnosis continuously.
5. DIAGNOSTIC METHOD
If the duration of time while the following conditions are met is longer than the time indicated, judge as NG.
Malfunction Criteria | Threshold Value |
Output voltage | < 0.973 V |
Time Needed for Diagnosis: 1000 ms
Malfunction Indicator Light Illumination: Illuminates as soon as a malfunction occurs.
 Dtc p0451 evap system (cpc) pressure sensor/switch circuit range/performance
ENGINE (DIAGNOSTICS)(H4DO) > Diagnostic Procedure with Diagnostic Trouble Code (DTC)DTC P0451 EVAP SYSTEM (CPC) PRESSURE SENSOR/SWITCH CIRCUIT RANGE/PERFORMANCEDTC detecting condition:Detected when ...
 Dtc p0453 evap system (cpc) pressure sensor/switch circuit high
ENGINE (DIAGNOSTICS)(H4DO) > Diagnostic Procedure with Diagnostic Trouble Code (DTC)DTC P0453 EVAP SYSTEM (CPC) PRESSURE SENSOR/SWITCH CIRCUIT HIGHDTC detecting condition:Immediately at fault recog ...
Other materials:
Operation during cold weather
Maintenance
When operating your Subaru Ascent in winter conditions, proper preparation is
essential for safety and reliability. It is highly recommended to carry emergency
supplies such as an ice scraper, sand for traction, warning flares, a compact shovel,
and jumper cables to handle unexpec ...
Dtc p015b a/f / o2 sensor delayed response - lean to rich bank 1 sensor 1
ENGINE (DIAGNOSTICS)(H4DO) > Diagnostic Procedure with Diagnostic Trouble Code (DTC)DTC P015B A/F / O2 SENSOR DELAYED RESPONSE - LEAN TO RICH BANK 1 SENSOR 1NOTE:For the diagnostic procedure, refer to DTC P014C. Diagnostic Procedure with Diagnostic Trouble Code (DTC) > DTC P014C A/F / O2 SENS ...
Dtc p0841 transmission fluid pressure sensor/switch "a" circuit range/performance
CONTINUOUSLY VARIABLE TRANSMISSION (DIAGNOSTICS) > Diagnostic Procedure with Diagnostic Trouble Code (DTC)DTC P0841 TRANSMISSION FLUID PRESSURE SENSOR/SWITCH "A" CIRCUIT RANGE/PERFORMANCEDTC detecting condition:Immediately at fault recognitionTrouble symptom:• Acceleration is poor ...
