Subaru Crosstrek Service Manual: Dtc b1838 short in curtain shield airbag lh squib circuit (to +b)
AIRBAG SYSTEM (DIAGNOSTICS) > Diagnostic Chart with Trouble Code
DTC B1838 SHORT IN CURTAIN SHIELD AIRBAG LH SQUIB CIRCUIT (TO +B)
Diagnosis start condition:
Ignition voltage is 10 V to 16 V.
DTC detecting condition:
• Curtain airbag harness (LH) is shorted to power supply.
• Curtain airbag module (LH) is faulty.
• Airbag control module is faulty.
CAUTION:
Before performing diagnosis, refer to “CAUTION” in “General Description”. General Description > CAUTION">
Wiring diagram:
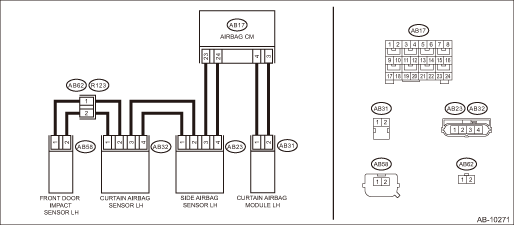
Airbag system Airbag System > WIRING DIAGRAM">
| STEP | CHECK | YES | NO |
1.CHECK POOR CONTACT OF CONNECTORS.
Check for poor contact of the connectors between the airbag control module, curtain airbag module LH and the curtain airbag sensor LH.
Is there poor contact?
Replace the airbag rear harness along with body harness.
Diagnostic Chart with Trouble Code > DTC B1838 SHORT IN CURTAIN SHIELD AIRBAG LH SQUIB CIRCUIT (TO +B)">Go to Step 2.
2.CHECK CURTAIN AIRBAG MODULE.
1) Turn the ignition switch to OFF, disconnect the battery ground cable, and wait for 60 seconds or more.
2) Disconnect the connector (AB31), and connect the connector (1N) in test harness N to connector (AB31).
3) Connect the airbag resistor to the connector (2N) of test harness N.
4) Connect the battery ground terminal and turn the ignition switch to ON.
Does the airbag warning light illuminate for six seconds and go off?
Replace the curtain airbag module (LH). Curtain Airbag Module">
Diagnostic Chart with Trouble Code > DTC B1838 SHORT IN CURTAIN SHIELD AIRBAG LH SQUIB CIRCUIT (TO +B)">Go to Step 3.
3.CHECK AIRBAG REAR HARNESS (CURTAIN AIRBAG MODULE HARNESS LH).
1) Turn the ignition switch to OFF, disconnect the battery ground cable, and wait for 60 seconds or more.
2) Disconnect the connector (AB21) from seat belt pretensioner (LH).
3) Disconnect connector (AB19) from side airbag module (LH).
4) Disconnect the airbag resistor from test harness N.
5) Disconnect the connectors (AB6, AB17, AB18) from airbag control module.
6) Connect the connector (1AG) in the test harness AG to the connectors (AB6, AB17, AB18).
7) Connect the battery ground terminal and turn the ignition switch to ON.
8) Measure the voltage between connector (6AG) in the test harness AG and chassis ground.
Connector & terminal
(6AG) No. 1 (+) — Chassis ground (−):
(6AG) No. 3 (+) — Chassis ground (−):
Is the voltage less than 1 V?
Diagnostic Chart with Trouble Code > DTC B1838 SHORT IN CURTAIN SHIELD AIRBAG LH SQUIB CIRCUIT (TO +B)">Go to Step 4.
Replace the airbag rear harness along with body harness.
4.CHECK AIRBAG CONTROL MODULE.
1) Connect all connectors.
2) Clear the memory. Clear Memory Mode">
3) Perform the Inspection Mode. Inspection Mode">
4) Read the DTC. (Current malfunction) Read Diagnostic Trouble Code (DTC)">
Is DTC B1838 displayed?
Replace the airbag control module. Airbag Control Module">
Diagnostic Chart with Trouble Code > DTC B1838 SHORT IN CURTAIN SHIELD AIRBAG LH SQUIB CIRCUIT (TO +B)">Go to Step 5.
5.CHECK FOR ANY OTHER DTC ON DISPLAY.
Is any other DTC displayed?
Check DTC using “List of Diagnostic Trouble Code (DTC)”. List of Diagnostic Trouble Code (DTC)">
Finish the diagnosis.
 Dtc b1837 short in curtain airbag lh squib circuit (to ground)
AIRBAG SYSTEM (DIAGNOSTICS) > Diagnostic Chart with Trouble CodeDTC B1837 SHORT IN CURTAIN AIRBAG LH SQUIB CIRCUIT (TO GROUND)Diagnosis start condition:Ignition voltage is 10 V to 16 V.DTC detectin ...
 Dtc b1860 short in driver s knee airbag
AIRBAG SYSTEM (DIAGNOSTICS) > Diagnostic Chart with Trouble CodeDTC B1860 SHORT IN DRIVER’S KNEE AIRBAGDiagnosis start condition:Ignition voltage is 10 V to 16 V.DTC detecting condition:&bull ...
Other materials:
Dtc u0140 lost communication with body control module
HVAC SYSTEM (AUTO A/C) (DIAGNOSTICS) > Diagnostic Procedure with Diagnostic Trouble Code (DTC)DTC U0140 LOST COMMUNICATION WITH BODY CONTROL MODULEDetected when CAN data from BIU does not arrive.NOTE:Perform the diagnosis for LAN system. Basic Diagnostic Procedure > PROCEDURE"> ...
Shift lock release using the shift lock release button
Perform the following procedure to release
the shift lock.
1. Apply the parking brake and turn the
ignition switch to the "LOCK"/"OFF" position.
2. Wrap the tip of a flat-head screwdriver
with vinyl tape or a cloth and use it to
remove the shift lock cover. The shift lock
release button ...
Front wiring harness Location
WIRING SYSTEM > Front Wiring HarnessLOCATIONConnectorConnecting toNo.PoleColorAreaNo.DescriptionF51BlackC-1 HornF62C-1 Front fog light RH (without SRF)2BlackC-1 Front fog light RH (with SRF)F162C-1 Sub fan motorF172D-2 Main fan motorF212D-4 Front fog light LH (without SRF)2BlackD-4 Front fog ligh ...
