Subaru Crosstrek Service Manual: Disposal of pretensioner Procedure
SEAT BELT SYSTEM > Disposal of Pretensioner
PROCEDURE
WARNING:
Make sure to follow the instructions below. Otherwise, personal injuries may occur.
• Before discarding a pretensioner, always perform an activation process to prevent any false activation.
• Wear protective gloves, safety goggles and earplugs during this operation. Wash your hands afterwards.
• Do not touch the pretensioner just after activation because it is very hot. Before handling it for disposal, wait for 40 minutes.
CAUTION:
• Perform a pretensioner operation process in a safe, level place. Do not perform the process outdoors when there is a strong rain or wind.
• Do not drop or damage the pretensioner.
• A large explosive noise will occur when the pretensioner is deployed. Warn persons in the area, and do not allow anyone to approach a radius of 5 m (16 ft) from the discard location.
• After activating the pretensioner, smoke may arise. Therefore, always perform an operation process in a well-ventilated place without any smoke sensor.
• Do not expose the activated pretensioner to water.
• Wrap the activated pretensioner in a sealed vinyl bag when discarding.
• If it is impossible to perform a pretensioner activation process due to some situational reasons, consult SUBARU dealership or one of the authorized workshops.
1. Fold the backrest all the way forward, and move the front seat all the way forward.
2. Turn the ignition switch to OFF.
3. Disconnect the ground cable from battery and wait for at least 60 seconds before starting work. NOTE">
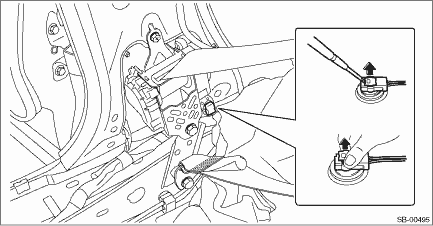
4. Disconnect connector of the pretensioner.
5. Short the alligator clip and terminal of the airbag deployment tool together.
CAUTION:
Short the airbag deployment tool terminals until just before the pretensioner operation process.
Preparation tool:
ST: AIRBAG DEPLOYMENT TOOL (98299PA030)
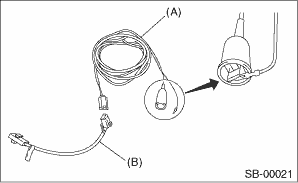
6. Connect the airbag deployment tool (A) and test harness adapter D (B).
Preparation tool:
ST: TEST HARNESS ADAPTER D (98299SA010)
7. Connect the test harness adapter D connector to the pretensioner.
8. Make sure there is no one inside the vehicle.
9. Extend the wiring of the airbag deployment tool to its limit, and completely close all the windows and sunroof.
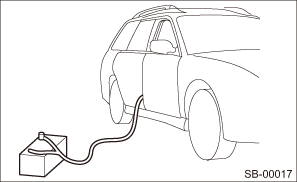
10. Move the battery 5 m (16 ft) or more from the vehicle, and affix nearby.
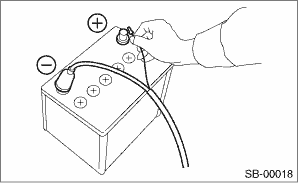
11. Connect the airbag deployment tool alligator clip to the battery negative (−) terminal.
12. Connect the other cable of airbag deployment tool to the battery positive (+) terminal, and activate the pretensioner.
CAUTION:
• After activation, the pretensioner will be extremely hot. Let it cool down for at least 40 minutes in an area with no one around.
• Do not expose the activated pretensioner to water.
13. Perform operation process of lap seat belt pretensioner from steps 14) to 22) for the passenger’s side.
14. Disconnect the connector from the lap seat belt pretensioner.
15. Short the alligator clip and terminal of the airbag deployment tool together.
CAUTION:
Short the airbag deployment tool terminals until just before the pretensioner operation process.
Preparation tool:
ST: AIRBAG DEPLOYMENT TOOL (98299PA030)
16. Connect the airbag deployment tool (A) and test harness adapter D (B).
Preparation tool:
ST: TEST HARNESS ADAPTER D (98299SA010)
17. Connect the test harness adapter D connector to the lap seat belt pretensioner.
18. Make sure there is no one inside the vehicle.
19. Extend the wiring of airbag deployment tool to the limit, and close all the windows and sunroof completely.
20. Move the battery 5 m (16 ft) or more from the vehicle, and affix nearby.
21. Connect the airbag deployment tool alligator clip to the battery negative (−) terminal.
22. Connect the other cable of airbag deployment tool to the battery positive (+) terminal, and activate the pretensioner.
CAUTION:
• After activation, the pretensioner will be extremely hot. Let it cool down for at least 40 minutes in an area with no one around.
• Do not expose the activated pretensioner to water.
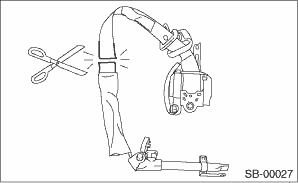
23. Remove the seat belt outer - front. Front Seat Belt > REMOVAL">
24. Cut the seat belt at a position as close as possible to the seat belt retractor.
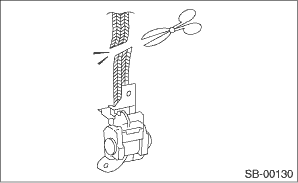
25. Cut the seat belt at a position as close as possible to the lap seat belt pretensioner.
26. Place the activated pretensioner in a sealed vinyl bag, then discard.


 Wiring diagram
SEAT BELT SYSTEM > Seat Belt Warning SystemWIRING DIAGRAMRefer to “Seat Belt Warning System” in the wiring diagram. Seat Belt Warning System > WIRING DIAGRAM"> ...
 Inspection locations after a collision Inspection
SEAT BELT SYSTEM > Inspection Locations after a CollisionINSPECTIONRefer to “Inspection Locations after a Collision” of “AIRBAG SYSTEM” section. Inspection Locations after ...
Other materials:
Inspection
FUEL INJECTION (FUEL SYSTEMS)(H4DO) > Fuel PumpINSPECTION1. Check that the fuel pump has no deformation, cracks or other damages.2. Connect the battery positive terminal to terminal No. 3 and the battery ground terminal to terminal No. 4, and inspect the fuel pump operation.WARNING:• Wipe o ...
Caution
EXHAUST(H4DO) > General DescriptionCAUTION• Prior to starting work, pay special attention to the following:1. Always wear work clothes, a work cap, and protective shoes. Additionally, wear a helmet, protective goggles, etc. if necessary.2. Protect the vehicle using a seat cover, fender cove ...
Installation
BRAKE > Rear Disc Brake AssemblyINSTALLATIONNOTE:Before installation, remove mud and foreign matter from the caliper body assembly and support - rear disc brake.1. Before installation, check each part. Rear Disc Brake Assembly > INSPECTION">2. Apply a thin coat of grease to the suppor ...
