Subaru Crosstrek Service Manual: Blind spot detection/rear cross traffic alert
Note
Blind Spot Detection/Rear Cross Traffic Alert > Blind Spot Detection/Rear Cross Traffic Alert
NOTE
For procedure of each component in the Subaru Rear Vehicle Detection system, refer to the respective sections.
• Radar sensor: Radar Sensor">
• BSD/RCTA OFF switch: Switches and Harness">
• Combination meter: Combination Meter">
• Outer mirror assembly: Outer Mirror Assembly">
General description
Component
Blind Spot Detection/Rear Cross Traffic Alert > General Description
COMPONENT
1. RADAR SENSOR
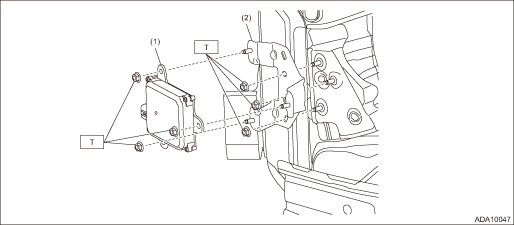
(1) | Radar sensor (master & slave) | (2) | Radar bracket | Tightening torque: N·m (kgf-m, ft-lb) | |
T: | 7.5 (0.8, 5.5) | ||||
Location
Blind Spot Detection/Rear Cross Traffic Alert > General Description
LOCATION
Refer to “LOCATION” of “Blind Spot Detection/Rear Cross Traffic Alert (DIAGNOSTICS)” section. Electrical Component Location > LOCATION">
Radar sensor
Installation
Blind Spot Detection/Rear Cross Traffic Alert > Radar Sensor
INSTALLATION
1. Install each part in the reverse order of removal.
Tightening torque:
Radar sensor and radar bracket: 7.5 N·m (0.8 kgf-m, 5.5 ft-lb)
2. Perform the adjustment of the radar sensor radar axis. Radar Sensor > ADJUSTMENT">
Switches and harness
Installation
Blind Spot Detection/Rear Cross Traffic Alert > Switches and Harness
INSTALLATION
BSD/RCTA OFF switch
Install each part in the reverse order of removal.
 Switches and harness
Inspection
Blind Spot Detection/Rear Cross Traffic Alert > Switches and HarnessINSPECTIONBSD/RCTA OFF switch1. Measure the resistance between connector terminals.Preparation tool:Circuit testerTer ...
 Combination meter Note
Blind Spot Detection/Rear Cross Traffic Alert > Combination MeterNOTEFor the operation procedures for combination meter, refer to “INSTRUMENTATION/DRIVER INFO” section. Combination Met ...
Other materials:
Dtc p0420 catalyst system efficiency below threshold bank 1
ENGINE (DIAGNOSTICS)(H4DO) > Diagnostic Procedure with Diagnostic Trouble Code (DTC)DTC P0420 CATALYST SYSTEM EFFICIENCY BELOW THRESHOLD BANK 1DTC detecting condition:Detected when two consecutive driving cycles with fault occur.Trouble symptom:• Engine stall• Idle mixture is out of s ...
At oil temp warning light (CVT models)
If this light illuminates when the engine is
running, it may indicate that the transmission
fluid temperature is too hot.
If the light illuminates while driving, immediately
stop the vehicle in a safe place
and let the engine idle until the warning
light turns off.
Transmission control ...
Roof tent
WARNING
Installing a roof tent on the Subaru Ascent increases the overall weight positioned
above the vehicle’s center of gravity, which can negatively influence handling,
braking efficiency, and rollover resistance. Under no circumstances should the Subaru
Ascent be driven if the total ...
