Subaru Crosstrek Service Manual: Assembly
SEATS > Front Seat
ASSEMBLY
CAUTION:
• Do not confuse the harness routing of the side airbag harness and the seat belt inner - front harness, etc. Assembling with harnesses improperly routed may cause the harness to get caught and short out.
• If the flat mat hook of the frame assembly - front backrest is deformed or comes off due to the deformation, replace the hook with a new part.
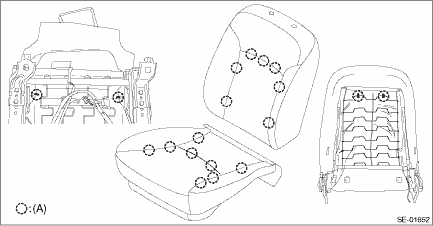
• Make sure that the side airbag module is installed as shown in the figure.

(1) | Pad ASSY - front seat backrest | (4) | Side airbag module inflator | (7) | Side airbag guide cloth |
(2) | Frame ASSY - front backrest | (5) | Nut | ||
(3) | Side airbag module protective cover | (6) | Cover COMPL - front backrest |
Besides, if the cover COMPL - front backrest is not installed securely, the side airbag may not be activated properly, therefore keep strictly to the following procedures.
• Be careful not to stain or damage the cover COMPL - front backrest during assembly.
• Do not reuse hog rings.
• Secure the hog ring using hog ring pliers.
• Install the hog rings to the specified points securely and make sure that there is no wrinkle or twisting on the cover COMPL - front backrest.
1. Install the seat heater module.
CAUTION:
• If the seat heater module is removed, replace the pad assembly with a new part. (Driver’s seat)
• If the seat heater module is removed, replace the seat cushion pad & frame assembly with a new part. (Passenger’s seat)
• If the seat heater module is reused, remove the polyurethane section from the reverse side completely and attach a new pad assembly with a double-sided tape.
Double-sided tape:
NITTO DENKO 501L or equivalent
2. Make sure that there is no foreign matter on side airbag module.
3. Assemble the seat cover.
(1) Adjust so that the left and right clearances between wire and seat pad become equal, and mark the seat pad.
(1) | Marking |
(2) Mark the center of the wire on the pad side to which the hog ring is attached.
(1) | Marking |
(3) Insert the wire into the seat cover, and align the wire with the position marked in step 1).
(4) Mark the wire on the seat cover side according to the markings on the seat pad.
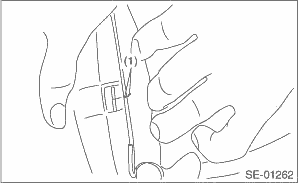
(1) | Marking |
(5) Perform steps 1) — 4) to all sections to which the hog rings are attached.
(6) Make sure that all hog rings (A) are attached securely.
4. Assemble remaining parts in the reverse order of disassemble.
NOTE:
• When installing the seat belt inner - front, follow the procedures described in the seat belt section. Front Seat Belt > INSTALLATION">
• Install the backrest assembly and seat cushion assembly in the following procedure.
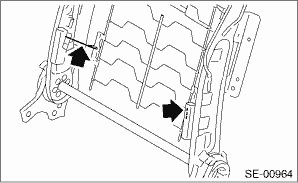
1. Temporarily tighten the four reclining hinge bolts.
2. Place the backrest in the most upright position.
3. Tighten the reclining hinge bolts in order from (1) to (4) two or three times, until they reach the specified torque.
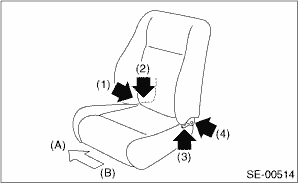
(A) | Vehicle inside |
(B) | Vehicle outside |
Tightening torque:
Refer to “COMPONENT” of “General Description”. General Description > COMPONENT">
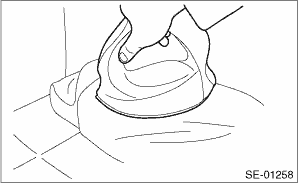
5. If any wrinkles are found after the assembly of the seat cover, finish the seat cover with iron.
(1) Place the wet towel on wrinkles.
(2) Touch up with warm iron.
CAUTION:
Keep moving the iron, otherwise the seat cover surface can be damaged.
NOTE:
This method is available for genuine leather, synthetic leather, cloth, etc.
6. Install connectors located under the front seat.
• Manual seat
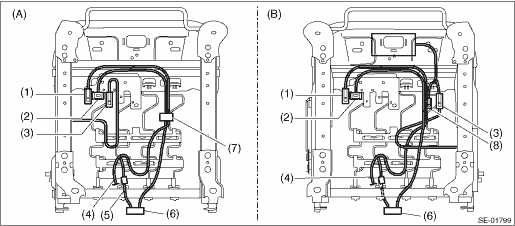
(A) | Driver’s seat (six-way) | (B) | Passenger’s seat (four-way) | ||
(1) | Seat cushion heater connector | (4) | Seat cushion - heater harness | (7) | Band A |
(2) | Side airbag connector | (5) | Backrest heater harness | (8) | Occupant detection control module |
(3) | Seat belt switch connector | (6) | Velcro |
7. Install the seat assembly.
CAUTION:
• The seat mounting bolts differ between the front mounting points and the rear mounting points. Make sure that you are using correct bolts at correct positions.
• Tighten the slide rail installing bolts in the order as shown in the figure, in several steps by gradually increasing the torque until they reach the specified torque.
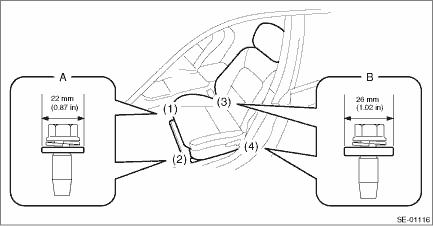
• Front (bolt A): Washer diameter 22 mm (0.87 in)
• Rear (bolt B): Washer diameter 26 mm (1.02 in)
Tightening torque: 53 N·m (5.4 kgf-m, 39.1 ft-lb)
 Front seat
...
 Removal
SEATS > Front SeatREMOVALCAUTION:Before handling the airbag system components, refer to “CAUTION” of “General Description” in “AIRBAG SYSTEM”. General Descripti ...
Other materials:
Basic operation
Control switches
By using
or
on the steering wheel controls, the driver of the Subaru Ascent can seamlessly switch
between different display screens and information panels.
When important notifications arise, such as vehicle status updates or safety
w ...
Light control switch
CAUTION
Use of any lights for a long period
of time while the engine is not
running can cause the battery to
discharge.
Before leaving the vehicle, make
sure that the lights are turned off.
If the vehicle is left unattended
for a long time with the lights
illuminated, the batte ...
Dtc b2a03 gps antenna circuit
TELEMATICS SYSTEM (DIAGNOSTICS) > Diagnostic Procedure with Diagnostic Trouble Code (DTC)DTC B2A03 GPS ANTENNA CIRCUITDiagnosis start condition:When ignition switch is ON.DTC detecting condition:Any of the followings continues for 5 seconds or more.• GPS antenna impedance is more than 1 M?. ...
