Subaru Crosstrek Service Manual: Adjustment
EXTERIOR BODY PANELS > Rear Door
ADJUSTMENT
Adjust the clearance around the panel assembly - rear door as follows.
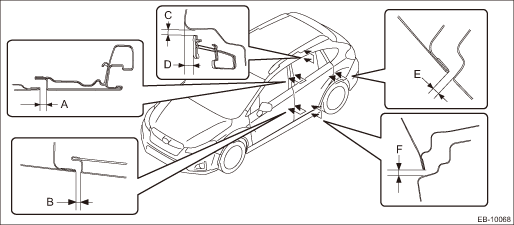
Part | Standard | |
A | Front door sash to Rear door sash | 5.5+1.5, −1.0 mm (0.22+0.06, −0.04 in) |
B | Panel assembly - front door to Panel assembly - rear door | 4.5±1.0 mm (0.18±0.04 in) |
C | Roof panel to Rear door sash | 5.1+1.5, −1.0 mm (0.20+0.06, −0.04 in) |
D | Surface level gap between roof panel and rear door sash | 6.6±1.5 mm (0.26±0.06 in) |
E | Panel assembly - rear door to Rear quarter panel | 4.1±1.0 mm (0.16±0.04 in) |
F | Panel assembly - rear door to Side sill | 6.0±1.5 mm (0.24±0.06 in) |
1. Adjust the vertical and horizontal positions of the panel assembly - rear door.
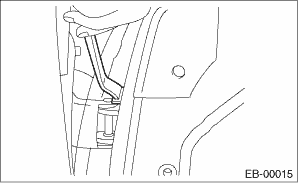
(1) Loosen the body side bolts of the upper hinge - rear door and the lower hinge - rear door.
(2) Adjust the vertical and horizontal clearance of the panel assembly - rear door.
2. Adjust the surface level gap between the panel assembly - rear door and the body.
CAUTION:
Do not use an impact wrench. Welding area on the striker nut plate is easily broken.

(1) Loosen the screws (A).
(2) Tap the striker - rear door (B) using a plastic hammer to adjust the surface level gap between the rear end of the panel assembly - rear door and the rear quarter.
 Rear door
...
 Removal
EXTERIOR BODY PANELS > Rear DoorREMOVAL1. REAR DOOR PANEL1. Disconnect the ground cable from battery. NOTE">2. Remove the trim panel - rear door. Door Trim > REMOVAL">3. Remove ...
Other materials:
Airbag warning light illumination pattern Inspection
OCCUPANT DETECTION SYSTEM (DIAGNOSTICS) > Airbag Warning Light Illumination PatternINSPECTIONTurn the ignition switch to ON, and confirm that the airbag warning light remains on for approx. 6 seconds then turns off afterwards.(1)Airbag warning light(2)Approx. 6 seconds(3)Ignition switch ON ...
Harness components location Location
WIRING SYSTEM > Harness Components LocationLOCATION(1)Front wiring harness(7)Rear wiring harness RH(12)Front door cord LH(2)Engine wiring harness(8)Rear wiring harness LH(13)Transmission cord(3)Bulkhead wiring harness(9)Roof cord(14)Generator cord(4)Instrument panel wiring harness(10)Rear gate co ...
List of diagnostic trouble code (dtc) List
TIRE PRESSURE MONITORING SYSTEM (DIAGNOSTICS) > List of Diagnostic Trouble Code (DTC)LISTDTCItemContents of diagnosisRemarksC2021TIRE 1 AIR PRESSURE LOW (NORMAL MODE)Tire pressure of tire 1 is reduced. Diagnostic Procedure with Diagnostic Trouble Code (DTC) > DTC C2021 TIRE 1 AIR PRESSURE LOW ...
