Subaru Crosstrek Service Manual: Removal
ENTERTAINMENT > Audio
REMOVAL
CAUTION:
Before handling the airbag system components, refer to “CAUTION” of “General Description” in “AIRBAG SYSTEM”. General Description > CAUTION">
1. Disconnect the ground cable from battery and wait for at least 60 seconds before starting work. NOTE">
2. Remove the cover assembly - instrument panel LWR driver and the knee airbag module. Knee Airbag Module > REMOVAL">
3. Remove the glove box. Glove Box > REMOVAL">
4. Remove the center grille assembly. Air Vent Grille > REMOVAL">
5. Remove the audio assembly.
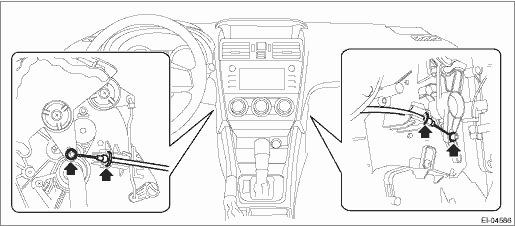
(1) On manual A/C models, disconnect the control cables from both sides of the heater & cooling unit.
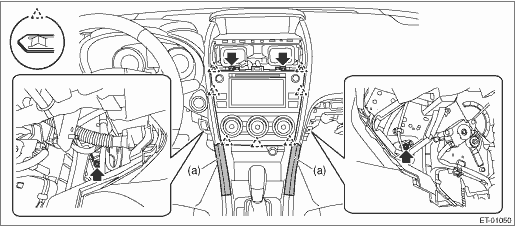
(2) Attach the protective tape (a) to the cover - shift lever.
(3) Remove the bolts, release the claws, and partially pull out the audio assembly.
NOTE:
• Release the claw by using a clip remover wrapped with protective tape.
• If the antenna cable interferes with the removal operation of the side attachment bolts (for model with telematics), move the antenna cable aside before service as necessary.
(4) Disconnect the connectors, and remove the audio assembly.
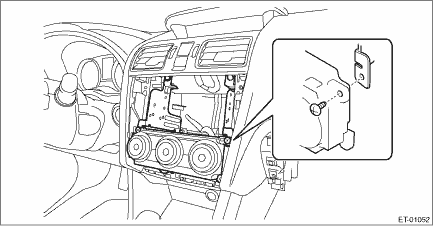
6. Remove the screws, and then remove the audio bracket.

NOTE:
• The model with telematics is equipped with the data communication module under the audio assembly.
• When sending the audio for repair, remove the audio bracket and heater control assembly, and install on the vehicle as shown in the figure below. Control Panel > REMOVAL">
 Installation
ENTERTAINMENT > AudioINSTALLATIONCAUTION:• After installing the center grille assembly, check that the air vent grille of the center grille assembly is inserted correctly into the air vent du ...
 Audio system
...
Other materials:
Dtc c1321 fl hold valve
VEHICLE DYNAMICS CONTROL (VDC) (DIAGNOSTICS) > Diagnostic Procedure with Diagnostic Trouble Code (DTC)DTC C1321 FL HOLD VALVENOTE:For the diagnostic procedure, refer to “DTC C1362 NORMAL CLOSING VALVE 2”. Diagnostic Procedure with Diagnostic Trouble Code (DTC) > DTC C1362 NORMAL C ...
Dtc b1800 short in driver s airbag
AIRBAG SYSTEM (DIAGNOSTICS) > Diagnostic Chart with Trouble CodeDTC B1800 SHORT IN DRIVER’S AIRBAGDiagnosis start condition:Ignition voltage is 10 V to 16 V.DTC detecting condition:• Airbag main harness circuit is shorted.• Airbag module harness (driver’s side) circuit is ...
Installation
CONTROL SYSTEMS > MT Gear Shift LeverINSTALLATION1. Insert the gear shift lever from the room side.NOTE:Insert the rod and the stay, and then temporarily set them onto the transmission mount.2. Lift up the vehicle.3. Install the joint to the transmission and secure with a spring pin.(A)Joint(B)Sp ...
