Subaru Crosstrek Service Manual: Dtc b28a0 vehicle model judgment
EyeSight (DIAGNOSTICS) > Diagnostic Procedure with Diagnostic Trouble Code (DTC)
DTC B28A0 VEHICLE MODEL JUDGMENT
Detected when the model code for stereo camera and the model code used for CAN data are different.
DTC DETECTING CONDITION:
• Defective CAN system
• Defective stereo camera
• In the aiming operation, there is an open circuit in the +B harness of the stereo camera.
• In the completion of the aiming operation, the switching from IGN OFF to IGN ON takes place too early, and the recording of the model information has not yet been finished.
• Incorrect assembly of stereo camera (when the stereo camera designed for A-type vehicle is installed to the B-type vehicle, etc.)
TROUBLE SYMPTOM:
• All functions of EyeSight system do not operate.
• EyeSight warning light illuminates.
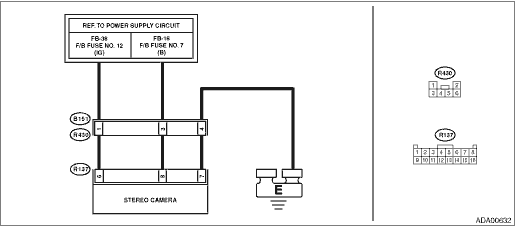
WIRING DIAGRAM:
EyeSight System EyeSight System > WIRING DIAGRAM">

| STEP | CHECK | YES | NO |
1.CHECK RELATED CM.
Check the part number of the ECM, TCM, VDC CM and combination meter.
Is each CM a genuine part?
Diagnostic Procedure with Diagnostic Trouble Code (DTC) > DTC B28A0 VEHICLE MODEL JUDGMENT">Go to Step 2.
Replace the non-genuine CM with a genuine one.
2.CHECK STEREO CAMERA.
1) Remove the camera cover.
2) Check the part number of the stereo camera.
Is the stereo camera genuine?
Diagnostic Procedure with Diagnostic Trouble Code (DTC) > DTC B28A0 VEHICLE MODEL JUDGMENT">Go to Step 3.
Replace the stereo camera. Stereo Camera > REMOVAL">
3.CHECK LAN SYSTEM.
Perform the diagnosis for LAN system. Basic Diagnostic Procedure">
Is DTC displayed?
Perform the diagnosis according to DTC.
Diagnostic Procedure with Diagnostic Trouble Code (DTC) > DTC B28A0 VEHICLE MODEL JUDGMENT">Go to Step 4.
4.CHECK MODEL REGISTRATION INFORMATION.
Check the model registration information from the current data of stereo camera. Read Current Data">
Does vehicle and data correspond?
Perform the adjustment or inspection of the camera. Camera Adjustment, Inspection">
Diagnostic Procedure with Diagnostic Trouble Code (DTC) > DTC B28A0 VEHICLE MODEL JUDGMENT">Go to Step 5.
5.CHECK FUSE.
Check fuses No. 7 and No. 12 in the fuse & relay box. Relay and Fuse">
Is the fuse OK?
Diagnostic Procedure with Diagnostic Trouble Code (DTC) > DTC B28A0 VEHICLE MODEL JUDGMENT">Go to Step 6.
Replace the faulty fuse. When the replaced fuse blows out easily, check the short circuit in harness.
6.CHECK HARNESS (POWER SUPPLY CIRCUIT).
1) Disconnect the stereo camera.
2) Turn the ignition switch to ON.
3) Measure the voltage between harness connector of stereo camera and chassis ground.
Connector & terminal
(R137) No. 6 (+) — Chassis ground (−):
(R137) No. 8 (+) — Chassis ground (−):
Is the voltage 10 V or more?
Diagnostic Procedure with Diagnostic Trouble Code (DTC) > DTC B28A0 VEHICLE MODEL JUDGMENT">Go to Step 7.
Check the power supply system circuit, and if any fault is found, repair the defective parts or replace the harness.
7.CHECK HARNESS (GROUND CIRCUIT).
1) Turn the ignition switch to OFF.
2) Disconnect the ground cable from battery.
3) Measure the resistance between stereo camera and chassis ground.
Connector & terminal
(R137) No. 7 — Chassis ground:
Is the resistance less than 10 ??
Diagnostic Procedure with Diagnostic Trouble Code (DTC) > DTC B28A0 VEHICLE MODEL JUDGMENT">Go to Step 8.
Check the ground system circuit, and if any fault is found, repair the defective parts or replace the harness.
8.CHECK POOR CONTACT OF CONNECTORS.
Check stereo camera connector.
Is there poor contact of the connector?
Repair the connector.
Diagnostic Procedure with Diagnostic Trouble Code (DTC) > DTC B28A0 VEHICLE MODEL JUDGMENT">Go to Step 9.
9.CHECK STEREO CAMERA.
1) Connect all connectors and battery terminals securely.
2) Clear the memory. Clear Memory Mode">
3) Read the DTC. Diagnostic Code(s) Display">
Is the same DTC (DTC B28A0) displayed?
Replace the stereo camera. Stereo Camera > REMOVAL">
Even if DTC is displayed, the circuit has returned to a normal condition at this time. Reproduce the failure, and then perform the diagnosis again.
NOTE:
In this case, temporary poor contact of connector, or temporary open or short circuit of harness may be the cause.
 Dtc b2817 brake lamp
EyeSight (DIAGNOSTICS) > Diagnostic Procedure with Diagnostic Trouble Code (DTC)DTC B2817 BRAKE LAMPDTC DETECTING CONDITION:• Defective brake light relay• Defective brake light switch&b ...
 Dtc b28a1 eyesight communication(ecm)
EyeSight (DIAGNOSTICS) > Diagnostic Procedure with Diagnostic Trouble Code (DTC)DTC B28A1 EyeSight COMMUNICATION(ECM)Detected when the engine control module (ECM) detects the malfunction of stereo ...
Other materials:
Real-time diagnosis Operation
EyeSight (DIAGNOSTICS) > Real-time DiagnosisOPERATION1. On «Start» display, select «Diagnosis».2. On «Vehicle selection» display, input the target vehicle information and select «Confirmed».3. On «Main Menu» display, select «Each System».4. On «Select System» display, select «EyeSi ...
Touch screen gestures
Operations are performed by touching the touch screen directly with your
finger.
Operation method
Outline
Main use
TouchQuickly touch and release
once.
Changing and selecting various
settings
Drag*Touch the screen with your
finger, and mo ...
Self-check screen
When the ignition switch is turned to the
"ON" position, the vehicle self-check will
be performed. The screens corresponding
to the following items will appear one after
another for several seconds each.
Engine oil: Checks the interval of engine
oil replacement.
Oil filter: Checks th ...
