Subaru Crosstrek Service Manual: Component
FRONT SUSPENSION > General Description
COMPONENT
1. FRONT SUSPENSION

(1) | Front crossmember COMPL | (14) | Bushing rear - front arm | (27) | Clip |
(2) | Flange bolt | (15) | Stud bolt | ||
(3) | Front crossmember support | (16) | Stopper - front arm bushing rear | Tightening torque: N·m (kgf-m, ft-lb) | |
(4) | Front stabilizer | (17) | Adapter | T1: | 25 (2.55, 18.4) |
(5) | Bushing - stabilizer | (18) | Front arm rear plate | T2: | 60 (6.12, 44.3) |
(6) | Clamp - stabilizer bushing | (19) | Adjusting washer | T3: | 39 (3.98, 28.8) |
(7) | Flange nut | (20) | Ball joint ASSY | T4: | 50 (5.10, 36.9) |
(8) | Stabilizer link | (21) | Castle nut | T5: | 60 (6.12, 44.3) |
(9) | Self-locking nut | (22) | Cotter pin | T6: | 95 (9.69, 70.1) |
(10) | Front support | (23) | Housing ASSY - front axle | T7: | 100 (10.20, 73.8) |
(11) | Support plate - front crossmember | (24) | Flange bolt | T8: | 110 (11.22, 81.1) |
(12) | Bushing front - front arm | (25) | Adjusting bolt | T9: | 150 (15.30, 110.6) |
(13) | Front arm ASSY | (26) | Front strut ASSY | T10: | 155 (15.81, 114.3) |
2. FRONT STRUT
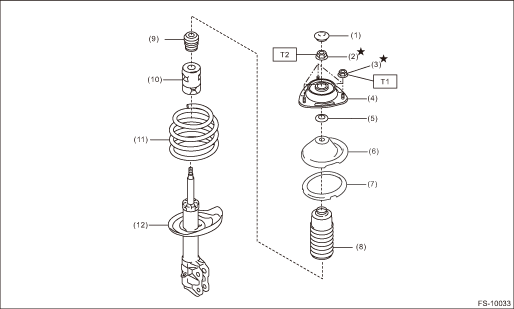
(1) | Dust seal - front strut | (7) | Rubber seat | Tightening torque: N·m (kgf-m, ft-lb) | |
(2) | Self-locking nut | (8) | Dust cover - front strut | T1: | 20 (2.04, 14.8) |
(3) | Flange nut | (9) | Helper - front strut | T2: | 55 (5.61, 40.6) |
(4) | Strut mount - front | (10) | Dust cover inner | ||
(5) | Spacer - front strut | (11) | Coil spring - front | ||
(6) | Spring seat - front strut UPR | (12) | Strut COMPL - front | ||
 Specification
FRONT SUSPENSION > General DescriptionSPECIFICATIONTire sizeP225/55R17225/55R17FrontWheel arch height452 (17.8)(Tolerance: +12 mm −24 mm (+0.47 in −0.94 in))mm (in)Camber (tolerance: ± ...
 Preparation tool
FRONT SUSPENSION > General DescriptionPREPARATION TOOL1. SPECIAL TOOLILLUSTRATIONTOOL NUMBERDESCRIPTIONREMARKS927680000INSTALLER & REMOVER SETUsed for replacing the bushing front - front arm of ...
Other materials:
Control screen and audio panel
Control screen
Perform the SXM setting. See below.
Refer to "SXM setting" F5-42.
Search for a channel which the
direction of higher frequency from
current frequency. Reproduce the
channel that can receive by 5
seconds.
A list is displayed. There are three
types of lists ("P ...
Inspection
LIGHTING SYSTEM > Door SwitchINSPECTION1. Check the resistance between switch terminals.Preparation tool:Circuit testerTerminal No.Inspection conditionsStandardConnection diagram1 — 3When door is openedLess than 1 ?When door is closed1 M? or more2. Replace the switch assembly - door if the insp ...
Disassembly
GLASS/WINDOWS/MIRRORS > Outer Mirror AssemblyDISASSEMBLYCAUTION:When removing the mirror - repair, be careful not to damage the back surface of mirror - repair with a flat tip screwdriver.1. Operate the remote control mirror switch to face the mirror - repair upward.2. Disconnect the ground cable ...
