Subaru Crosstrek Service Manual: Assembly
REAR SUSPENSION > Rear Shock Absorber
ASSEMBLY
1. Before assembly, check each part. Rear Shock Absorber > INSPECTION">
2. Using a coil spring compressor, compress the coil spring - rear.
CAUTION:
When installing the coil spring compressor to the coil spring, follow the operation manual accompanied with the coil spring compressor during operation.
3. Install by aligning with the edge surface of the coil spring - rear and the stopper portion of the lower side spring seat.
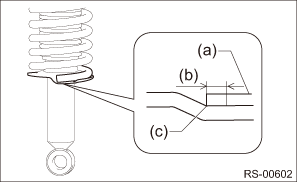
(a) | Coil spring - rear |
(b) | 0+ 10 mm (0 + 0.4 in) |
(c) | Spring seat stopper portion |
4. Install the helper - rear and the dust cover - rear shock to the piston rod.
5. Fully pull up the piston rod in the upward direction.
6. Temporarily tighten the rubber seat - shock UPR and the shock mount - rear with new self-locking nuts.
NOTE:
Position the shock mount - rear as shown in the figure.
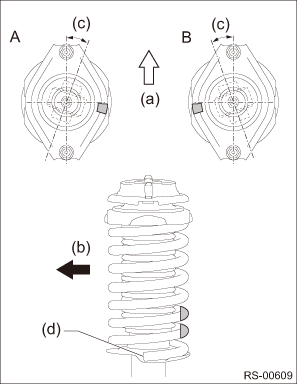
A | LH side |
B | RH side |
(a) | Front side of vehicle |
(b) | Vehicle outside |
(c) | 0°±10° |
(d) | End portion of coil spring - rear |
7. Using a hexagon wrench to prevent the shock absorber piston rod from turning, tighten the new self-locking nut with ST.
CAUTION:
Make sure that the shock mount - rear turns smoothly after tightening.
Preparation tool:
ST: STRUT MOUNT SOCKET (20399FG000)
Tightening torque:
25 N·m (2.55 kgf-m, 18.4 ft-lb)
8. Loosen the coil spring compressor carefully.

 Removal
REAR SUSPENSION > Rear Shock AbsorberREMOVAL1. CROSSTREK MODEL1. Disconnect the ground cable from battery. NOTE">2. Lift up the vehicle, and then remove the rear wheels.3. Remove the senso ...
Other materials:
Dtc c0041 ecm
VEHICLE DYNAMICS CONTROL (VDC) (DIAGNOSTICS) > Diagnostic Procedure with Diagnostic Trouble Code (DTC)DTC C0041 ECMDTC detecting condition:Defective VDCCM&H/UTrouble symptom:• ABS does not operate.• EBD does not operate.• VDC does not operate.• EyeSight does not operat ...
Audio system Wiring diagram
WIRING SYSTEM > Audio SystemWIRING DIAGRAM1. 6.2-INCH DISPLAY2. 7 INCH DISPLAY (WITHOUT TELEMATICS)3. 7 INCH DISPLAY (WITH TELEMATICS) ...
Removal
EXTERIOR/INTERIOR TRIM > Roof MoldingREMOVALCAUTION:Be careful not to damage the body.1. Remove the roof rail assembly. (model with roof rail) Roof Rail > REMOVAL">2. Turn over the front end of the molding - roof.3. Slide the inner fastener in the direction of the arrow using a flat t ...
