Subaru Crosstrek Owners Manual: Type D
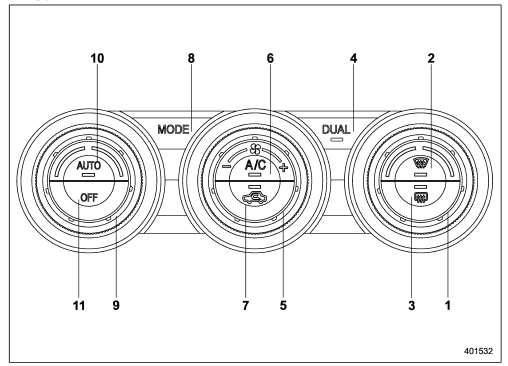
- Temperature control dial (Refer to "Automatic climate control operation (type B, C and D)" F4-7 and/or "Temperature control
- Defroster button (Refer to "Airflow mode selection"
- Rear window defogger button (Refer to "Defogger and deicer"
- DUAL mode button (Refer to ""DUAL" mode (type D)"
- Fan speed control dial (Refer to "Fan speed control"
- Air conditioner button (Refer to "Air conditioner control"
- Air inlet selection button (Refer to "Air inlet selection"
- Airflow mode selection button (Refer to "Airflow mode selection"
- Temperature control dial (Refer to "Automatic climate control operation (type B, C and D)" F4-7 and/or "Temperature control"
- AUTO button (Refer to "Automatic climate control operation (type B, C and D)"
- OFF button (Refer to "Automatic climate control operation (type B, C and D)"
 Type C
Airflow mode selection dial (Refer to
"Airflow mode selection"
Defroster button (Refer to "Airflow mode
selection"
Rear window defogger button (Refer to
"Defogger and deicer"
Fan sp ...
 Automatic climate control operation (type B, C and D)
When this mode is selected, the fan
speed, airflow distribution, air-inlet control,
and air conditioner compressor operation
are automatically controlled. To activate
this mode, perform the follow ...
Other materials:
Towing with all wheels on the ground
1. Release the parking brake and put the
transmission in the "N" position.
2. The ignition switch should be in the
"ON" position while the vehicle is being
towed.
3. Take up slack in the towline slowly to
prevent damage to the vehicle.
WARNING
Never turn the ignition switch to
t ...
Windshield wiper blade rubber
1) Metal support
1. Grasp the locked end of the blade
rubber assembly and pull it firmly until the
stoppers on the rubber are free of the
metal support.
1) Metal spines
2. If the new blade rubber is not provided
with two metal spines, remove the metal
spines from the old blade rubber ...
If you have accidentally triggered the alarm system
To stop the alarm
Do any of the following operations
Press any button on the access key/
remote transmitter.
Turn the ignition switch to the "ON"
position (models without "keyless access
with push-button start system").
Turn the push-button ignition to the
"ACC" position (models wit ...
