
Subaru Crosstrek Owners Manual: SXM setting
1. An option menu screen is displayed
when you touch the tab on the
lower
left side of the screen. The "Options"
screen will appear.
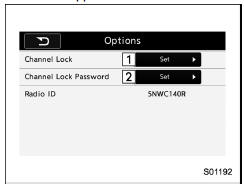
Option menu screen
| No. | Function |
| 1 | Set the lock function of each channel.
Input the password is necessary for operation. |
| 2 | Set the password of the lock function. |
2. A password input screen is displayed when you touch the "Set" key of the Channel Lock function.
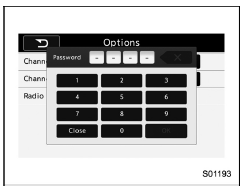
Password input screen
3. When the input password is approved, change to the lock channel selection screen.
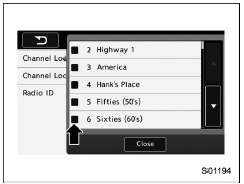
Lock channel selection screen
4. In the channel list, touch the channel that should be locked.
 Direct Tune
1. A channel input screen is displayed
when you touch the tab.
2. Input any number and touch the "OK"
key, receive the channel which input.
...
 Displaying the Radio ID
Each SiriusXM tuner is identified with a
unique radio ID. The "Radio ID" is required
when activating an SiriusXM Satellite
Services or when reporting a problem.
If "Ch 000" is selected using th ...
Other materials:
About HD RadioTM technology (if
equipped)
HD RadioTM Technology is the digital
evolution of analog AM/FM radio. Your
radio product has a special receiver which
allows it to receive digital broadcasts
(where available) in addition to the analog
broadcasts it already receives. Digital
broadcasts have better sound quality than
analog br ...
Installation
FUEL INJECTION (FUEL SYSTEMS)(H4DO) > Front Oxygen (A/F) SensorINSTALLATIONCAUTION:If lubricant is spilt over the exhaust pipe, wipe it off with cloth to avoid emission of smoke or causing a fire.1. Before installing front oxygen (A/F) sensor, apply anti-seize compound only to the threaded portio ...
Removal
WIPER AND WASHER SYSTEMS > Rear Wiper MotorREMOVAL1. Disconnect the ground cable from battery. NOTE">2. Remove the trim panel - rear gate. Rear Gate Trim > REMOVAL">3. Remove the arm assembly - rear wiper.(1) Remove the cover - rear wiper arm.(2) Remove the nut, and remove th ...
