
Subaru Crosstrek Owners Manual: Roof rail
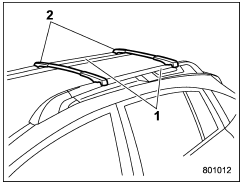
- Roof rail
- Crossbar
Cargo can be carried on the roof after securing the crossbars to the roof rails and installing an appropriate carrying attachment.
When installing crossbars and a carrying attachment, follow the manufacturer's instructions. The roof rail system is designed to carry loads (cargo, crossbars and carrying attachment) of no more than 150 lbs (68 kg). Be sure not to exceed your vehicle's GVWR and GAWR.
CAUTION
- When using a carrying attachment,
make sure that the total
carrying load of the cargo, crossbars
and carrying attachment
does not exceed 150 lbs (68 kg).
Overloading may cause damage to the vehicle.
- For cargo carrying purposes, the roof rails must be used together with the crossbars and any appropriate carrying attachment that may be needed. The roof rails must never be used alone to carry cargo. Otherwise, damage to the roof or paint, or a dangerous road hazard due to loss of cargo could result.
NOTE
Remember that the vehicle's center of gravity is altered with the weight of the load on the roof, thus affecting driving characteristics.
Drive carefully. Avoid rapid starts, hard cornering and abrupt stops. Crosswind effects will be increased.
 GVWR and GAWR (Gross Vehicle Weight Rating and Gross Axle Weight
Rating)
GVWR and GAWR (Gross Vehicle Weight Rating and Gross Axle Weight
Rating)
Certification label
The certification label attached to the
bottom of driver's side door pillar shows
GVWR (Gross Vehicle Weight Rating) and
GAWR (Gross Axle Weight Rating).
The GVW (Gross ...
 Trailer hitch (dealer option)
WARNING
Never exceed the maximum
weight specified for the trailer
hitch. Exceeding the maximum
weight could cause an accident
resulting in serious personal injuries.
Permissible traile ...
Other materials:
Dtc c1342 rl pressure reducing valve
VEHICLE DYNAMICS CONTROL (VDC) (DIAGNOSTICS) > Diagnostic Procedure with Diagnostic Trouble Code (DTC)DTC C1342 RL PRESSURE REDUCING VALVENOTE:For the diagnostic procedure, refer to “DTC C1362 NORMAL CLOSING VALVE 2”. Diagnostic Procedure with Diagnostic Trouble Code (DTC) > DTC C ...
USB memory
Audio files on the USB memory can be
played.
WARNING
Do not operate the player's controls
or connect the USB memory while
driving. Doing so may result in
losing control of your vehicle and
cause an accident or serious injury.
CAUTION
Do not leave your USB memory
in the car. In particul ...
Dtc b1821 open in side airbag rh
AIRBAG SYSTEM (DIAGNOSTICS) > Diagnostic Chart with Trouble CodeDTC B1821 OPEN IN SIDE AIRBAG RHDiagnosis start condition:Ignition voltage is 10 V to 16 V.DTC detecting condition:• Side airbag harness (RH) circuit is open.• Side airbag module (RH) is faulty.• Airbag control modu ...
