Subaru Crosstrek Service Manual: Replacement
DIFFERENTIALS > Rear Differential Front Oil Seal
REPLACEMENT
1. Shift the select lever or gear shift lever to neutral.
2. Release the parking brake.
3. Disconnect the ground cable from battery.
4. Lift up the vehicle.
5. Drain differential gear oil. Differential Gear Oil > REPLACEMENT">
6. Remove the rear exhaust pipe. Rear Exhaust Pipe > REMOVAL">
7. Remove the center exhaust cover.
8. Remove the propeller shaft. Propeller Shaft > REMOVAL">
9. Check the initial torque and write it down.
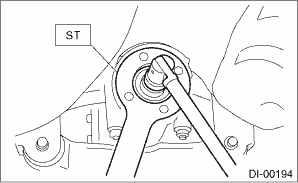
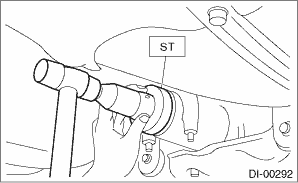
10. Remove the self-locking nut while holding the companion flange with ST.
| ST 498427200 | FLANGE WRENCH |
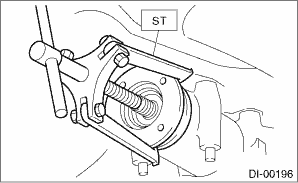
11. Extract the companion flange using the ST.
| ST 399703600 | PULLER ASSY |
12. Remove the oil seal using ST or screwdriver.
| ST 398527700 | PULLER ASSY |
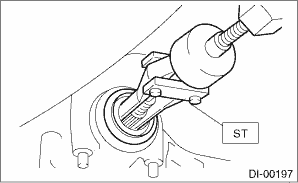
13. Using the ST, install the oil seal.
NOTE:
• Use a new oil seal.
• Apply differential gear oil to the oil seal lips.
| ST 498447120 | INSTALLER |
14. Install the companion flange.
NOTE:
Use a plastic hammer to install companion flange.
15. Tighten the self-locking nut to the specified torque while holding the companion flange with ST.
CAUTION:
Tighten so that the initial torque of companion flange becomes the same as that of before oil seal replacement.
NOTE:
• Use a new self-locking nut.
• Before installing the self-locking nut, apply the seal material to the threads of the drive pinion shaft and to the seating surface of the self-locking nut.
Seal material:
THREE BOND 1324 (Part No. 004403042) or equivalent
Tightening torque:
T-type
167 — 196 N·m (17.0 — 20.0 kgf-m, 123.2 — 144.6 ft-lb)
VA1-type
162 — 220 N·m (16.5 — 22.5 kgf-m, 119.5 — 162.3 ft-lb)
| ST 498427200 | FLANGE WRENCH |
16. Hereafter, perform assembly in the reverse order of disassembly.
17. Fill differential gear oil. Differential Gear Oil > REPLACEMENT">
 Inspection
DIFFERENTIALS > Rear Differential Front Oil SealINSPECTIONMake sure that there is no leakage from front oil seal portion. If there is any leakage, replace the oil seal and inspect the propeller sha ...

Other materials:
Installation
SECURITY AND LOCKS > IG Relay1 (Push Button Start)INSTALLATIONCAUTION:Before handling the airbag system components, refer to “CAUTION” of “General Description” in “AIRBAG SYSTEM”. General Description > CAUTION">Install each part in the reverse order ...
Removal
WIPER AND WASHER SYSTEMS > Front Wiper Motor and LinkREMOVAL1. Disconnect the ground cable from battery. NOTE">2. Remove the arm assembly - windshield wiper. Front Wiper Arm > REMOVAL">3. Remove the cowl panel assembly. Cowl Panel > REMOVAL">CAUTION:Before removin ...
Installation
CONTINUOUSLY VARIABLE TRANSMISSION(TR580) > Front Differential AssemblyINSTALLATION1. Install the front differential assembly to the converter case.NOTE:Be careful not to damage the inside of the case (especially the mounting surface of the differential side retainers).2. Install the bearing oute ...
