Subaru Crosstrek Service Manual: Removal
AIRBAG SYSTEM > Front Door Impact Sensor
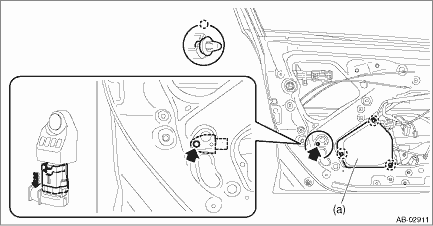
REMOVAL
CAUTION:
Before handling the airbag system components, refer to “CAUTION” of “General Description” in “AIRBAG SYSTEM”. General Description > CAUTION">
1. Operate the power window switch to close the front door glass.
2. Turn the ignition switch to OFF.
3. Disconnect the ground cable from battery and wait for at least 60 seconds before starting work. NOTE">
4. Remove the trim panel - front door. Door Trim > REMOVAL">
5. Remove the sealing cover. Front Sealing Cover > REMOVAL">
6. Remove the front door impact sensor.
(1) Remove the front door inner pad (a).
CAUTION:
If the clip is damaged, replace it with a new part because the panel assembly - front door may be deformed.
(2) Remove the nuts and then remove the front door impact sensor.
(3) Disconnect the airbag connector and remove the front door impact sensor. Airbag Connector > PROCEDURE">
 Installation
AIRBAG SYSTEM > Front Door Impact SensorINSTALLATIONCAUTION:Do not reuse the bolt and nut.Always replace with the specified new bolts and nuts.1. Before installation, inspect the following items an ...
 Front sub sensor
...
Other materials:
Assembly
CONTINUOUSLY VARIABLE TRANSMISSION(TR580) > Transfer ClutchASSEMBLY1. Install the transfer clutch piston.NOTE:Apply CVTF to the transfer clutch piston lip.2. Install the return spring.3. Install the transfer clutch piston seal.NOTE:Apply CVTF to the lip section of transfer clutch piston seal.4. C ...
Note
LIGHTING SYSTEM > Back-up Light SystemNOTEFor operation procedures of each component of the back-up light system, refer to the respective section.• Rear combination light assembly: Rear Combination Light Assembly">• Back-up light bulb: Back-up Light Bulb"> ...
Installation
DIFFERENTIALS > Rear Differential Front MemberINSTALLATION1. Install the rear differential front member, and temporarily attach and tighten a new self-locking nut.2. Remove the transmission jack.3. Tighten the self-locking nut.Tightening torque:T1: 50 N·m (5.1 kgf-m, 36.9 ft-lb)T2: 110 N&m ...
