Subaru Crosstrek Service Manual: Removal
AIRBAG SYSTEM > Curtain Airbag Module
REMOVAL
1. CROSSTREK MODEL
CAUTION:
Before handling the airbag system components, refer to “CAUTION” of “General Description” in “AIRBAG SYSTEM”. General Description > CAUTION">
1. Turn the ignition switch to OFF.
2. Disconnect the ground cable from battery and wait for at least 60 seconds before starting work. NOTE">
3. Remove the trim panel - roof assembly. Roof Trim > REMOVAL">
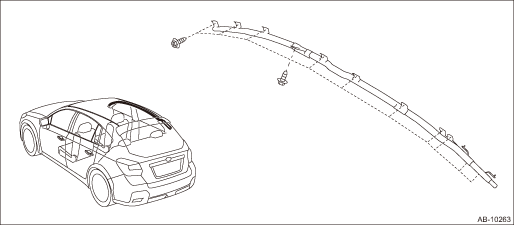
4. Remove the curtain airbag module.
CAUTION:
• Be careful not to damage the curtain airbag module during removal.
• Never open the curtain airbag module before activation. Never reuse the deployed curtain airbag module.
• Remove the modules in order starting from the vehicle front.
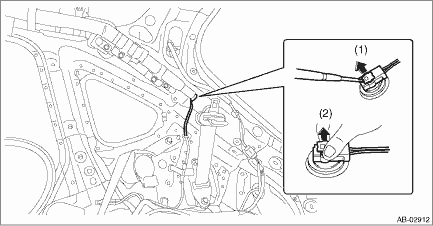
(1) Remove all the bolts and clips, and remove the curtain airbag module.
(2) Disconnect the curtain airbag module connector. Airbag Connector > PROCEDURE">
 Installation
AIRBAG SYSTEM > Curtain Airbag ModuleINSTALLATIONCAUTION:• Before handling the airbag system components, refer to “CAUTION” of “General Description” in “AIRBAG S ...

Other materials:
Check list for interview Check
AIRBAG SYSTEM (DIAGNOSTICS) > Check List for InterviewCHECKCustomer’s NameInspector’s NameDate Vehicle Brought in/ /Registration No. Odometer ReadingkmmilesV.I.N. Date Problem Occurred/ /Registration Year/ /Weather Fine Cloudy Rainy Snowy Others:Temper ...
Installation
FUEL INJECTION (FUEL SYSTEMS)(H4DO) > Fuel Sub Level SensorINSTALLATION1. Install the fuel sub level sensor to the fuel tank.(1) Make sure the sealing portion is free from fuel or foreign matter before installation.(2) Align the cutout (B) as shown in the figure, and install the fuel sub level se ...
Inspection
LIGHTING SYSTEM > Headlight BulbINSPECTION1. HALOGEN TYPECAUTION:• Do not perform work with wet hands, because there is a possibility of electrical shock.• Do not leave the light assembly - head without the bulb and cover - headlight for a long time. Dust, moisture, etc. entering the ...
