Subaru Crosstrek Service Manual: Removal
EXTERIOR/INTERIOR TRIM > Upper Inner Trim
REMOVAL
CAUTION:
• Before handling the airbag system components, refer to “CAUTION” of “General Description” in “AIRBAG SYSTEM”. General Description > CAUTION">
• Airbag system satellite safing sensor is located in the lower of the rear seat cushion center. Be careful not to apply strong impact to the sensor when performing operations, while the rear seat cushion is removed.
1. Disconnect the ground cable from battery and wait for at least 60 seconds before starting work. NOTE">
2. Release the clips and claws, then detach the grille speaker side.
NOTE:
Remove the grille speaker side by using a plastic remover.
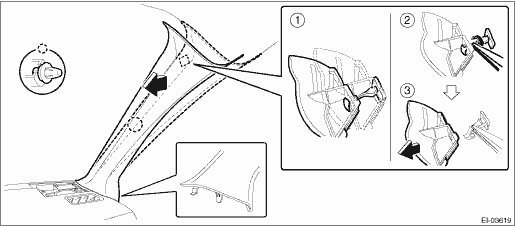
3. Remove the trim panel - front pillar UPR.
(1) Pull the upper part of the trim panel - front pillar UPR towards the center of the vehicle.
(2) Insert long-nose pliers into the top part of the trim, grip the tether clip with the pliers and twist 90° in that position.
CAUTION:
Be careful not to damage the pillar trim surface and curtain airbag module when inserting the pliers.
(3) Holding the tether clip twisted as in the previous step, remove the trim panel - front pillar UPR from the tether clip.
(4) Remove the clips, and remove the trim panel - front pillar UPR.
4. Remove the rear seat cushion assembly. Rear Seat > REMOVAL">
5. Remove the cover side sill - front INN, cover side sill - rear INN, and trim panel - center pillar LWR. Lower Inner Trim > REMOVAL">
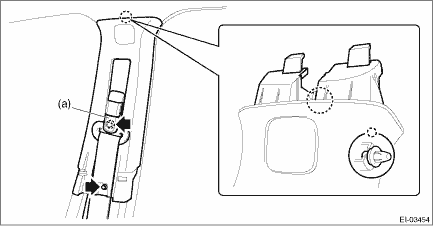
6. Remove the trim panel - center pillar UPR.
(1) Remove the cover through (a), and remove the seat belt anchor bolt.
(2) Remove the bolt on the lower side of the trim panel - center pillar UPR.
(3) Remove the clip by pulling the upper part of the trim toward you, and while lowering the entire trim, remove the trim panel - center pillar UPR.
CAUTION:
Do not reuse the upper clips of the trim panel - center pillar UPR. Once the clip is removed, its holding force is reduced. Be sure to replace it with a new clip.
 Installation
EXTERIOR/INTERIOR TRIM > Upper Inner TrimINSTALLATIONCAUTION:• When reusing the tether clip on the upper part of the trim panel - front pillar UPR, check that there is no damage to the tether ...
 Fuel tank protector Note
EXTERIOR/INTERIOR TRIM > Fuel Tank ProtectorNOTERefer to “FUEL INJECTION” section for removal and installation procedure of the fuel tank protector. (Gasoline engine model) Fuel Tank P ...
Other materials:
MT models
1. Apply the parking brake.
2. Turn off unnecessary lights and accessories.
3. Depress the clutch pedal to the floor
and shift the shift lever into neutral. Hold
the clutch pedal to the floor while starting
the engine.
The starter motor will only operate when
the clutch pedal is depress ...
Windshield wiper blade assembly
1. Raise the wiper arm off the windshield.
1) Stopper
2. Remove the wiper blade assembly by
holding its pivot area and pushing it in the
direction shown by the arrow while depressing
the wiper blade stopper.
3. Install the wiper blade assembly to the
wiper arm. Make sure that it locks i ...
Installation
EMISSION CONTROL (AUX. EMISSION CONTROL DEVICES)(H4DO) > EGR CoolerINSTALLATION1. Set the gasket to the stud bolt.NOTE:Use a new gasket.2. Temporarily tighten the bolts securing the EGR cooler to the EGR control valve and the cylinder head RH, and tighten in numerical order.NOTE:Use a new gasket. ...
