Subaru Crosstrek Service Manual: Removal
EXTERIOR BODY PANELS > Rear Door
REMOVAL
1. REAR DOOR PANEL
1. Disconnect the ground cable from battery. NOTE">
2. Remove the trim panel - rear door. Door Trim > REMOVAL">
3. Remove the sealing cover - rear door. Rear Sealing Cover > REMOVAL">
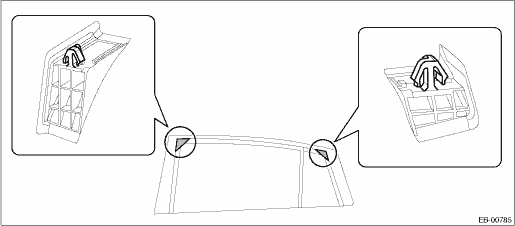
4. Remove the cover B pillar - rear door INN and the cover C pillar - rear door INN.
5. Remove the rear door speaker assembly. Rear Speaker > REMOVAL">
6. Remove the sash COMPL - rear partition and the glass assembly - rear door. Rear Door Glass > REMOVAL">
7. Remove the regulator - rear. Rear Regulator and Motor Assembly > REMOVAL">
8. Remove the latch and actuator assembly - rear. Rear Door Latch and Door Lock Actuator Assembly > REMOVAL">
9. Remove the handle - door outer and the cover - handle rear outer. Rear Outer Handle > REMOVAL">
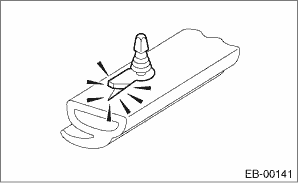
10. Remove the weather strip - rear door.
CAUTION:
If the weather strip clip is removed with excessive force, the weather strip may be damaged. Be sure to use clip remover to remove.
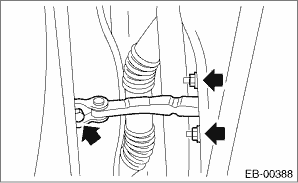
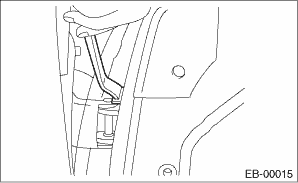
11. Remove the bolts and nuts, and then detach the checker assembly - rear door.
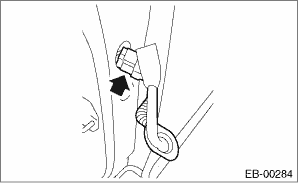
12. Disconnect the rear door harness connectors.
(1) Remove the grommet and pull out the rear door harness connector from inside the center pillar.
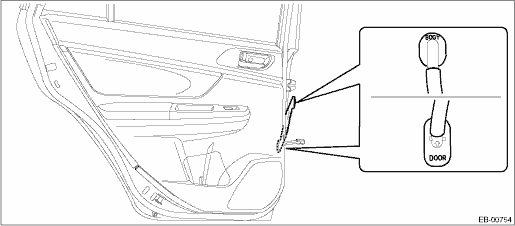
(2) Disconnect the rear door harness connectors.
13. Before removing the panel assembly - rear door, make the following preparations.
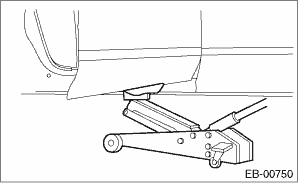
(1) Put a wooden block on a floor jack and place the jack under the panel assembly - rear door.
(2) Support the panel assembly - rear door with the jack to protect it from damage.
CAUTION:
Do not excessively lift the panel assembly - rear door with the floor jack. The door hinges may be damaged.
14. Remove the door-side bolts for the upper hinge - rear door and the lower hinge - rear door to remove the panel assembly - rear door.
CAUTION:
The panel assembly - rear door is heavy. When removing and installing it, always work in a team of two or more persons.
15. Remove the door hinge from vehicle. Rear Door > REMOVAL">
2. REAR DOOR HINGE
1. Open the panel assembly - rear door, and remove the bolts of the upper hinge - rear door or the lower hinge - rear door.
CAUTION:
• Do not remove the upper hinge - rear door and the lower hinge - rear door at the same time.
• Removal and installation of the panel assembly - rear door must be performed with the door closed.
2. Remove the rear door hinge from vehicle.
 Adjustment
EXTERIOR BODY PANELS > Rear DoorADJUSTMENTAdjust the clearance around the panel assembly - rear door as follows.PartStandardAFront door sash to Rear door sash5.5+1.5, −1.0 mm (0.22+0.06, &min ...
 Installation
EXTERIOR BODY PANELS > Rear DoorINSTALLATION1. REAR DOOR PANEL1. Put a wooden block on a jack and place the panel assembly - rear door on it.2. Apply grease to the moving part of door hinges.3. Adj ...
Other materials:
Engine electrical system Wiring diagram
WIRING SYSTEM > Engine Electrical SystemWIRING DIAGRAM1. WITHOUT PUSH BUTTON START2. WITH PUSH BUTTON START ...
Dtc b1828 short in side airbag lh (to +b)
AIRBAG SYSTEM (DIAGNOSTICS) > Diagnostic Chart with Trouble CodeDTC B1828 SHORT IN SIDE AIRBAG LH (TO +B)Diagnosis start condition:Ignition voltage is 10 V to 16 V.DTC detecting condition:• Side airbag harness (LH) is shorted to power supply.• Side airbag module (LH) is faulty.• ...
Shift lock release
If the select lever cannot be operated, turn
the ignition switch back to the "ON"
position then move the select lever to the
"P" position with the select lever button
pressed and brake pedal depressed.
If the select lever does not move after
performing the above procedure, perform
the follo ...
