Subaru Crosstrek Service Manual: Removal
DRIVE SHAFT SYSTEM > Rear Drive Shaft
REMOVAL
1. Disconnect the ground cable from battery. NOTE">
2. Lift up the vehicle, and then remove the rear wheels.
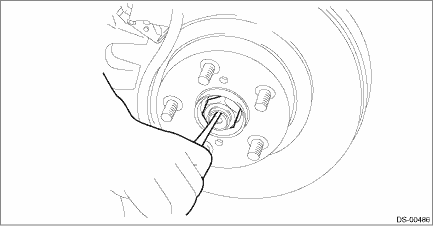
3. Remove the axle nut.
CAUTION:
Do not loosen the axle nut while the rear axle is loaded. Doing so may damage the hub unit bearing.
(1) Lift the crimped section of axle nut.
(2) Remove the axle nut using a socket wrench while depressing the brake pedal.
4. Remove the sensor assembly - headlight beam leveler. (Model with auto headlight beam leveler)
CAUTION:
Do not apply impact to the sensor assembly - headlight beam leveler or forcibly move the arm. Doing so may cause sensor damage and malfunction.
(1) Disconnect the connector of the sensor assembly - headlight beam leveler.
(2) Remove the nuts, and remove the sensor assembly - headlight beam leveler.
5. Drain differential gear oil.
6. Remove the propeller shaft. Propeller Shaft > REMOVAL">
7. Loosen the joint of rear differential assembly and rear drive shaft assembly.
• T type: Pull out the rear drive shaft assembly by fitting the ST to the bolt (a) as shown in the figure.
CAUTION:
Fit the ST to the bolts as shown in the figure to prevent damage of the side bearing retainer.
Preparation tool:
ST: DRIVE SHAFT REMOVER (28099PA100)
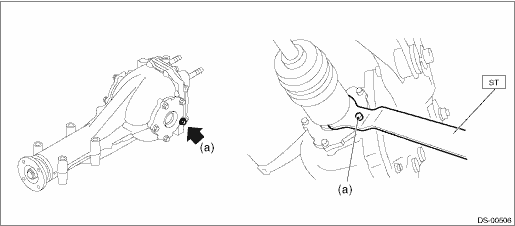
• VA1 type: Pull out the rear drive shaft assembly by fitting the tire lever (b) to the bolt (a) as shown in the figure.
CAUTION:
To prevent damage to the side bearing retainer, use by placing the tire lever against the bolt as shown in the figure.
Preparation tool:
Tire lever

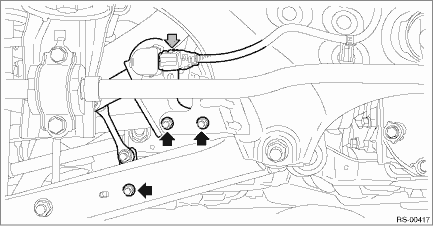
8. Remove the installation section of rear differential assembly.
(1) Support the rear differential assembly with a transmission jack.
(2) Remove the bolts which hold the rear differential front crossmember from the rear sub frame assembly.

(3) Remove the self-locking nuts which hold the rear differential to the rear sub frame assembly.

9. Completely pull out the rear drive shaft assembly while lowering the rear differential.
CAUTION:
Pay attention to avoid damaging the boot of drive shaft.

10. Remove the rear drive shaft assembly from the rear axle housing.
NOTE:
If it is hard to remove, use the ST.
Preparation tool:
ST1: AXLE SHAFT PULLER (926470000)
ST2: AXLE SHAFT PULLER PLATE (28099PA110)

 Assembly
DRIVE SHAFT SYSTEM > Rear Drive ShaftASSEMBLYCAUTION:Wrap shaft splines with vinyl tape to protect the boot from scratches.NOTE:Use specified grease.Grease:BJ, EBJ side: NKG814DOJ side: NKG8141. In ...
 Disassembly
DRIVE SHAFT SYSTEM > Rear Drive ShaftDISASSEMBLY1. Remove the outer race (DOJ) from the shaft assembly.CAUTION:Be careful not to damage the boot.(1) Using a flat tip screwdriver or pliers, loosen t ...
Other materials:
Removal
MANUAL TRANSMISSION AND DIFFERENTIAL(5MT) > Transmission Mounting SystemREMOVAL1. PITCHING STOPPER1. Disconnect the ground cable from battery.2. Remove the clip (A) from the air intake boot.3. Loosen the clamp (B) connecting the air intake boot and air cleaner case (rear).4. Loosen the clamp (C) ...
Inspection
LIGHTING SYSTEM > Rear Height SensorINSPECTION1. Connect three dry cell batteries (1.5 V) in series.NOTE:• Use new dry-cell batteries.• Using a circuit tester, check that the initial voltage of each dry-cell battery is 1.6 V or more. And also check that the voltage of three batteries ...
Regarding access key
CAUTION
If the access key is dropped, the
integrated mechanical key inside
may become loose. Be careful not
to lose the mechanical key.
NOTE
The access key is always communicating
with the vehicle and is continuously
using the battery. Although
the life of the battery varies depending
on t ...
