
Subaru Crosstrek Service Manual: Removal
COOLING(H4DO) > Water Pump
REMOVAL
1. WATER PUMP PULLEY
1. Disconnect the ground cable from battery. NOTE">
2. Remove the V-belt covers.
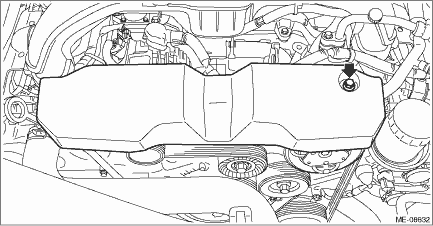
3. Remove the V-belts. V-belt > REMOVAL">
4. Remove the radiator main fan & fan motor assembly. Radiator Main Fan and Fan Motor > REMOVAL">
5. Lift up the vehicle.
6. Remove the under cover. Front Under Cover > REMOVAL">
7. Remove the water pump pulley using the ST.
| ST1 18355AA000 | PULLEY WRENCH |
| ST2 18334AA030 | PULLEY WRENCH PIN SET |
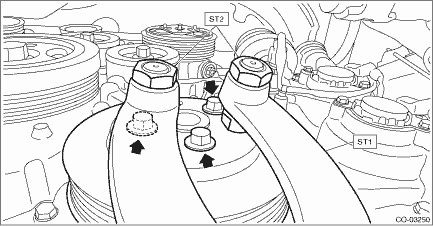
2. WATER PUMP
1. Drain engine coolant. Engine Coolant > REPLACEMENT">
2. Remove the water pump pulley. Water Pump > REMOVAL">
3. Remove the front exhaust pipe. Front Exhaust Pipe > REMOVAL">
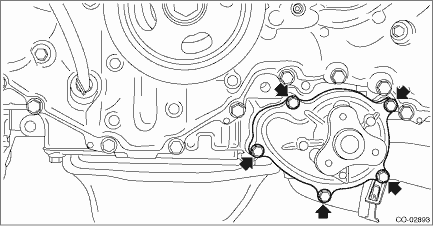
4. Remove the water pump from the oil pan upper.
 Inspection
COOLING(H4DO) > Water PumpINSPECTION1. Check the water pump bearing for smooth rotation.2. Check the water pump pulley for abnormalities.3. Make sure the impeller is not abnormally deformed or dama ...
 Installation
COOLING(H4DO) > Water PumpINSTALLATION1. WATER PUMP PULLEY1. Using the ST, install the water pump pulley.ST1 18355AA000PULLEY WRENCHST2 18334AA030PULLEY WRENCH PIN SETTightening torque:14 N&m ...
Other materials:
Inspection
TELEMATICS SYSTEM (DIAGNOSTICS) > General DescriptionINSPECTION1. BASIC INSPECTIONBefore performing the diagnosis, check the following items which may affect the problems relating to the telematics system.1. Check the battery. Battery">2. Check the relay and fuse condition. Relay and Fu ...
Dtc u0101 lost communication with tcm
KEYLESS ACCESS WITH PUSH BUTTON START SYSTEM (DIAGNOSTICS) > Diagnostic Procedure with Diagnostic Trouble Code (DTC)DTC U0101 LOST COMMUNICATION WITH TCMDetected when CAN data from TCM does not arrive.NOTE:Perform the diagnosis for LAN system. Basic Diagnostic Procedure > PROCEDURE"> ...
Manual seat
Forward and backward adjustment
In the Subaru Ascent, adjusting the seat forward or backward is simple and designed
for precision. Lift the adjustment lever upward and smoothly slide the seat to your
preferred position. Once positioned, release the lever and gently move the seat
back and ...
