Subaru Crosstrek Service Manual: Removal
CLUTCH SYSTEM > Operating Cylinder
REMOVAL
CAUTION:
Brake fluid spilled on the vehicle body will harm the paint surface; therefore, wash it off with water and wipe clean quickly if spilled.
1. Disconnect the ground cable from battery.
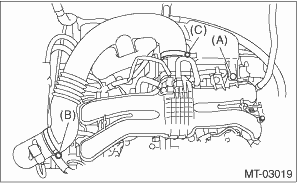
2. Remove the clip (A) from the air intake boot.
3. Loosen the clamp (B) connecting the air intake boot and air cleaner case (rear).
4. Loosen the clamp (C) which connects the air intake boot and throttle body.
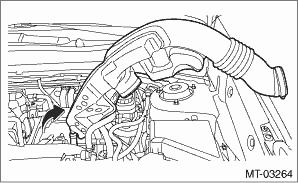
5. Remove the air intake boot from the throttle body, and move it to the left side wheel apron.
6. Disconnect the clutch hose.
CAUTION:
Cover the hose joint to prevent the brake fluid from flowing out.
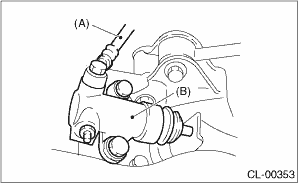
(A) | Clutch hose |
(B) | Operating cylinder |
7. Remove the operating cylinder.

 Assembly
CLUTCH SYSTEM > Operating CylinderASSEMBLYNOTE:During assembly, apply hydraulic oil to all parts.Recommended brake fluid:New FMVSS No. 116 DOT3 or DOT41. Install the piston spring.2. Insert piston ...
 Disassembly
CLUTCH SYSTEM > Operating CylinderDISASSEMBLY1. Remove the boot and push rod.2. Apply compressed air through clutch hose attachment hole.NOTE:Face the piston hole down and place a piece of wood und ...
Other materials:
Spark plugs
It may be difficult to replace the spark
plugs. It is recommended that you have
the spark plugs replaced by your
SUBARU dealer.
The spark plugs should be replaced
according to the maintenance schedule
in the "Warranty and Maintenance Booklet".
CAUTION
Make sure the cables are replaced in
...
Dtc p0131 a/f / o2 sensor circuit low voltage bank 1 sensor 1
ENGINE (DIAGNOSTICS)(H4DO) > Diagnostic Procedure with Diagnostic Trouble Code (DTC)DTC P0131 A/F / O2 SENSOR CIRCUIT LOW VOLTAGE BANK 1 SENSOR 1DTC detecting condition:Immediately at fault recognitionCAUTION:After servicing or replacing faulty parts, perform Clear Memory Mode Clear Memory Mode ...
Dtc u0100 lost communication with ecm/pcm a
TELEMATICS SYSTEM (DIAGNOSTICS) > Diagnostic Procedure with Diagnostic Trouble Code (DTC)DTC U0100 LOST COMMUNICATION WITH ECM/PCM “A”Detected when CAN data from ECM does not arrive.NOTE:Perform the diagnosis for LAN system. Basic Diagnostic Procedure > PROCEDURE"> ...
