Subaru Crosstrek Service Manual: Removal
BRAKE > Rear Disc Brake Assembly
REMOVAL
CAUTION:
Do not allow brake fluid to come in contact with the painted surface of the vehicle body. If it does, wash off with water and wipe away completely.
1. Lift up the vehicle, and then remove the rear wheels.
2. Remove the caliper body assembly from the support - rear disc brake.
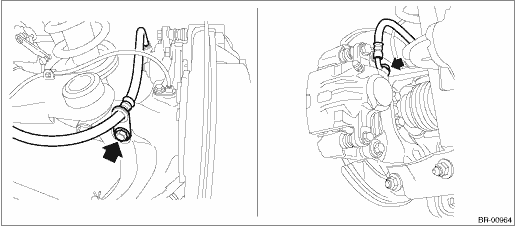
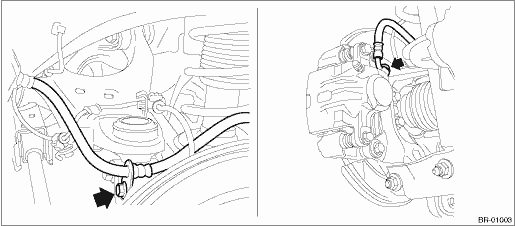
(1) Remove the brake hose bracket and union bolt.
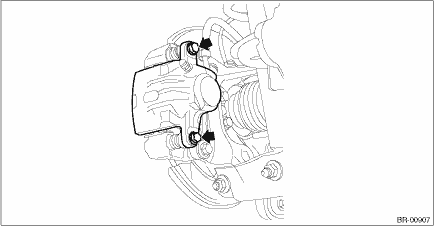
(2) Remove the caliper bolt, and remove the caliper body assembly.
3. Remove the support - rear disc brake.
NOTE:
Remove the support - rear disc brake only when replacing the disc rotor or the support - rear disc brake. It is not necessary to remove it when servicing the caliper body assembly.
(1) Remove the brake pad from support - rear disc brake.
(2) Remove the mounting bolts, and then remove the support - rear disc brake from the housing assembly - rear axle.
 Assembly
BRAKE > Rear Disc Brake AssemblyASSEMBLY1. Before installation, check each part. Rear Disc Brake Assembly > INSPECTION">2. Clean the inside of the caliper body cylinder using brake flui ...
 Disassembly
BRAKE > Rear Disc Brake AssemblyDISASSEMBLYCAUTION:Be careful not to allow foreign matter to enter the brake hose connector.1. Remove mud and foreign matter from the caliper body assembly.2. Remove ...
Other materials:
Dtc p0700 transmission control system (mil request)
ENGINE (DIAGNOSTICS)(H4DO) > Diagnostic Procedure with Diagnostic Trouble Code (DTC)DTC P0700 TRANSMISSION CONTROL SYSTEM (MIL REQUEST)NOTE:For the diagnostic procedure, refer to CVT section. Basic Diagnostic Procedure">1. OUTLINE OF DIAGNOSISJudge as NG when there is CAN communication w ...
Removal
HVAC SYSTEM (HEATER, VENTILATOR AND A/C) > Air Vent GrilleREMOVAL1. CENTER GRILLE ASSEMBLYCAUTION:• Do not put your finger on the fin of the air vent grille. Doing so may damage the fin.• Always pull the center grille assembly toward you slowly. If attempting to remove by turning it u ...
Removal
GLASS/WINDOWS/MIRRORS > Rear Quarter GlassREMOVAL1. Disconnect the ground cable from battery. NOTE">2. Remove the trim panel - rear pillar UPR. Rear Quarter Trim > REMOVAL">3. Remove the glass - rear quarter in the same procedure as for the glass - front window. Windshield G ...
