Subaru Crosstrek Service Manual: Preparation tool
COOLING(H4DO) > General Description
PREPARATION TOOL
1. SPECIAL TOOL
ILLUSTRATION | TOOL NUMBER | DESCRIPTION | REMARKS |
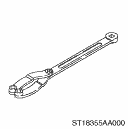
18355AA000
PULLEY WRENCH
• Used for removing and installing water pump pulley.
• Used with PULLEY WRENCH PIN SET (18334AA030).
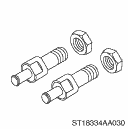
18334AA030
PULLEY WRENCH PIN SET
• Used for removing and installing water pump pulley.
• Used together with PULLEY WRENCH (18355AA000).

—
SUBARU SELECT MONITOR 4
Used for setting of each function and troubleshooting for electrical system.
NOTE:
For detailed operation procedures of Subaru Select Monitor 4, refer to “Application help”.
2. GENERAL TOOL
TOOL NAME | REMARKS |
Circuit tester | Used for measuring resistance, voltage and current. |
Radiator cap tester | Used for checking radiator and radiator cap. |
DST-i | Used together with Subaru Select Monitor 4. |
 Component
COOLING(H4DO) > General DescriptionCOMPONENT1. WATER PUMP(1)Water pump pulley(13)Clip(25)Gasket(2)Water pump ASSY(14)Water pipe hose RH(26)Engine coolant temperature sensor(3)Gasket(15)Water pipe A ...
 Radiator
...
Other materials:
Dtc u0140 lost communication with body control module
EyeSight (DIAGNOSTICS) > Diagnostic Procedure with Diagnostic Trouble Code (DTC)DTC U0140 LOST COMMUNICATION WITH BODY CONTROL MODULEDetected when CAN data from body integrated unit is not transmitted to stereo camera.NOTE:Perform the diagnosis for LAN system. Basic Diagnostic Procedure > PRO ...
Adjustment
FRONT SUSPENSION > Wheel AlignmentADJUSTMENTCAUTION:When the wheel alignment has been adjusted, perform the adjustment of the VDC. VDC Control Module and Hydraulic Control Unit (VDCCM&H/U) > ADJUSTMENT">1. FRONT CAMBER1. Adjust the camber angle to the following value.Tire sizeCamb ...
Specification
VEHICLE DYNAMICS CONTROL (VDC) > ABS Sequence ControlSPECIFICATION1. CONDITIONS FOR COMPLETION OF ABS SEQUENCE CONTROLWhen the following conditions develop, the ABS sequence control stops and ABS operation is returned to the normal control mode.• When the speed of at least one wheel reaches ...
