Subaru Crosstrek Owners Manual: Outside mirrors
Convex mirror (passenger side)
WARNING
Objects look smaller in a convex mirror and farther away than when viewed in a flat mirror. Do not use the convex mirror to judge the distance of vehicles behind you when changing lanes. Use the inside mirror (or glance backwards) to determine the actual size and distance of objects that you view in convex mirror.
Remote control mirror switch
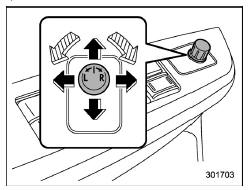
 Select side to adjust
 Direction control
The remote control mirrors operate only when the ignition switch is in the "ON" or "ACC" position.
1. Turn the control switch to the side that you want to adjust. "L" is for the left mirror, "R" is for the right mirror.
2. Move the control switch in the direction you want to move the mirror.
3. Return the control switch to the neutral position to prevent unintentional operation.
The mirrors can also be adjusted manually.
 Inside mirror
The inside mirror has a day and night
position. Pull the tab at the bottom of the
mirror toward you for the night position.
Push it away for the day position. The
night position reduces glar ...
 Defogger and deicer
Rear window defogger
Outside mirror defogger (if equipped)
Windshield wiper deicer (if equipped)
The vehicle is equipped with a rear
window defogger. Some models are also
equipped with ...
Other materials:
Dtc u0140 lost communication with body control module
INSTRUMENTATION/DRIVER INFO (DIAGNOSTICS) > Diagnostic Procedure with Diagnostic Trouble Code (DTC)DTC U0140 LOST COMMUNICATION WITH BODY CONTROL MODULEDetected when CAN data is not received from body integrated unit.NOTE:Perform the diagnosis for LAN system. Basic Diagnostic Procedure > PROC ...
Dtc p0345 camshaft position sensor "a" circuit bank 2
ENGINE (DIAGNOSTICS)(H4DO) > Diagnostic Procedure with Diagnostic Trouble Code (DTC)DTC P0345 CAMSHAFT POSITION SENSOR "A" CIRCUIT BANK 2DTC DETECTING CONDITION:Immediately at fault recognitionTROUBLE SYMPTOM:• Engine stall• Failure of engine to startCAUTION:After servicing ...
Talking on the phone
The call screen opens when you perform
the following operations.
When you accept a call on the incoming
call screen (by selecting the
key),
the call screen opens.
When you are on the outgoing call
screen, the screen changes to the call
screen when the other party answers the ...
