Subaru Crosstrek Owners Manual: Open/close
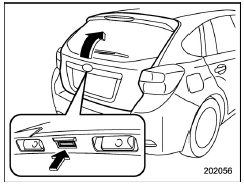
To open: First unlock the rear gate lock then push the rear gate opener button.
To close: Lower the rear gate slowly and push down firmly until the latch engages.
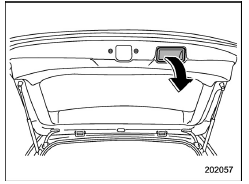
The rear gate can be lowered easily if you pull it down holding the recessed grip.
WARNING
- To prevent dangerous exhaust gas from entering the vehicle, always keep the rear gate closed while driving.
- Do not attempt to shut the rear
gate while holding the recessed
grip. Also avoid closing the rear
gate by pulling on the recessed
grip from inside the cargo space.
There is a danger of your hand being caught and injured.
CAUTION
- Do not jam a plastic bag in or
place cellophane tape on the rear
gate stays or scratch the stays
while loading or unloading cargo.
That could cause leakage of gas from the stays, which may result in their inability to hold the rear gate open.
- Be careful not to hit your head or face on the rear gate when opening or closing the rear gate and when loading or unloading cargo.
NOTE
If the rear gate cannot be unlocked due to a discharged vehicle battery, a malfunction in the door locking/unlocking system or other causes, you can unlock it by manually operating the rear gate lock release lever. For the procedure, refer to "Rear gate - if the rear gate cannot be opened" 9-18.
 Lock/unlock
The rear gate can be locked and unlocked
using any of the following systems
Power door locking switch: Refer to
"Power door locking switches" 2-8.
Keyless access with the push-button
...
 Moonroof (if equipped)
WARNING
Never let anyone's hands, arms,
head or any objects protrude from
the moonroof. A person could be
seriously injured if any of the following
conditions occur.
The vehicle stops suddenl ...
Other materials:
Installation
POWER ASSISTED SYSTEM (POWER STEERING) > Universal JointINSTALLATION1. Before installation, check the universal joint assembly - steering. Universal Joint > INSPECTION">2. Adjust the tilt position of the column assembly - steering to the neutral position and lock the tilt lever.3. Ali ...
Caution
DIFFERENTIALS > General DescriptionCAUTION• When performing any work, always wear work clothes, a work cap and protective shoes. Additionally, wear a helmet, protective goggles, etc. if necessary.• Remove contamination including dirt and corrosion before removal, installation, disasse ...
Inspection
LIGHTING SYSTEM > Hazard SwitchINSPECTION1. Measure the resistance between connector terminals.Preparation tool:Circuit testerTerminal No.Inspection conditionsStandard2 — 3Switch OFF1 M? or moreSwitch ONLess than 1 ?2. Apply battery voltage between the connector terminals to check the lighting ...
