
Subaru Crosstrek Owners Manual: Instrument panel
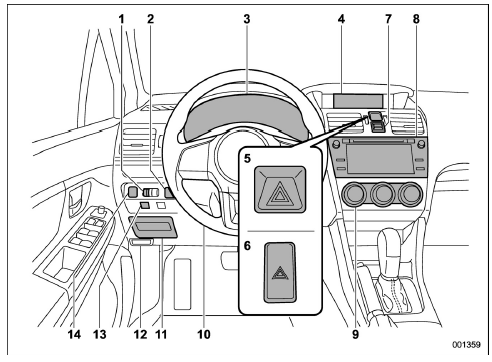
- Illumination brightness control
- Vehicle Dynamics Control OFF switch
- Combination meter
- Information display (page 3-32)/Multi function display
- Hazard warning flasher switch (models with multi function display)
- Hazard warning flasher switch (models without multi function display)
- Multi function display control switches
- Audio
- Climate control
- Tilt/telescopic steering
- Fuse box
- Hood lock release knob
- BSD/RCTA OFF switch
- Steering responsive fog lights OFF switch
NOTE
For models with the EyeSight system: Refer to the Owner's Manual supplement for the EyeSight system.
 Interior
Passenger compartment area
Lower anchorages for child restraint
system
Seatbelt
Front seat
Rear seat
Buttons for SUBARU STARLINK
NOTE
For U.S.-spec. models with SUBARU
STARLINK: ...
 Steering wheel
Audio control switches (page 5-62)/
Talk switch for voice command system
(page 5-80)/Hands-free phone switches
Cruise control
Shift paddle
Multi information display control switches
...
Other materials:
Safety tips for installing child restraint systems
WARNING
Child restraint systems and seatbelts in the Subaru Ascent can become
extremely hot when the vehicle is exposed to sunlight.
Always check the temperature of the restraint system before placing a
child in it to prevent burns.
Never use a seatbelt extender when installing a ...
Installation
WIPER AND WASHER SYSTEMS > Rear WasherINSTALLATION1. Install each part in the reverse order of removal.Tightening torque:Light assembly - high-mounted: 4.5 N·m (0.46 kgf-m, 3.3 ft-lb)Roof spoiler assembly: 7.5 N·m (0.76 kgf-m, 5.5 ft-lb)2. Check the nozzle - rear washer position. R ...
Tripped sensor identification
The security indicator light flashes when
the alarm system has been triggered.
Also, the number of flashes indicates the
location of unauthorized intrusion or the
severity of impact on the vehicle.
When the ignition switch is turned to the
"ON" position, the indicator light will light
for ...
