
Subaru Crosstrek Owners Manual: Installing a booster seat
WARNING
- Child restraint systems and seatbelts can become hot in a vehicle that has been closed up in sunny weather; they could burn a small child. Check the child restraint system before you place a child in it.
- Do not leave an unsecured child
restraint system in your vehicle.
Unsecured child restraint systems can be thrown around inside of the vehicle in a sudden stop, turn or accident; they can strike and injure vehicle occupants as well as result in serious injuries or death to the
child.
CAUTION
When you install a child restraint system, follow the manufacturer's instructions supplied with it. After installing the child restraint system, check to ensure that it is held securely in position. If it is not held tight and secure, the danger of your child suffering personal injury in the event of an accident may be in-creased.
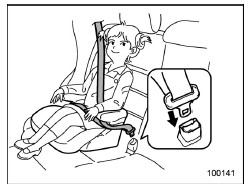
1. Place the booster seat in the rear seating position and sit the child on it. The child should sit well back on the booster seat.
2. Run the lap and shoulder belt through or around the booster seat and the child following the instructions provided by its manufacturer.
3. Insert the tongue plate into the buckle until you hear a click. Take care not to twist the seatbelt.
Make sure the shoulder belt is positioned across the center of child's shoulder and that the lap belt is positioned as low as possible on the child's hips.
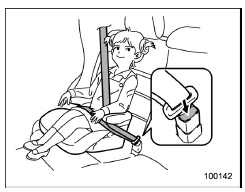
4. To remove the booster seat, press the release button on the seatbelt buckle and allow the belt to retract.
WARNING
- Never use a belt that is twisted or reversed. In an accident, this can increase the risk or severity of injury to the child.
- Never place the shoulder belt under the child's arm or behind the child's back. If an accident occurs, this can increase the risk or severity of injury to the child.
- The seatbelt should fit snugly in
order to provide full restraint.
Loose fitting belts are not as effective in preventing or reducing injury.
- Place the lap belt as low as possible on the child's hips. A high-positioned lap belt will increase the risk of sliding under the lap belt and of the lap belt sliding up over the abdomen, and both can result in serious internal injury or death.
- Make sure the shoulder belt is positioned across the center of child's shoulder. Placing the shoulder belt over the neck may result in neck injury during sudden braking or in a collision.
 Installing forward facing child restraint
WARNING
Before installing a child restraint
system, be sure to confirm that the
seatback is securely locked into
place. Otherwise, in an accident,
serious injury or death could result.
1. Shake ...
 Installation of child restraint systems by use of lower and tether
anchorages (LATCH)
Installation of child restraint systems by use of lower and tether
anchorages (LATCH)
WARNING
Child restraint systems and seatbelts
can become hot in a vehicle
that has been closed up in sunny
weather; they could burn a small
child. Check the child restraint
system before ...
Other materials:
Disabling functions
By operating the access key
If you have registered a PIN code for PIN
Code Access, you can disable the keyless
access function by operating the access
key. For details about registering a PIN
code, refer to "Registering a PIN code"
1. Open the driver's door.
2. Rotate the lock lever forwa ...
Dtc c2221 transmitter 1 pressure data abnormal
TIRE PRESSURE MONITORING SYSTEM (DIAGNOSTICS) > Diagnostic Procedure with Diagnostic Trouble Code (DTC)DTC C2221 TRANSMITTER 1 PRESSURE DATA ABNORMALNOTE:Refer to DTC C2224 for diagnostic procedure. Diagnostic Procedure with Diagnostic Trouble Code (DTC) > DTC C2224 TRANSMITTER 4 PRESSURE DAT ...
Disassembly
MANUAL TRANSMISSION AND DIFFERENTIAL(5MT) > Drive Pinion Shaft AssemblyDISASSEMBLYNOTE:Attach a cloth to the end of driven shaft (on the frictional side of the thrust needle bearing) to prevent damage during disassembly or reassembly.1. Flatten the tab of the lock nut. Remove the lock nut with ST ...
