Subaru Crosstrek Service Manual: Installation
EXTERIOR/INTERIOR TRIM > Instrument Panel Assembly
INSTALLATION
CAUTION:
• Before handling the airbag system components, refer to “CAUTION” of “General Description” in “AIRBAG SYSTEM”. General Description > CAUTION">
• After installing the panel center assembly, check that the air vent grille of the panel center assembly is inserted correctly into the air vent duct.
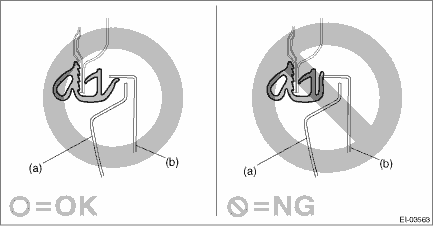
• When installing the cover - instrument panel side (a), make sure that the body side weather strip - flange front does not come inside the panel COMPL - instrument (b).
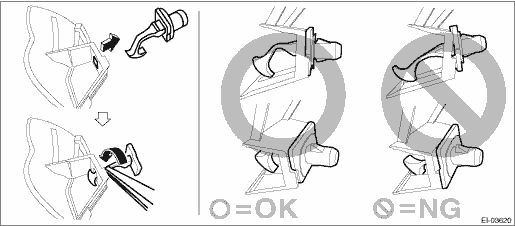
• When reusing the tether clip on the upper part of the trim panel - front pillar UPR, check that there is no damage to the tether clip. If the tether clip is damaged, always replace it with a new tether clip. If the tether clip is damaged, its holding force is reduced and the trim panel - front pillar UPR may come off.
• Do not reuse the tether clip removed from the upper part of the trim panel - front pillar UPR. Always replace with a new part.
• Check the installation status of the tether clips and install the trim panel - front pillar UPR.
1. Attach components until the instrument panel assembly is formed, in the reverse order of removal.
NOTE:
Method of installing insulator
• Adhesive
Use polyurethane adhesive. When assembling the instrument panel assembly, wait until the adhesive has evaporated to prevent filling of the smell in the compartment.
• Double-sided tape
Use commercial double-sided tape. (Use strong double-sided adhesive tape.)
2. Insert the matching pins on the body side (three locations - one in the center and the remaining two on both sides) into the instrument panel assembly and the beam COMPL - steering.
3. Check that the matching pins are inserted securely, and then route the harness.
4. Install the sunload sensor and the grille - front defroster.
5. Secure the instrument panel assembly and the beam COMPL - steering to the vehicle body.
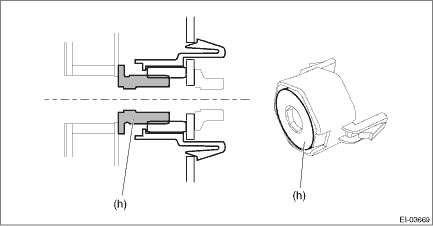
(1) Position the instrument panel assembly and the beam COMPL - steering to the vehicle body and tighten the adjuster - clip space.
Preparation tool:
Hexagon wrench: 8 mm (0.31 in)
NOTE:
Tighten so that there is no gap between the adjuster portion (h) and the body.
Tightening torque:
Adjuster - clip space: 0.8 — 4 N·m (0.08 — 0.41 kgf-m, 0.6 — 2.95 ft-lb)
(2) Temporarily tighten the bolts (a), (b), (c) and (d) of the beam COMPL - steering.
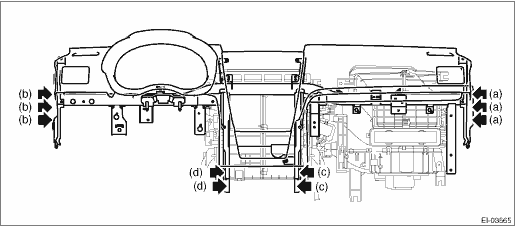
(3) Tighten the beam COMPL - steering in the order from (a) to (d) to the specified torque.
Tightening torque:
Beam COMPL - steering: 25 N·m (2.55 kgf-m, 18.4 ft-lb)
Passenger’s airbag module: 7.5 N·m (0.76 kgf-m, 5.5 ft-lb)
6. Install each part in the reverse order of removal.
Tightening torque:
Column assembly - steering: General Description > COMPONENT">
Knee airbag module: 7.5 N·m (0.76 kgf-m, 5.5 ft-lb)
Console box assembly: 6.5 N·m (0.66 kgf-m, 4.8 ft-lb)

 Removal
EXTERIOR/INTERIOR TRIM > Instrument Panel AssemblyREMOVALCAUTION:• Before handling the airbag system components, refer to “CAUTION” of “General Description” in “ ...
Other materials:
Wiring diagram
LIGHTING SYSTEM > Front Fog Light SystemWIRING DIAGRAMRefer to “Front Fog Light System” in the wiring diagram.• Model without SRF: Front Fog Light System > WIRING DIAGRAM">• Model with SRF: Front Fog Light System > WIRING DIAGRAM"> ...
Inspection
SECURITY AND LOCKS > Ignition Key LockINSPECTIONPreparation tool:Circuit tester1. Check the resistance between switch terminals.Terminal No.Inspection conditionsStandardBetween all terminals(A)LOCK1 M? or more2 — 4(B)ACCLess than 1 ?1 — 2 — 45 — 6(C)ONLess than 1 ?1 — 3 — 45 — 6 — ...
Dtc p0134 a/f / o2 sensor circuit no activity detected bank 1 sensor 1
ENGINE (DIAGNOSTICS)(H4DO) > Diagnostic Procedure with Diagnostic Trouble Code (DTC)DTC P0134 A/F / O2 SENSOR CIRCUIT NO ACTIVITY DETECTED BANK 1 SENSOR 1DTC detecting condition:Immediately at fault recognitionCAUTION:After servicing or replacing faulty parts, perform Clear Memory Mode Clear Mem ...
