Subaru Crosstrek Service Manual: Inspection
CONTINUOUSLY VARIABLE TRANSMISSION(TR580) > Transfer Clutch
INSPECTION
• Inspect the drive plate facing for wear and damage.
• Driven plate for discoloration (burned color)
• Make sure the snap ring is not worn and the return spring has no permanent distortion, damage, or deformation.
• Check the lip seal for damage.
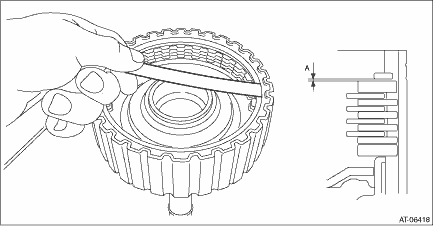
• Inspect the extension end play, and adjust it to within the standard value. Transfer Clutch > ADJUSTMENT">
1. Before measuring clearance “A” between snap ring and driven plate, place same thickness shims on both sides to prevent the plate from tilting.
2. When clearance “A” exceeds the limit for use, replace the drive plate and driven plate as a set, and select the pressure plate within the initial specified value.
Initial standard:
0.7 — 1.1 mm (0.028 — 0.043 in)
Limit thickness:
1.3 mm (0.051 in)

3. Check for tight corner braking phenomenon when the vehicle is moved forward with the steering fully turned. If tight corner braking occurs, perform the following procedures.
(1) With the steering wheel held at fully turned position, drive the vehicle in “D” range and with vehicle speed at approx. 5 km/h (3 MPH) in both clockwise and counterclockwise directions for approx. ten times each, while repeating acceleration and braking intermittently.
(2) If the tight corner braking phenomenon still persists, drive the vehicle again in a circle for several laps.
 Disassembly
CONTINUOUSLY VARIABLE TRANSMISSION(TR580) > Transfer ClutchDISASSEMBLY1. Remove the snap ring, and then remove the pressure plate, drive plate and driven plate.(A)Snap ring2. Compress the return sp ...
 Installation
CONTINUOUSLY VARIABLE TRANSMISSION(TR580) > Transfer ClutchINSTALLATION1. Install the thrust bearing.NOTE:Make sure to install in the right direction.2. Install the transfer clutch assembly.3. Sele ...
Other materials:
Installation
MECHANICAL(H4DO) > Cam CarrierINSTALLATION1. CAM CARRIER RH1. Insert the steel rods into ST, and set the engine so that the camshaft RH is facing up.CAUTION:• If the engine is standing on one side without inserting the steel rod into ST, engine may lose balance and fall down. Be sure to ins ...
Removal
CONTINUOUSLY VARIABLE TRANSMISSION(TR580) > Inhibitor SwitchREMOVAL1. Shift the select lever to “N” range.2. Disconnect the ground cable from battery. NOTE">NOTE:For model with battery sensor, disconnect the ground terminal from battery sensor.3. Lift up the vehicle.4. Remove ...
List
TELEMATICS SYSTEM (DIAGNOSTICS) > Diagnostics with PhenomenonLISTNo.SymptomsReference1The system does not notify the Telematics Service Provider Center automatically after collision. Diagnostics with Phenomenon > INSPECTION">2The system does not notify the center even if the SOS button ...
