Subaru Crosstrek Owners Manual: Front towing hook
1. Take the towing hook and screwdriver out of the tool bucket. Take the jack handle out of the cargo area.
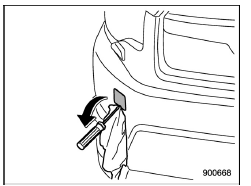
2. Cover the tip of a flat-head screwdriver with vinyl tape or cloth so that it will not scratch the bumper. Insert the flat-head screwdriver into the cutout of the cover and pry open the cover.
3. Screw the towing hook into the thread hole until its thread can no longer be seen.

4. Tighten the towing hook securely using the jack handle.
After towing, remove the towing hook from the vehicle and stow it in the tool bucket.
Fit the towing hook cover on the bumper.
WARNING
- Do not use the towing hook for purposes other than towing your vehicle.
- Be sure to remove the towing hook after towing. Leaving the towing hook mounted on the vehicle could interfere with proper operation of the SRS airbag system in a frontal collision.
 Towing hooks and tie-down hooks/holes
The towing hooks should be used only in
an emergency (e.g., to free a stuck vehicle
from mud, sand or snow).
CAUTION
Use only the specified towing
hooks and tie-down hooks/holes.
Never us ...
 Rear towing hook
1. Take the towing hook and screwdriver
out of the tool bucket. Take the jack
handle out of the cargo area.
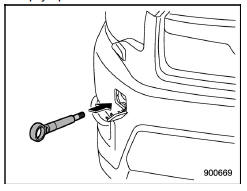
2. Pry off the cover on the rear bumper
using a screwdriver, and you will find a
th ...
Other materials:
Folding down the seatback
WARNING
Never allow passengers to sit on folded seatbacks or remain in the cargo
area of the Subaru Ascent, as this can lead to serious injury or death.
Secure long items such as skis or equipment properly to prevent them
from moving freely and causing injury during sudden stops or maneu ...
Locking the doors
Press the lock/arm button to lock all doors
and rear gate. An electronic chirp will
sound once and the hazard warning
flashers will flash once.
If any of the doors (or the rear gate) is not
fully closed, the following will occur to alert
you that the doors (or the rear gate) are
not properl ...
Installation
BRAKE > Master CylinderINSTALLATION1. Replace the seal sub assembly for the master cylinder assembly with a new part.CAUTION:Be careful not to install the seal sub assembly in the wrong location.(a)Primary piston(b)Seal sub ASSY(c)Install the seal sub assembly to this surface.2. Install each part ...
