Subaru Crosstrek Owners Manual: Engine hood
CAUTION
- When you open the engine hood,
do not stand the wiper blades up.
Furthermore, while the hood is open, do not operate the windshield wipers. Doing so could result in damage to the engine hood and wiper blades.
- Be extremely careful not to catch fingers or other objects when closing the engine hood.
- Do not push the hood forcibly to close it. It could deform the metal.
- Be extremely careful opening the engine hood when the wind is strong. The engine hood could close suddenly, possibly causing injuries from slamming.
- Do not install accessories other than genuine SUBARU parts to the engine hood. If the engine hood becomes too heavy, the stay may not be able to support holding it open.
To open the hood:
1. If the wiper blades are lifted off the windshield, return them to their original position.
2. Pull the hood release knob under the instrument panel.
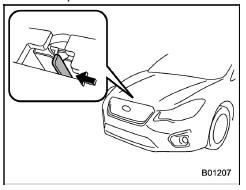
3. Release the secondary hood release by moving the lever between the front grille and the hood toward the left.
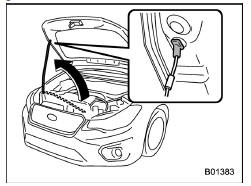
4. Lift up the hood, release the hood prop from its retainer and put the end of the hood prop into the slot in the hood.
To close the hood:
1. Lift the hood slightly and remove the hood prop from the slot in the hood and return the prop to its retainer.
2. Lower the hood to a height of approximately 5.9 in (15 cm) above its closed position and then let it drop.
3. After closing the hood, be sure the hood is securely locked.
If this does not close the hood, release it from a slightly higher position.
WARNING
Always check that the hood is properly locked before you start driving. If it is not, it might fly open while the vehicle is moving and block your view, which may cause an accident and serious bodily injury.
 When checking or servicing in the engine compartment
CAUTION
Do not contact the drive belt
cover while checking the components
in the engine compartment.
Doing so may cause your
hand to slip off the cover and
result in an unexpected ...
 Engine compartment overview
Brake fluid reservoir/Clutch fluid reservoir
(MT)
Fuse box
Battery
Windshield washer tank
Engine oil filler cap
Engine coolant reservoir
Radiator cap
Engine oil filter
Engine ...
Other materials:
Removal
HVAC SYSTEM (HEATER, VENTILATOR AND A/C) > Heater and Cooling UnitREMOVALCAUTION:Before handling the airbag system components, refer to “CAUTION” of “General Description” in “AIRBAG SYSTEM”. General Description > CAUTION">1. Disconnect the ground ca ...
Inspection
WIPER AND WASHER SYSTEMS > Rear WasherINSPECTION1. VISUAL INSPECTIONCheck for the following items, and if any malfunction is found, replace the corresponding part.• Make sure the nozzle - rear washer and the hose - rear washer are not clogged.• Make sure the hose - rear washer is not ...
Dtc b2782 steering lock drive request signal correlation
KEYLESS ACCESS WITH PUSH BUTTON START SYSTEM (DIAGNOSTICS) > Diagnostic Procedure with Diagnostic Trouble Code (DTC)DTC B2782 STEERING LOCK DRIVE REQUEST SIGNAL CORRELATIONDTC detecting condition:When the open or short circuit in the steering lock motor power supply circuit is detected.Trouble sy ...
