Subaru Crosstrek Service Manual: Dtc b1836 open in curtain airbag lh squib circuit
AIRBAG SYSTEM (DIAGNOSTICS) > Diagnostic Chart with Trouble Code
DTC B1836 OPEN IN CURTAIN AIRBAG LH SQUIB CIRCUIT
Diagnosis start condition:
Ignition voltage is 10 V to 16 V.
DTC detecting condition:
• Curtain airbag harness (LH) circuit is open.
• Curtain airbag module (LH) is faulty.
• Airbag control module is faulty.
CAUTION:
Before performing diagnosis, refer to “CAUTION” in “General Description”. General Description > CAUTION">
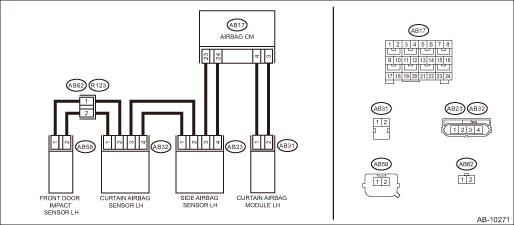
Wiring diagram:
Airbag system Airbag System > WIRING DIAGRAM">
| STEP | CHECK | YES | NO |
1.CHECK POOR CONTACT OF CONNECTORS.
Check for poor contact of the connectors between the airbag control module, curtain airbag module LH and the curtain airbag sensor LH.
Is there poor contact?
Replace the airbag rear harness along with body harness.
Diagnostic Chart with Trouble Code > DTC B1836 OPEN IN CURTAIN AIRBAG LH SQUIB CIRCUIT">Go to Step 2.
2.CHECK CURTAIN AIRBAG MODULE.
1) Turn the ignition switch to OFF, disconnect the battery ground cable, and wait for 60 seconds or more.
2) Disconnect the connector (AB31) from curtain airbag module (LH).
3) Connect the connector (1N) in the test harness N to the connector (AB31).
4) Connect the airbag resistor to the connector (2N) of test harness N.
5) Connect the battery ground terminal and turn the ignition switch to ON.
Does the airbag warning light illuminate for 6 seconds and go off?
Replace the curtain airbag module (LH). Curtain Airbag Module">
Diagnostic Chart with Trouble Code > DTC B1836 OPEN IN CURTAIN AIRBAG LH SQUIB CIRCUIT">Go to Step 3.
3.CHECK AIRBAG REAR HARNESS (CURTAIN AIRBAG MODULE HARNESS LH).
1) Turn the ignition switch to OFF, disconnect the battery ground cable, and wait for 60 seconds or more.
2) Disconnect the connector (AB21) from seat belt pretensioner (LH).
3) Disconnect connector (AB19) from side airbag module (LH).
4) Disconnect the airbag resistor from test harness N.
5) Disconnect the connectors (AB6, AB17, AB18) from airbag control module.
6) Connect the connector (1AG) in the test harness AG to the connectors (AB6, AB17, AB18).
7) Measure the resistance between connector (6AG) in the test harness AG and connector (2N) in the test harness N.
Connector & terminal
(6AG) No. 1 — (2N) No. 2:
(6AG) No. 3 — (2N) No. 1:
Is the resistance less than 10 ??
Diagnostic Chart with Trouble Code > DTC B1836 OPEN IN CURTAIN AIRBAG LH SQUIB CIRCUIT">Go to Step 4.
Replace the airbag rear harness along with body harness.
4.CHECK AIRBAG CONTROL MODULE.
1) Connect all connectors.
2) Clear the memory. Clear Memory Mode">
3) Perform the Inspection Mode. Inspection Mode">
4) Read the DTC. (Current malfunction) Read Diagnostic Trouble Code (DTC)">
Is DTC B1836 displayed?
Replace the airbag control module. Airbag Control Module">
Diagnostic Chart with Trouble Code > DTC B1836 OPEN IN CURTAIN AIRBAG LH SQUIB CIRCUIT">Go to Step 5.
5.CHECK FOR ANY OTHER DTC ON DISPLAY.
Is any other DTC displayed?
Check DTC using “List of Diagnostic Trouble Code (DTC)”. List of Diagnostic Trouble Code (DTC)">
Finish the diagnosis.
 Dtc b1835 short in curtain airbag lh squib circuit
AIRBAG SYSTEM (DIAGNOSTICS) > Diagnostic Chart with Trouble CodeDTC B1835 SHORT IN CURTAIN AIRBAG LH SQUIB CIRCUITDiagnosis start condition:Ignition voltage is 10 V to 16 V.DTC detecting condition: ...
 Dtc b1837 short in curtain airbag lh squib circuit (to ground)
AIRBAG SYSTEM (DIAGNOSTICS) > Diagnostic Chart with Trouble CodeDTC B1837 SHORT IN CURTAIN AIRBAG LH SQUIB CIRCUIT (TO GROUND)Diagnosis start condition:Ignition voltage is 10 V to 16 V.DTC detectin ...
Other materials:
Shift lock function
The shift lock function helps prevent the
improper operation of the select lever.
The select lever cannot be operated
unless the ignition switch is turned to the
"ON" position and the brake pedal is
depressed.
The select lever cannot be moved from
the "P" position to any other positio ...
Dtc b2a09 i-call button circuit
TELEMATICS SYSTEM (DIAGNOSTICS) > Diagnostic Procedure with Diagnostic Trouble Code (DTC)DTC B2A09 I-CALL BUTTON CIRCUITDiagnosis start condition:When ignition switch is ON.DTC detecting condition:The following conditions occur for at least 50 ms.• i-button impedance is more than 10 k?.&bul ...
Accessory power outlets
Power outlet below the climate control dials
Power outlet in the center console
Accessory power outlets are provided
below the climate control dials and in the
center console. Electrical power (12V DC)
from the battery is available at any of the
outlets when the ignition switch is in e ...
