
Subaru Crosstrek Service Manual: Dtc b1823 short in side airbag rh (to +b)
AIRBAG SYSTEM (DIAGNOSTICS) > Diagnostic Chart with Trouble Code
DTC B1823 SHORT IN SIDE AIRBAG RH (TO +B)
Diagnosis start condition:
Ignition voltage is 10 V to 16 V.
DTC detecting condition:
• Side airbag harness (RH) is shorted to power supply.
• Side airbag module (RH) is faulty.
• Airbag control module is faulty.
CAUTION:
Before performing diagnosis, refer to “CAUTION” in “General Description”. General Description > CAUTION">
Wiring diagram:
Airbag system Airbag System > WIRING DIAGRAM">
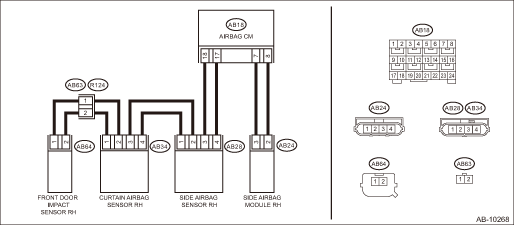
| STEP | CHECK | YES | NO |
1.CHECK POOR CONTACT OF CONNECTORS.
Check for poor contact of the connectors between the airbag control module, side airbag module RH and the side airbag sensor RH.
Is there poor contact?
Replace the airbag rear harness along with body harness.
Diagnostic Chart with Trouble Code > DTC B1823 SHORT IN SIDE AIRBAG RH (TO +B)">Go to Step 2.
2.CHECK SIDE AIRBAG MODULE.
1) Turn the ignition switch to OFF, disconnect the battery ground cable, and wait for 60 seconds or more.
2) Disconnect the connector (AB24), and connect the connector (1AJ) in test harness AJ to connector (AB24).
3) Connect the airbag resistor to the test harness AJ connector (3AJ).
4) Connect the battery ground terminal and turn the ignition switch to ON.
Does the airbag warning light illuminate for six seconds and go off?
Replace the side airbag module (RH). Side Airbag Module > REMOVAL">
Diagnostic Chart with Trouble Code > DTC B1823 SHORT IN SIDE AIRBAG RH (TO +B)">Go to Step 3.
3.CHECK AIRBAG REAR HARNESS (SIDE AIRBAG MODULE HARNESS RH).
1) Turn the ignition switch to OFF, disconnect the battery ground cable, and wait for 60 seconds or more.
2) Disconnect the connector (AB26) from seat belt pretensioner (RH).
3) Disconnect the connector (AB33) from curtain airbag module (RH).
4) Disconnect the airbag resistor from test harness.
5) Disconnect the connectors (AB6, AB17, AB18) from airbag control module.
6) Connect the connector (1AG) in the test harness AG to the connectors (AB6, AB17, AB18).
7) Connect the battery ground terminal and turn the ignition switch to ON.
8) Measure the voltage between connector (5AG) in the test harness AG and chassis ground.
Connector & terminal
(5AG) No. 5 (+) — Chassis ground (−):
(5AG) No. 7 (+) — Chassis ground (−):
Is the voltage less than 1 V?
Diagnostic Chart with Trouble Code > DTC B1823 SHORT IN SIDE AIRBAG RH (TO +B)">Go to Step 4.
Replace the airbag rear harness along with body harness.
4.CHECK AIRBAG CONTROL MODULE.
1) Connect all connectors.
2) Clear the memory. Clear Memory Mode">
3) Perform the Inspection Mode. Inspection Mode">
4) Read the DTC. (Current malfunction) Read Diagnostic Trouble Code (DTC)">
Is DTC B1823 displayed?
Replace the airbag control module. Airbag Control Module">
Diagnostic Chart with Trouble Code > DTC B1823 SHORT IN SIDE AIRBAG RH (TO +B)">Go to Step 5.
5.CHECK FOR ANY OTHER DTC ON DISPLAY.
Is any other DTC displayed?
Check DTC using “List of Diagnostic Trouble Code (DTC)”. List of Diagnostic Trouble Code (DTC)">
Finish the diagnosis.
 Dtc b1822 short in side airbag rh (to ground)
AIRBAG SYSTEM (DIAGNOSTICS) > Diagnostic Chart with Trouble CodeDTC B1822 SHORT IN SIDE AIRBAG RH (TO GROUND)Diagnosis start condition:Ignition voltage is 10 V to 16 V.DTC detecting condition:&bull ...
 Dtc b1825 short in side airbag lh
AIRBAG SYSTEM (DIAGNOSTICS) > Diagnostic Chart with Trouble CodeDTC B1825 SHORT IN SIDE AIRBAG LHDiagnosis start condition:Ignition voltage is 10 V to 16 V.DTC detecting condition:• Side airb ...
Other materials:
Dtc p014c a/f / o2 sensor slow response - rich to lean bank 1 sensor 1
ENGINE (DIAGNOSTICS)(H4DO) > Diagnostic Procedure with Diagnostic Trouble Code (DTC)DTC P014C A/F / O2 SENSOR SLOW RESPONSE - RICH TO LEAN BANK 1 SENSOR 1DTC DETECTING CONDITION:Detected when two consecutive driving cycles with fault occur.CAUTION:After servicing or replacing faulty parts, perfor ...
Ventilator control
Center and side ventilators
Center ventilators
Open
Close
Side ventilators
Open
Close
To adjust the flow direction, move the tab.
To open or close the ventilator, turn the
thumb-wheel up or down. ...
Connecting and disconnecting a USB memory/portable device
The USB port and the AUX jack are
located as shown in the following illustration.
NOTE
This unit does not support commercially
available USB hubs.
Turn on the power of the device
when it is not turned on.
This device has a USB port for USB
memory/portable device.
For compatible ...
