Subaru Crosstrek Service Manual: Disassembly
REAR SUSPENSION > Rear Shock Absorber
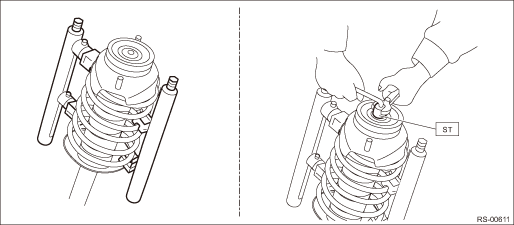
DISASSEMBLY
1. Using a coil spring compressor, compress the coil spring.
2. Using a hexagon wrench to prevent the shock absorber piston rod from turning, remove the self-locking nut with ST.
CAUTION:
When installing the coil spring compressor to the coil spring, follow the operation manual accompanied with the coil spring compressor during operation.
Preparation tool:
ST: STRUT MOUNT SOCKET (20399FG000)
NOTE:
The installing position of coil spring compressor varies depending on the coil spring shape and winding number.
3. Remove the rubber seat - shock UPR and shock mount - rear from the shock absorber COMPL - rear.
4. Gradually decrease the compression pressure of compressor, and remove the coil spring - rear.
5. Remove the helper - rear and the dust cover - rear shock.
 Removal
REAR SUSPENSION > Rear Shock AbsorberREMOVAL1. CROSSTREK MODEL1. Disconnect the ground cable from battery. NOTE">2. Lift up the vehicle, and then remove the rear wheels.3. Remove the senso ...
 Disposal
REAR SUSPENSION > Rear Shock AbsorberDISPOSALCAUTION:• Before discarding the strut COMPL and the shock absorber COMPL, be sure to wear goggles to protect eyes from gas, oil and cutting powder ...
Other materials:
Preparation tool
VEHICLE DYNAMICS CONTROL (VDC) > General DescriptionPREPARATION TOOL1. SPECIAL TOOLILLUSTRATIONTOOL NUMBERDESCRIPTIONREMARKS — SUBARU SELECT MONITOR 4Used for setting of each function and troubleshooting for electrical system.NOTE:For detailed operation procedures of Subaru Select Monitor 4, re ...
Precautions against vehicle modification
WARNING
To avoid accidental activation of the
system or rendering the system
inoperative, which may result in
serious injury, no modifications
should be made to any components
or wiring of the SRS airbag system.
This includes following modifications.
Installation of custom steering
wh ...
Inspection
FUEL INJECTION (FUEL SYSTEMS)(H4DO) > Tumble Generator Valve AssemblyINSPECTION1. CHECK MOTOR1. Connect the battery positive terminal to terminal No. 5 and the battery ground terminal to terminal No. 4, and check that the valve is fully opened on LH side and the valve is fully closed on RH side.C ...
