
Subaru Crosstrek Owners Manual: Checking the oil level
1. Park the vehicle on a level surface and turn the ignition switch to the "LOCK"/ "OFF" position. If you check the oil level just after turning the ignition switch to the "LOCK"/"OFF" position, wait a few minutes for the oil to drain back into the oil pan before checking the level.
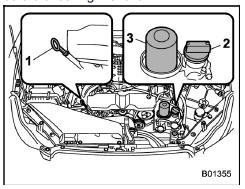
- Oil level gauge
- Oil filler cap
- Oil filter
CAUTION
If the level gauge cannot be pulled out easily, twist the level gauge right and left, then gently pull it out.
Otherwise, you may be injured accidentally straining yourself.
2. Pull out the level gauge, wipe it clean, and insert it again.
3. Be sure the level gauge is correctly inserted until it stops.
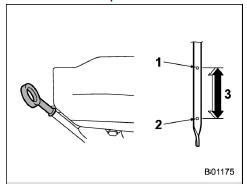
- Full level
- Low level
- Approximately 1.1 US qt (1.0 liter, 0.9 Imp qt) from low level to full level
4. Pull out the oil level gauge again.
5. Check the oil levels on both sides of the level gauge. The engine oil level must be judged by the lowest of the two levels.
If the oil level is below the low level mark, add oil so that the full level is reached.
CAUTION
- Be careful not to touch the engine oil filter when removing the oil filler cap. Doing so may result in a burn, a pinched finger, or may cause some other injury.
- Use only engine oil with the recommended grade and viscosity.
- Be careful not to spill engine oil when adding it. If oil touches the exhaust pipe, it may cause a bad smell, smoke, and/or a fire. If engine oil gets on the exhaust pipe, be sure to wipe it off.
To add engine oil, remove the engine oil filler cap and slowly pour engine oil through the filler neck. After pouring oil into the engine, you must use the level gauge to confirm that the oil level is correct.
NOTE
To prevent overfilling the engine oil, do not add any additional oil above the upper level when the engine is cold.
 Engine oil consumption
Some engine oil will be consumed while
driving. The rate of consumption can be
affected by such factors as transmission
type, driving style, terrain and temperature.
Under the following conditio ...
 Changing the oil and oil filter
Change the oil and oil filter according to
the maintenance schedule in the "Warranty
and Maintenance Booklet".
The engine oil and oil filter must be
changed more frequently than listed in
the m ...
Other materials:
List of diagnostic trouble code (dtc) List
Blind Spot Detection/Rear Cross Traffic Alert (DIAGNOSTICS) > List of Diagnostic Trouble Code (DTC)LISTDTCItemReferenceB2300REAR RADAR CIRCUIT LOW Diagnostic Procedure with Diagnostic Trouble Code (DTC) > DTC B2300 REAR RADAR CIRCUIT LOW">B2301REAR RADAR CIRCUIT HIGH Diagnostic Procedu ...
Dtc p2006 tgv control stuck closed bank 1
ENGINE (DIAGNOSTICS)(H4DO) > Diagnostic Procedure with Diagnostic Trouble Code (DTC)DTC P2006 TGV CONTROL STUCK CLOSED BANK 1DTC DETECTING CONDITION:Immediately at fault recognitionCAUTION:After servicing or replacing faulty parts, perform Clear Memory Mode Clear Memory Mode > OPERATION" ...
Replacement
DIFFERENTIALS > Rear Differential Front Oil SealREPLACEMENT1. Shift the select lever or gear shift lever to neutral.2. Release the parking brake.3. Disconnect the ground cable from battery.4. Lift up the vehicle.5. Drain differential gear oil. Differential Gear Oil > REPLACEMENT">6. R ...
