Subaru Crosstrek Service Manual: Adjustment
PARKING BRAKE > Parking Brake Assembly (Rear Disc Brake)
ADJUSTMENT
1. SHOE CLEARANCE
1. Return the lever assembly - hand brake completely.
2. Loosen the adjusting nut, and make the cable free.
3. Remove the adjusting hole cover (A) from the rear disc rotor.
4. Insert a flat tip screwdriver (b) into the adjustment hole, and rotate the adjuster assembly - rear brake (a) until the disc rotor cannot be turned by hand.
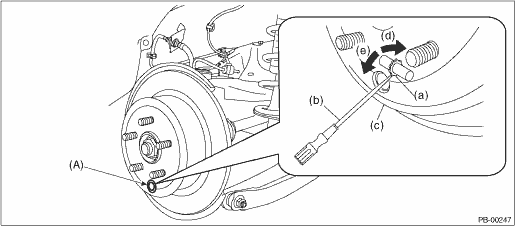
(a) | Adjuster ASSY - rear brake | (c) | Disc rotor | (e) | Shorten the adjuster ASSY - rear brake |
(b) | Flat tip screwdriver | (d) | Extend the adjuster ASSY - rear brake |
5. Loosen the adjuster assembly - rear brake by 10 notches in the direction of the arrow (e).
CAUTION:
• Check there is no brake drag.
• Make sure that the adjuster assembly - rear brake is loosened by 10 notches. If it is not loosened sufficiently, dragging may occur.
6. Install the adjusting hole cover to the disc rotor.
7. Adjust the parking lever stroke. Parking Brake Assembly (Rear Disc Brake) > ADJUSTMENT">
2. LEVER STROKE
1. Adjust the shoe clearance before adjusting lever stroke. Parking Brake Assembly (Rear Disc Brake) > ADJUSTMENT">
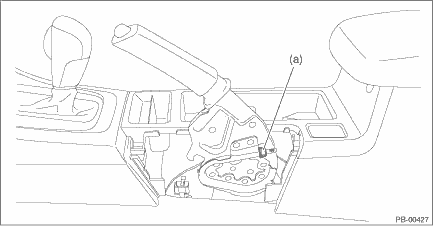
2. Release the claws, and then remove the boot - parking brake.

3. Pull the lever assembly - hand brake hard 3 to 5 times.
4. Turn the adjusting nut (a) until the lever stroke is at the specified value.
Lever stroke:
7 to 8 notches when pulled with a force of 200 N (20.4 kgf, 45 lbf)
5. Check there is no brake drag.
6. Check that the brake warning light illuminates when the lever assembly - hand brake is operated.
NOTE:
The light must illuminate when the first notch is reached after pulling the lever.
7. Install the boot - parking brake.

 Removal
PARKING BRAKE > Parking Brake Assembly (Rear Disc Brake)REMOVAL1. Release the parking brake.2. Lift up the vehicle, and then remove the rear wheels.3. Remove the rear disc rotor. Rear Disc Rotor & ...
Other materials:
Installation
REAR SUSPENSION > Front Lateral LinkINSTALLATIONCAUTION:• Be sure to use a new self-locking nut.• Always tighten the bushing in the state where the vehicle is at curb weight and the wheels are in full contact with the ground.1. Before installation, inspect the following items and repl ...
Removal
STARTING/CHARGING SYSTEMS(H4DO) > StarterREMOVAL1. Disconnect the ground cable from battery. NOTE">2. Remove the clip (A) from the air intake boot.3. Loosen the clamp (B) securing the air cleaner case (rear) to the air intake boot.4. Loosen the clamp (C) which secures the throttle body t ...
Dtc p0890 tcm power relay sense circuit low
CONTINUOUSLY VARIABLE TRANSMISSION (DIAGNOSTICS) > Diagnostic Procedure with Diagnostic Trouble Code (DTC)DTC P0890 TCM POWER RELAY SENSE CIRCUIT LOWDTC detecting condition:Immediately at fault recognitionTrouble symptom:Gear is not changed.CAUTION:• After diagnosis, perform Clear Memory Mo ...
