Subaru Crosstrek Service Manual: Installation
SEAT BELT SYSTEM > Front Seat Belt
INSTALLATION
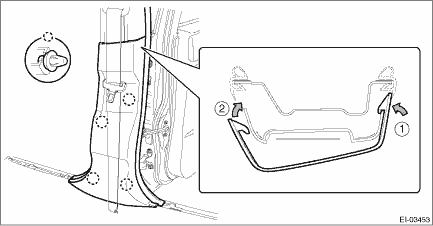
1. SEAT BELT OUTER - FRONT
CAUTION:
• The parts of the driver and passenger sides are not the same. Before installation, make sure that the correct part is used.
• During installation, make sure that the seat belts are not twisted.
• After installation, make sure that the seat belt can be pulled out and retracted smoothly.
• Make sure that the seat belt harness is not caught anywhere. Wrong harness rooting may cause the harness short from pinch.
• Do not reuse the upper clips of the trim panel - center pillar UPR. Once the clip is removed, its holding force is reduced. Be sure to replace it with a new clip.
1. Before installation, perform a unit inspection of retractor. Front Seat Belt > INSPECTION">
2. Install the adjuster assembly - seat belt and the seat belt outer - front.
Tightening torque:
Front seat belt: General Description > COMPONENT">
3. Install the remaining parts in the reverse order of removal.
Tightening torque
Trim panel - center pillar UPR: 7.5 N·m (0.76 kgf-m, 5.5 ft-lb)
NOTE:
Assemble the trim panel - center pillar LWR to the trim panel - center pillar UPR securely.
4. After installation, check the following points.
• The seat belt is not twisted.
• The seat belt can be pulled out and retracted smoothly.
• The adjuster assembly - seat belt can be moved smoothly.
• Check that the airbag warning light lights up for approximately 6 seconds and then turns off when connecting the battery ground cable and turning the ignition switch to ON.
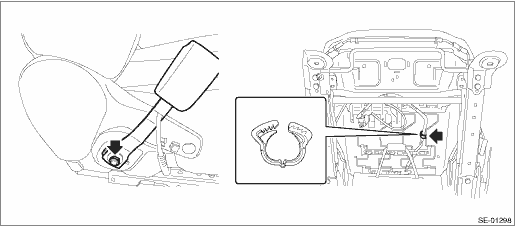
2. SEAT BELT INNER - FRONT
CAUTION:
• Before installation, make sure that the correct part is used.
• During installation, make sure that the seat belts are not twisted.
• Check that there is no pinching of the seat belt harness. Wrong harness rooting may cause the harness short from pinch.
• Do not forget the wave washer, when installing front seat inner belt assembly.
1. Install the seat belt inner - front.
Tightening torque:
Front seat belt: General Description > COMPONENT">
2. Locate the seat belt harness and retain it with a harness clip.
3. Install the seat assembly to the body. Front Seat > INSTALLATION">
4. Check that no harness is caught by sliding the seat back and forth.
5. Connect the battery ground terminal. NOTE">
3. ADJUSTABLE ANCHOR ASSY
Referring to the installation procedure for seat belt outer - front, install the parts in the reverse order of removal.
Tightening torque:
Front seat belt: General Description > COMPONENT">
Trim panel - center pillar UPR: 7.5 N·m (0.76 kgf-m, 5.5 ft-lb)
 Removal
SEAT BELT SYSTEM > Front Seat BeltREMOVAL1. SEAT BELT OUTER - FRONTCAUTION:• Before handling the airbag system components, refer to “CAUTION” of “General Description” ...

Other materials:
Removal
CONTINUOUSLY VARIABLE TRANSMISSION(TR580) > Torque Converter AssemblyREMOVAL1. Remove the transmission assembly from the vehicle. Automatic Transmission Assembly > REMOVAL">2. Pull out the torque converter assembly horizontally.CAUTION:Do not scratch the inside of engaging parts.3. Re ...
Preparation tool
GLASS/WINDOWS/MIRRORS > General DescriptionPREPARATION TOOL1. SPECIAL TOOLILLUSTRATIONTOOL NUMBERDESCRIPTIONREMARKS — SUBARU SELECT MONITOR 4Used for setting of each function and troubleshooting for electrical system.NOTE:For detailed operation procedures of Subaru Select Monitor 4, refer to &l ...
Reclining the seatback
Pull the reclining lever up and adjust the
seatback to the desired position. Then
release the lever and make sure the
seatback is securely locked into place.
The seatback placed in a reclined position
can spring back upward with force when
the lever is pulled. While operating the
lever ...
