Subaru Crosstrek Service Manual: Removal
SEAT BELT SYSTEM > Front Seat Belt
REMOVAL
1. SEAT BELT OUTER - FRONT
CAUTION:
• Before handling the airbag system components, refer to “CAUTION” of “General Description” in “AIRBAG SYSTEM”. General Description > CAUTION">
• Airbag system satellite safing sensor is located in the lower of the rear seat cushion center. Be careful not to apply strong impact to the sensor when working with the rear seat cushion removed.
• Do not drop or subject the pretensioner to any impact.
• Since the pretensioner and bracket are integrated as a unit, do not disassemble them.
1. Turn the ignition switch to OFF.
2. Disconnect the ground terminal from the battery sensor, and wait for at least 60 seconds before starting work. NOTE">
3. Tilt the front seat backrest assembly forward, and move the front seat all the way forward.
4. Remove the rear seat cushion assembly. Rear Seat > REMOVAL">
5. Remove the cover side sill - front INN, cover side sill - rear INN, and trim panel - center pillar LWR. (On the side where seat belt assembly is removed) Lower Inner Trim > REMOVAL">
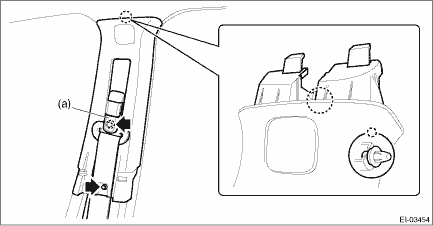
6. Remove the trim panel - center pillar UPR. (On the side where seat belt assembly is removed)
(1) Remove the cover through (a), and remove the seat belt anchor bolt.
(2) Remove the bolt on the lower side of the trim panel - center pillar UPR.
(3) Remove the clip by pulling the upper part of the trim toward you, and while lowering the entire trim, remove the trim panel - center pillar UPR.
CAUTION:
Do not reuse the upper clips of the trim panel - center pillar UPR. Once the clip is removed, its holding force is reduced. Be sure to replace it with a new clip.
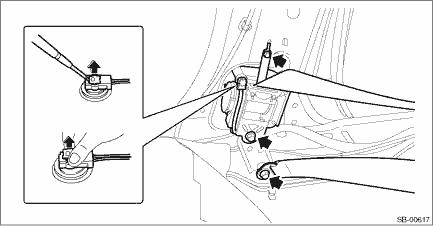
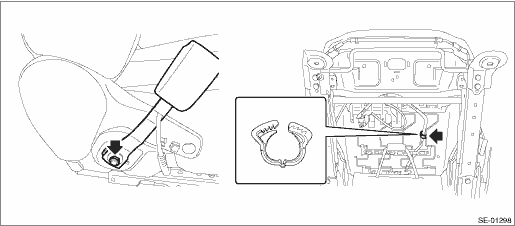
7. Remove the seat belt outer - front.
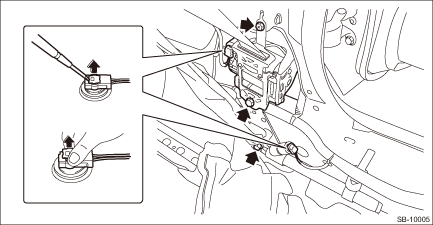
(1) Turn over the floor mat to disconnect the belt tension sensor connector. Airbag Connector > PROCEDURE">
NOTE:
On the passenger’s side, also disconnect the connector of the lap seat belt pretensioner.
(2) Remove the bolt to remove the seat belt retractor.
(3) Remove the lower anchor bolt, and remove the seat belt outer - front.
• Driver’s side
• Passenger’s side
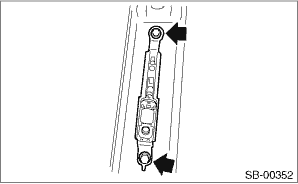
8. Remove the bolts, and then remove the adjuster assembly - seat belt.
2. SEAT BELT INNER - FRONT
CAUTION:
Before handling the airbag system components, refer to “CAUTION” of “General Description” in “AIRBAG SYSTEM”. General Description > CAUTION">
1. Turn the ignition switch to OFF.
2. Disconnect the ground cable from battery and wait for at least 60 seconds before starting work. NOTE">
3. Remove the front seats. Front Seat > REMOVAL">
4. Remove the seat belt inner - front.
(1) Remove the nut, and remove the seat belt inner - front.
(2) Remove the clip for the inner seat belt harness located under the seat cushion.
 Inspection
SEAT BELT SYSTEM > Front Seat BeltINSPECTION1. VISUAL INSPECTIONCheck for the following, and replace with new parts if necessary.• Pretensioner is cracked or deformed.• Adjuster assembl ...
 Installation
SEAT BELT SYSTEM > Front Seat BeltINSTALLATION1. SEAT BELT OUTER - FRONTCAUTION:• The parts of the driver and passenger sides are not the same. Before installation, make sure that the correct ...
Other materials:
Dtc u0140 lost communication with body control module
INSTRUMENTATION/DRIVER INFO (DIAGNOSTICS) > Diagnostic Procedure with Diagnostic Trouble Code (DTC)DTC U0140 LOST COMMUNICATION WITH BODY CONTROL MODULEDetected when CAN data is not received from body integrated unit.NOTE:Perform the diagnosis for LAN system. Basic Diagnostic Procedure > PROC ...
Inspection
GLASS/WINDOWS/MIRRORS > Outer Mirror AssemblyINSPECTION1. CHECK OPERATION1. Disconnect the outer mirror connector.2. Apply battery voltage between the outer mirror connector terminals and check the mirror operation.Terminal No.Inspection conditionsSwitch position — — OFF3 (+) — 8 (−) ...
Operation
CONTINUOUSLY VARIABLE TRANSMISSION (DIAGNOSTICS) > AT OIL TEMP Warning Light DisplayOPERATIONThe AT OIL TEMP light illuminates or blinks, when the ATF temperature is high and malfunction occurs in CVT.• At normal conditionAfter turning the ignition switch to ON, illuminates for 2 seconds th ...
