Subaru Crosstrek Service Manual: Removal
LIGHTING SYSTEM > Headlight Assembly
REMOVAL
CAUTION:
• Do not perform work with wet hands, because there is a possibility of electrical shock.
• The HID type uses very high voltages for the lighting circuit. Make sure that the power supply is turned OFF before working.
1. Disconnect the ground cable from battery. NOTE">
2. Remove the air intake duct. (When removing RH side) Air Intake Duct > REMOVAL">
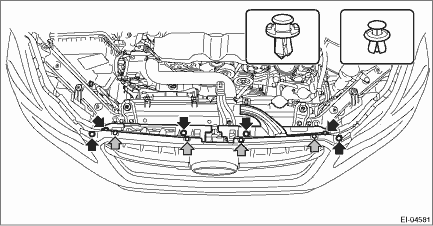
3. Remove the clip, and remove the bracket - grille.
CAUTION:
To prevent damage to the bracket - grille, make sure to remove all clips.
4. Remove the bumper face - front. Front Bumper > REMOVAL">
5. Remove the bolts and clips, and remove the bracket - front bumper corner.

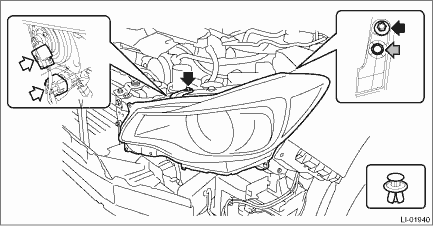
6. Remove the light assembly - head.
(1) Disconnect the connector.
(2) Remove the bolts and clips, and remove the light assembly - head.
 Adjustment
LIGHTING SYSTEM > Headlight AssemblyADJUSTMENT1. HEADLIGHT BEAM ADJUSTMENTCAUTION:• Turn off the light before adjusting the beam level of the light assembly - head. If it is necessary to insp ...
 Assembly
LIGHTING SYSTEM > Headlight AssemblyASSEMBLY1. HID HEADLIGHT BALLASTCAUTION:• When installing the ballast - headlight, be sure to install the gasket.• After installing the ballast to th ...
Other materials:
Dtc p1494 coil 2 egr "a" control circuit low
ENGINE (DIAGNOSTICS)(H4DO) > Diagnostic Procedure with Diagnostic Trouble Code (DTC)DTC P1494 COIL 2 EGR "A" CONTROL CIRCUIT LOWNOTE:For the diagnostic procedure, refer to DTC P1498. Diagnostic Procedure with Diagnostic Trouble Code (DTC) > DTC P1498 COIL 4 EGR "A" CONTROL ...
Installation
CONTINUOUSLY VARIABLE TRANSMISSION(TR580) > Air Breather HoseINSTALLATION1. FRONT DIFFERENTIAL SIDEInstall in the reverse order of removal.NOTE:Securely insert the air breather hose until the hose end contacts the catch of the pitching stopper bracket.2. TRANSMISSION CASE SIDEInstall in the rever ...
Removal
SUNROOF/T-TOP/CONVERTIBLE TOP (SUNROOF) > SunshadeREMOVAL1. Disconnect the ground cable from battery and wait for at least 60 seconds before starting work. NOTE">2. Remove the lid assembly - sunroof. Glass Lid > REMOVAL">3. Remove the trim panel - roof assembly. Roof Trim &g ...
