Subaru Crosstrek Service Manual: Removal
EXTERIOR/INTERIOR TRIM > Door Trim
REMOVAL
1. FRONT DOOR
1. Disconnect the ground cable from battery. NOTE">
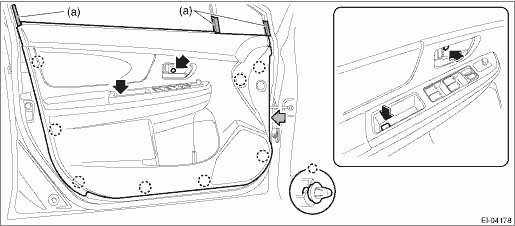
2. Remove the trim panel - front door.
(1) Attach the protective tape (a).
(2) Open the cover and remove the screw.
(3) Remove the clips, and remove the trim panel - front door from the panel assembly - front door.
NOTE:
It is easier to remove the door trim if the removal is performed from the gray arrow section.
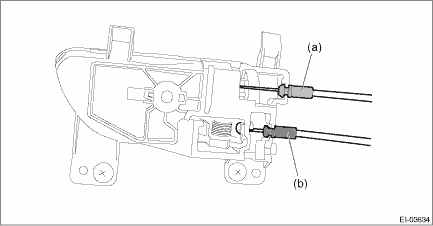
(4) Detach the door lock cable (a) and door open cable (b) from the remote assembly - door.
(5) Disconnect the harness connector and remove the trim panel - front door.
3. Remove each part as required.
• Remote assembly - door: Front Inner Remote > REMOVAL">
• Switch - power window main: Power Window Control Switch > REMOVAL">
• Weather strip - door INN: Door Trim > DISASSEMBLY">
2. REAR DOOR
1. Disconnect the ground cable from battery. NOTE">
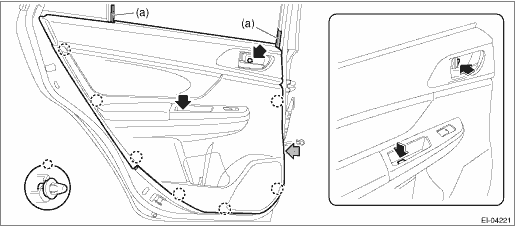
2. Remove the trim panel - rear door.
(1) Attach the protective tape (a).
(2) Open the cover and remove the screw.
(3) Remove the clips, and remove the trim panel - rear door from the panel assembly - rear door.
NOTE:
It is easier to remove the door trim if the removal is performed from the gray arrow section.
(4) Detach the door lock cable (a) and door open cable (b) from the remote assembly - door.
(5) Disconnect the harness connector and remove the trim panel - rear door.
3. Remove each part as required.
• Remote assembly - door: Rear Inner Remote > REMOVAL">
• Switch - power window sub: Power Window Control Switch > REMOVAL">
• Weather strip - door INN: Door Trim > DISASSEMBLY">
 Assembly
EXTERIOR/INTERIOR TRIM > Door TrimASSEMBLY1. Bend the claws while pushing the weather strip - door INN against the door trim so that there is no gap.CAUTION:Beware of the direction of folding the c ...
 Disassembly
EXTERIOR/INTERIOR TRIM > Door TrimDISASSEMBLY1. Remove the door trim.2. Remove the rivets and claws, and remove the weather strip - door INN from the door trim.(a)Rivet(b)Claw(c)ClawNOTE:Remove the ...
Other materials:
Dtc p1499 coil 4 egr "a" control circuit high
ENGINE (DIAGNOSTICS)(H4DO) > Diagnostic Procedure with Diagnostic Trouble Code (DTC)DTC P1499 COIL 4 EGR "A" CONTROL CIRCUIT HIGHDTC detecting condition:Immediately at fault recognitionTrouble symptom:• Improper idling• Poor driving performance• Engine breathingCAUTION ...
Glove box
Lock
Unlock
To open the glove box, pull the handle. To
close it, push the lid firmly upward.
To lock the glove box, insert the key and
turn it clockwise. To unlock the glove box,
insert the key and turn it counterclockwise.
For models with "keyless access with
push-button start s ...
Installation
DIFFERENTIALS > Rear Differential (T-type)INSTALLATION1. Attach the rear differential member plate to the rear differential.(A)Rear differential member plate2. Set the rear differential to transmission jack.3. Set the ST to the rear differential.ST 28099PA090OIL SEAL PROTECTOR4. Insert the rea ...
