Subaru Crosstrek Service Manual: Installation
MECHANICAL(H4DO) > Cam Sprocket
INSTALLATION
1. CAM SPROCKET RH
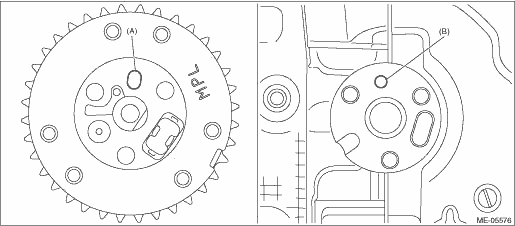
• Intake cam sprocket RH
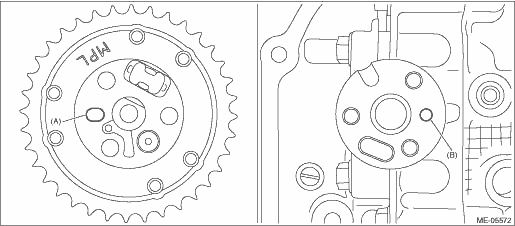
1. Install the intake cam sprocket RH by aligning the knock hole (A) of intake cam sprocket RH and the knock pin (B) of intake camshaft RH.
NOTE:
Before installation, check that there is no foreign matter on the intake cam sprocket RH and intake camshaft RH.
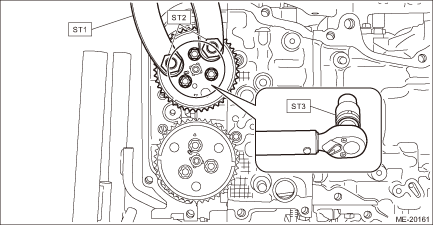
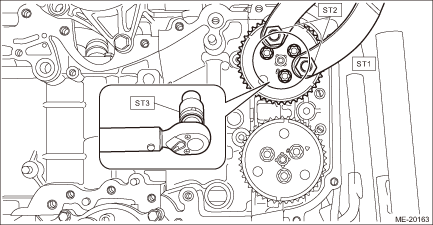
2. Hold the intake cam sprocket RH using the ST1 and ST2, and install the bolts using the ST3.
CAUTION:
Perform the operation carefully since the ST comes off easily.
| ST1 18355AA000 | PULLEY WRENCH |
| ST2 18334AA020 | PULLEY WRENCH PIN SET |
| ST3 18270KA010 | SOCKET |
Tightening torque:
18 N·m (1.8 kgf-m, 13.3 ft-lb)
3. Install the timing chain RH. Timing Chain Assembly > INSTALLATION">
4. Install the chain cover. Chain Cover > INSTALLATION">
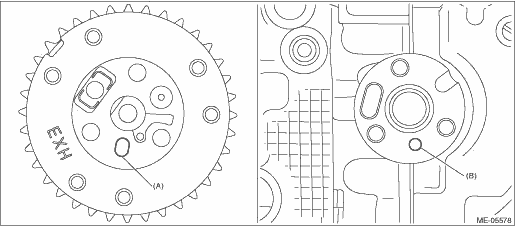
• Exhaust cam sprocket RH
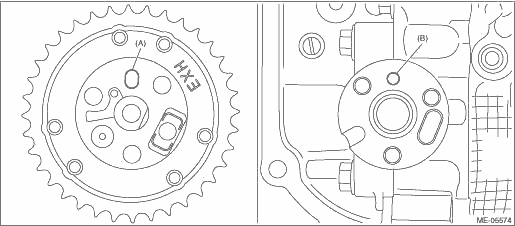
1. Install the exhaust cam sprocket RH by aligning the knock hole (A) of exhaust cam sprocket RH and the knock pin (B) of exhaust camshaft RH.
NOTE:
Before installation, check that there is no foreign matter on the exhaust cam sprocket RH and exhaust camshaft RH.
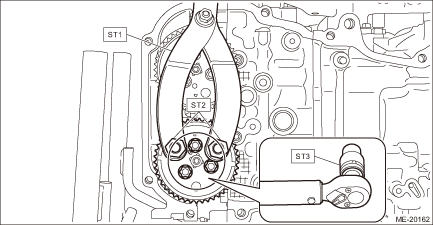
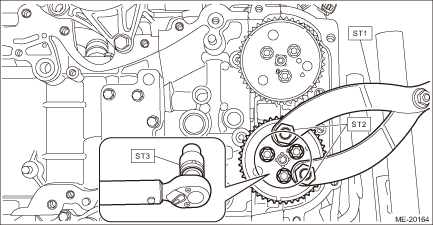
2. Hold the exhaust cam sprocket RH using ST1 and ST2, and install the bolts using ST3.
CAUTION:
Perform the operation carefully since the ST comes off easily.
| ST1 18355AA000 | PULLEY WRENCH |
| ST2 18334AA020 | PULLEY WRENCH PIN SET |
| ST3 18270KA010 | SOCKET |
Tightening torque:
18 N·m (1.8 kgf-m, 13.3 ft-lb)
3. Install the timing chain RH. Timing Chain Assembly > INSTALLATION">
4. Install the chain cover. Chain Cover > INSTALLATION">
2. CAM SPROCKET LH
• Intake cam sprocket LH
1. Install the intake cam sprocket LH by aligning the knock hole (A) of intake cam sprocket LH and the knock pin (B) of intake camshaft LH.
NOTE:
Before installation, check that there is no foreign matter on the intake cam sprocket LH and intake camshaft LH.
2. Hold the intake cam sprocket LH using the ST1 and ST2, and install the bolts using the ST3.
CAUTION:
Perform the operation carefully since the ST comes off easily.
| ST1 18355AA000 | PULLEY WRENCH |
| ST2 18334AA020 | PULLEY WRENCH PIN SET |
| ST3 18270KA010 | SOCKET |
Tightening torque:
18 N·m (1.8 kgf-m, 13.3 ft-lb)
3. Install timing chain LH. Timing Chain Assembly > INSTALLATION">
4. Install the chain cover. Chain Cover > INSTALLATION">
• Exhaust cam sprocket LH
1. Install the exhaust cam sprocket LH by aligning the knock hole (A) of exhaust cam sprocket LH and the knock pin (B) of exhaust camshaft LH.
NOTE:
Before installation, check that there is no foreign matter on the exhaust cam sprocket LH and exhaust camshaft LH.
2. Hold the exhaust cam sprocket LH using the ST1 and ST2, and install the bolts using the ST3.
CAUTION:
Perform the operation carefully since the ST comes off easily.
| ST1 18355AA000 | PULLEY WRENCH |
| ST2 18334AA020 | PULLEY WRENCH PIN SET |
| ST3 18270KA010 | SOCKET |
Tightening torque:
18 N·m (1.8 kgf-m, 13.3 ft-lb)
3. Install timing chain LH. Timing Chain Assembly > INSTALLATION">
4. Install the chain cover. Chain Cover > INSTALLATION">
 Removal
MECHANICAL(H4DO) > Cam SprocketREMOVAL1. CAM SPROCKET RHNOTE:When replacing a single part, perform the work with the engine assembly installed to body.• Intake cam sprocket RH1. Remove the ch ...
 Camshaft
...
Other materials:
Inspection
FRONT SUSPENSION > Front Ball JointINSPECTION1. Check that there is no looseness by moving the upper and lower portions of front tire in an axial direction with the brake pedal depressed.• Looseness exists > Replace the ball joint assembly. Front Ball Joint > REMOVAL">2. Chec ...
Dtc b1690 door sensor rh failure
AIRBAG SYSTEM (DIAGNOSTICS) > Diagnostic Chart with Trouble CodeDTC B1690 DOOR SENSOR RH FAILUREDIAGNOSIS START CONDITION:Ignition voltage is 10 V to 16 V.DTC DETECTING CONDITION:Front door impact sensor (RH) is faulty.If DTC B1690 is displayed, the circuit within the front door impact sensor (RH ...
Repair
EXTERIOR/INTERIOR TRIM > Front BumperREPAIR1. COATING METHOD FOR PP BUMPERProcess No.Process nameJob contents1Bumper installationPlace the bumper on a paint worktable as required. Use the paint worktable conforming to inner shape of bumper if possible.Cross section of bumper(1) Bumper(2) Paint wo ...
