Subaru Crosstrek Owners Manual: Fuel filler lid and cap
Locations of the fuel filler lid and the lid release lever
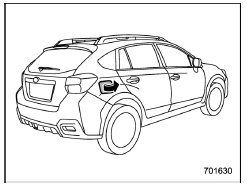
Fuel filler lid
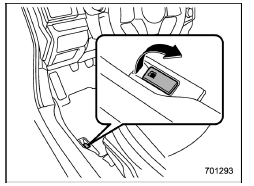
Fuel filler lid release lever
Refueling
Only one person should be involved in refueling. Do not allow others to approach the area of the vehicle near the fuel filler pipe while refueling is in progress.
Be sure to observe any other precautions that are posted at the service station.
1. Stop the vehicle and turn the ignition switch to the "LOCK"/"OFF" position and turn off all the other electrical components.
2. To open the fuel filler lid, pull the lid release lever up. The lever is on the floor at the left of the driver's seat.
WARNING
Before opening the fuel filler cap, first touch the vehicle body or a metal portion of the fuel pump or similar object to discharge any static electricity that may be present on your body. If your body is carrying an electrostatic charge, there is a possibility that an electric spark could ignite the fuel, which could burn you. To avoid acquiring a new static electric charge, do not get back into the vehicle while refueling is in progress.
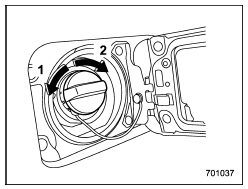
- Open
- Close
3. Remove the fuel filler cap by turning it slowly counterclockwise.
WARNING
- Gasoline vapor is highly flammable.
Before refueling, always turn the ignition switch to the "LOCK"/"OFF" position first and then close all vehicle doors and windows. Make sure that there are no lighted cigarettes, open flames or electrical sparks in the adjacent area. Only handle fuel outdoors. Quickly wipe up any spilled fuel.
- When opening the cap, grasp it firmly and turn it slowly to the left. Do not remove the cap quickly. Fuel may be under pressure and spray out of the fuel filler neck, especially in hot weather. If you hear a hissing sound while you are removing the cap, wait for the sound to stop and then slowly open the cap to prevent fuel from spraying out and creating a fire hazard.
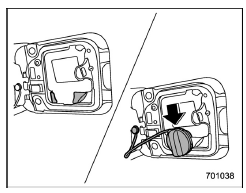
4. Set the fuel filler cap on the cap holder inside the fuel filler lid.
WARNING
- When refueling, insert the fuel nozzle securely into the fuel filler pipe. If the nozzle is lifted or not fully inserted, its automatic stopping mechanism may not function, causing fuel to overflow the tank and creating a fire hazard.
- Stop refueling when the automatic stop mechanism on the fuel nozzle activates. If you continue to add fuel, temperature changes or other conditions may cause fuel to overflow from the tank and create a fire hazard.
5. Stop filling the tank after the fuel filler pump automatically stops. Do not add any more fuel.
6. Put the cap back on, turn it clockwise until you hear a clicking noise. Be certain not to catch the tether under the cap while tightening.
CAUTION
Make sure that the cap is tightened until it clicks to prevent fuel spillage in the event of an accident.
7. Close the fuel filler lid completely.
CAUTION
If you spill any fuel on the painted surface, rinse it off immediately.
Otherwise, the painted surface could be damaged.
NOTE
- You will see the "
 "
sign in the fuel
gauge. This indicates that the fuel filler
door (lid) is located on the right side of
the vehicle.
"
sign in the fuel
gauge. This indicates that the fuel filler
door (lid) is located on the right side of
the vehicle. - If the fuel filler cap is not tightened until it clicks or if the tether is caught under the cap, the CHECK ENGINE warning light/malfunction indicator light may illuminate. Refer to "CHECK ENGINE warning light/Malfunction indicator light"
CAUTION
- Never add any cleaning agents to the fuel tank. The addition of a cleaning agent may cause damage to the fuel system.
- After refueling, turn the cap to the right until it clicks to ensure that it is fully tightened. If the cap is not securely tightened, fuel may leak out while the vehicle is being driven or fuel spillage could occur in the event of an accident, creating a fire hazard.
- Do not let fuel spill on the exterior surfaces of the vehicle. Because fuel may damage the paint, be sure to wipe off any spilled fuel quickly. Paint damage caused by spilled fuel is not covered under the SUBARU Limited Warranty.
- Always use a genuine SUBARU fuel filler cap. If you use the wrong cap, it may not fit or have proper venting and your fuel tank and emission control system may be damaged. It could also lead to fuel spillage and a fire.
- Immediately put fuel in the tank
whenever the low fuel warning
light illuminates. Engine misfires
as a result of an empty tank
could cause damage to the engine.
Continuing to operate your vehicle at an extremely low fuel level may result in a reduction of engine performance.
 Gasoline for cleaner air
Your use of gasoline with detergent
additives will help prevent deposits from
forming in your engine and fuel system.
This helps keep your engine in tune and
your emission control system working ...
 State emission testing (U.S. only)
WARNING
Testing of an All-Wheel Drive model
must NEVER be performed on a
single two-wheel dynamometer. Attempting
to do so will result in
uncontrolled vehicle movement and
may cause an accident ...
Other materials:
Component
REAR SUSPENSION > General DescriptionCOMPONENT1. REAR SUSPENSION(1)Rear sub frame ASSY(11)Stopper LWRTightening torque: N·m (kgf-m, ft-lb)(2)Stopper UPR(12)Flange nutT1:30 (3.06, 22.1)(3)Stay - rear frame COMPL(13)Rear stabilizerT2:33 (3.36, 24.3)(4)Front sub frame support(14)Bushing - sta ...
Removal
MANUAL TRANSMISSION AND DIFFERENTIAL(5MT) > Transmission Mounting SystemREMOVAL1. PITCHING STOPPER1. Disconnect the ground cable from battery.2. Remove the clip (A) from the air intake boot.3. Loosen the clamp (B) connecting the air intake boot and air cleaner case (rear).4. Loosen the clamp (C) ...
Contrast setting
1. Perform the preparation steps according
to "Preparation for image quality and
volume settings"
2. Operate the "
" or ""
switch to
select the "Contrast" item. Then push the
button.
3. Select a contrast level by operating the
"
"
or "
" switch, and confirm the setting
b ...
